
A backsplash tile kitchen is a great way to add style and character to any kitchen. Backsplashes can make a kitchen look larger and more inviting, and they can also protect walls from splashes and spills. With a few simple steps, you can learn how to backsplash tile a kitchen and give your kitchen an updated look. From selecting the right tile material to measuring and cutting the tile, to grouting and sealing, this guide will teach you how to backsplash tile a kitchen in no time.
Planning a Backsplash Tile Kitchen
Creating a stylish, modern backsplash tile kitchen can be an exciting and rewarding project. Whether you’re looking to add a touch of flair or go for a complete overhaul, you’ll need to consider all the elements that will make your kitchen backsplash tile project a success. To ensure a successful tiling project, you must plan out the design, select the right tiles, and install the tiles correctly.
When planning your tile kitchen backsplash, you’ll need to decide on a style. You can choose from glass, ceramic, stone, or porcelain and metal. Consider the color, size, and texture of the tiles and decide on a pattern that will best suit the overall aesthetic of your kitchen. Additionally, you’ll need to measure the kitchen backsplash area to determine the number of tiles and materials needed for the project.
Next, you’ll need to select the right tiles for your backsplash. Choose tiles that are durable and easy to clean, as they will be exposed to food, water, and other elements. Consider the colors and textures that will best match the overall look of your kitchen and be sure to choose tiles that are easy to install.
Preparing the Kitchen for Tiling
Tiling a kitchen backsplash is an exciting project, but there is a lot of preparation required before you can get started. Taking the time to properly prepare your kitchen for tiling will ensure that the project goes smoothly and that your tiled backsplash looks great when it is finished. This article will discuss the steps necessary to prepare your kitchen for tiling, including the tools you will need and the steps you should take to ensure the best results.
The first step is to remove any existing backsplash tiles or wallpaper from the wall. Doing so will allow you to start with a clean slate and prevent any issues with the new tiles not sticking correctly. Next, you’ll need to clean the wall and make sure all surfaces are free of dust, dirt, and other debris. This will allow the tiles to stick properly and prevent any problems during the tiling process.
After the wall has been cleaned, you’ll need to measure the area you want to tile and create a template. This will ensure that the tiles are laid out correctly and that no pieces are missing. Once you have the template in place, you can start applying the adhesive to the wall. Make sure to use the proper adhesive for your type of tiles and carefully follow the manufacturer’s instructions.
Gather the Necessary Materials
Creating a backsplash tile kitchen is a great way to add personality and style to your kitchen. With the right materials and tools, you can install a beautiful backsplash in just a few hours. Before you start, it is important to gather the necessary materials. To begin, you will need a backer board, a trowel, grout, spacers, a putty knife, a tile cutter, and tile adhesive.
You will also need to select the tiles for your backsplash. Choose tiles that are easy to clean and coordinate with the rest of your kitchen’s color scheme. Once you have selected the tiles, you will need to measure and cut them to fit the space. A tile cutter is the best tool for this job.
Finally, you will need to purchase the backer board, tile adhesive, grout, and other materials from your local hardware store. Make sure to get enough to cover the entire backsplash area. Once you have all the materials, you’ll be ready to start your backsplash project. With the right tools and materials, you can create a beautiful tile backsplash in your kitchen.
Measuring and Cutting the Tiles
Measuring and cutting tiles is one of the most important steps in the backsplash tiling process. Before you start, make sure to measure the area where you plan to install the tile and then add a few extra inches to allow for cutting. You will also need to consider the size and shape of the tiles you plan to use. Some tiles, like mosaic tiles, are easier to cut and may require special tools or techniques. If you plan to use larger tiles, you may need to rent or buy a wet saw for cutting them. When cutting tiles, be sure to use safety glasses and a dust mask to protect yourself from tile dust. Additionally, use a tile nipper or a tile cutter to cut the tiles to size. Make sure to always measure twice and cut once to ensure that your tiles fit perfectly in the desired area.
Installing the Backsplash Tile
Installing a backsplash tile in the kitchen is an excellent way to add a touch of style to the space while also protecting the walls from water and food stains. But before you start working on the project, it’s important to consider the type of tile you want and the best practices for installation.
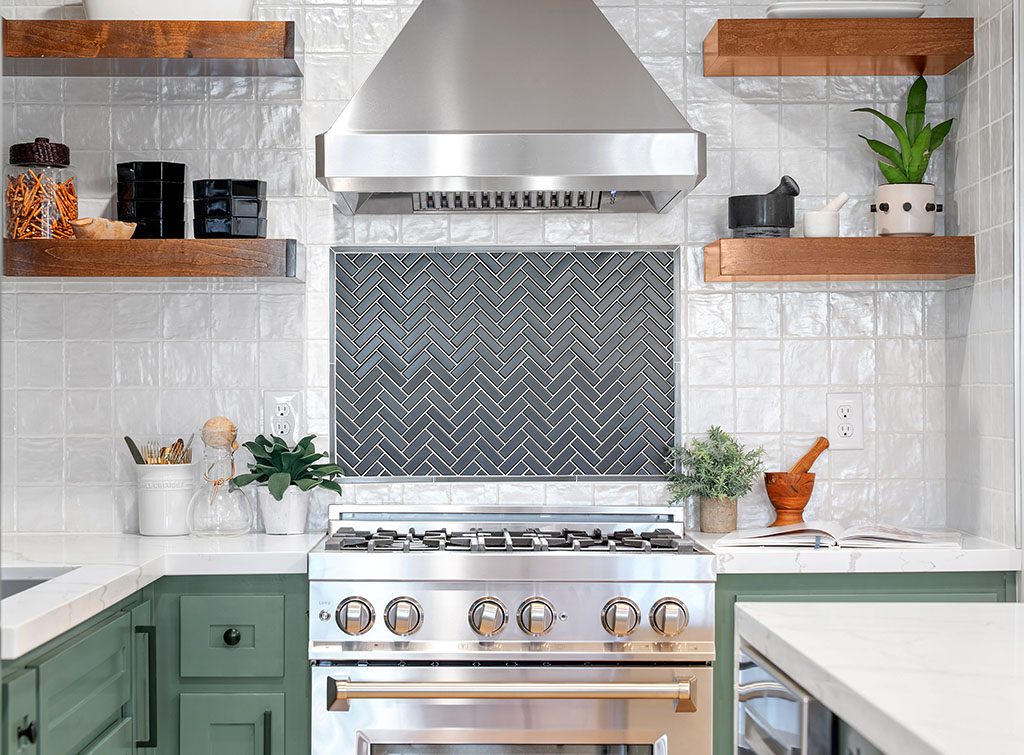
Choosing the right tile is the first step to making your backsplash a success. Whether you opt for a classic subway tile or an eye-catching mosaic, the tile you select should match the overall aesthetic of your kitchen. It’s also important to consider the size of the tile, the grout color, and the cost.
Once you have chosen the right tile, you can begin the installation process. First, you will need to measure the area you want to tile and calculate the number of tiles you will need. After that, you will need to apply mortar to the walls and place the tiles. For a seamless look, be sure to leave a gap of 1/8 inch between each tile. After the tiles are in place, cover them with grout and use a damp sponge to wipe away excess grout.
Grouting and Sealing the Tiles
Adding a backsplash to your kitchen can be a great way to spruce up the look of your home and make it feel more inviting for guests. But once you’ve installed your tiles, there’s still one more step to make sure that your backsplash looks great and lasts for years to come: grouting and sealing. Grouting and sealing tiles is essential to preventing water damage, staining, and mold growth, so it’s important to make sure you do it correctly.
Grouting is the process of filling in the gaps between tiles to create a finished look. Sealants, on the other hand, form a barrier between the tiles and the wall, helping to prevent water from seeping into the wall behind the tiles. Grouting and sealing are both relatively simple processes, but they can make a huge difference in the look and longevity of your backsplash.
When grouting, you’ll want to use a high-quality grout that is designed for use with tiles. Always mix the grout according to the package instructions, and use a rubber float to apply it evenly between the tiles. If you’re using a darker grout, you’ll want to make sure to wipe away any excess grout from the surface of the tiles before it has a chance to dry.
Conclusion
Installing a backsplash tile in your kitchen is a great way to add character to your space without a huge renovation. With the right tools and materials, you can easily create a unique and attractive backsplash that will add a touch of personality to your kitchen. With a few simple steps, you can quickly and easily install an attractive backsplash tile to create a beautiful and functional kitchen space.

