Removing a kitchen faucet with a sprayer can be a daunting task, but it doesn’t have to be. With the right tools and a little bit of know-how, you can easily remove the old faucet and replace it with a new one. To start, you’ll need to shut off the water supply to the kitchen sink. Once that’s done, you’ll need to disconnect the supply lines that connect the faucet to the water supply, and then disconnect the sprayer hose. After that, you can use a wrench to loosen the nuts that hold the faucet in place, and then use a pair of pliers to pull the faucet away from the sink. Finally, you’ll be able to remove the faucet and the sprayer, and replace them with a new one. With the right tools and a bit of patience, you can easily remove a kitchen faucet with a sprayer.

Tools and Materials Needed
Working on a kitchen faucet with a sprayer can seem like a daunting task, but with the right tools and materials, it’s actually quite simple. To begin, you’ll need a few basic items such as a basin wrench, adjustable wrench, plumber’s putty, Teflon tape, and a replacement faucet. Additionally, you’ll need a few rags, a flat-headed screwdriver, a bucket, an adjustable wrench, and a pair of safety glasses.
Once you’ve gathered all the necessary tools and materials, you’ll be ready to begin. Start by shutting off the water supply to your kitchen faucet. Then, place a small bucket beneath the faucet to catch any excess water that may run out. Next, use the flat-headed screwdriver to loosen any screws that may be holding your faucet in place. You may also need to use the adjustable wrench to loosen any nuts or bolts.
Finally, use the basin wrench to detach the faucet from the sink. Once the faucet is detached, you can remove the sprayer and replace it with your new faucet. Before attaching the faucet, make sure to apply a bead of the plumber’s putty around the base of the faucet and wrap Teflon tape around the faucet’s end. Finally, secure the faucet with the bolts and nuts and you’re all set.
Removing a kitchen faucet with a sprayer may seem intimidating, but with the right tools and materials, it’s actually a relatively easy job. Simply gather the necessary items, turn off the water supply, and detach the faucet from the sink. Then, replace the sprayer with your new faucet and secure it with the bolts and nuts. Finally, add a bead of plumber’s putty and Teflon tape and you’ll be good to go.
Shutting Off Water Supply
Removing a kitchen faucet with a sprayer requires you to turn off the water supply before you begin. To do this, locate the water shut-off valves under the sink, usually one for cold and one for hot water. Turn these valves clockwise until they won’t turn anymore. This will stop the water supply to the faucet. If you can’t find the valves, you may need to shut off the water at the main line. This is usually located outside in the basement or the utility closet. Make sure you know where the main water shut-off valve is located so you can turn the water back on when you’re finished.
Removing the Existing Faucet
Removing a kitchen faucet with a sprayer can be a daunting task, but it doesn’t have to be. Before you begin, you’ll need to gather the necessary tools, such as an adjustable wrench, plumbers’ tape, and towels. You’ll also need to turn off the water supply to the faucet. Once the water is shut off, you can begin to remove the existing faucet.
Start by using the adjustable wrench to loosen the nuts that secure the faucet to the sink. Depending on the design of the faucet, you may need to also remove the escutcheon plate. This is the decorative plate that covers the faucet’s mounting hole. Once all of the nuts and the escutcheon plate are removed, you can carefully lift the faucet from the sink.
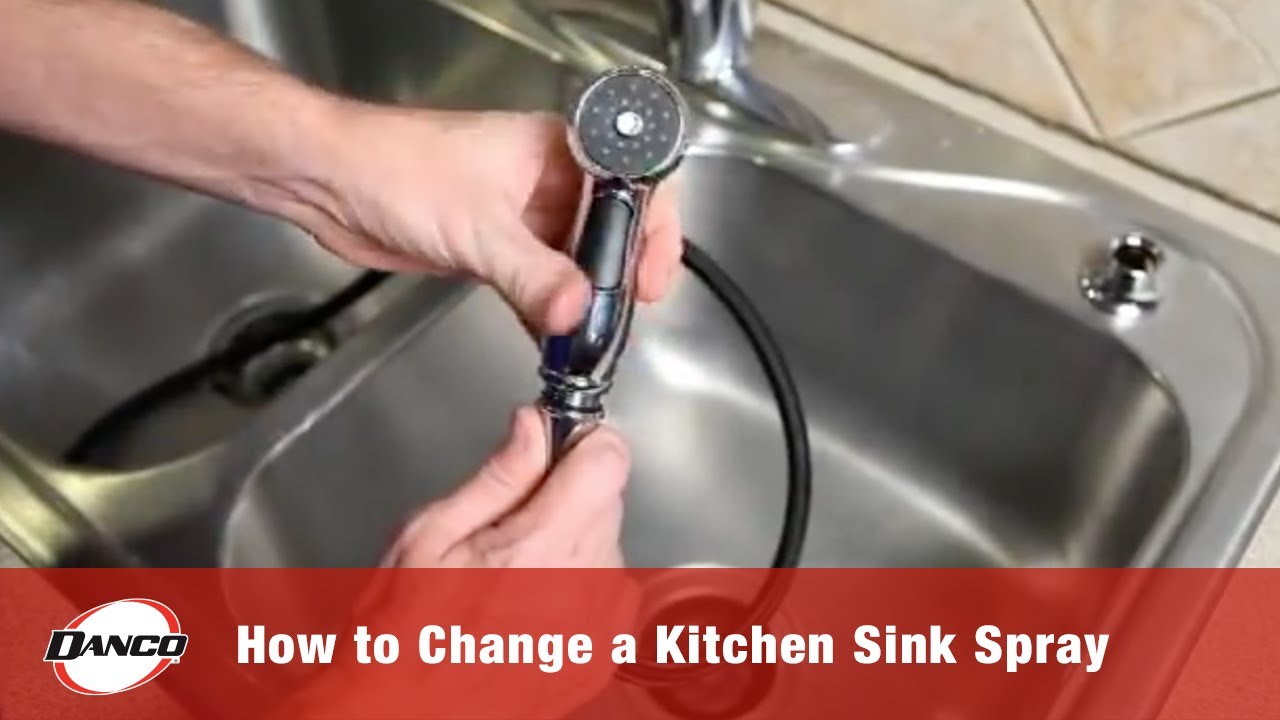
If the faucet has a sprayer attached, you’ll need to remove the flexible hose from the faucet. To do this, you’ll need to unscrew the nut from the base of the sprayer. Be sure to have a towel available to catch any water that may come out. Once the hose is removed, you can take the faucet and sprayer out of the sink.
Disconnecting the Sprayer
Removing a kitchen faucet with a sprayer is a fairly straightforward task, but it requires some special considerations before you can complete the job. Before you can remove the faucet, you must first disconnect the sprayer. To do this, locate the hose that connects the sprayer to the faucet. This will usually be located under the sink, and you’ll need to unscrew the nut that holds the hose in place. Once the nut is removed, you can carefully pull the hose from the faucet and set it aside. Next, you’ll need to locate the nozzle where the hose connects to the sprayer head. Most sprayers have a plastic or metal clip that holds the nozzle in place. To remove the clip, use a screwdriver to carefully pry it loose. Once the clip is off, you can unscrew the nozzle and disconnect the hose from the sprayer. With the sprayer now disconnected, you can begin the process of removing the faucet.
Installing the New Faucet
Removing and replacing a kitchen faucet with a sprayer can be a daunting task for even the most experienced DIYers. However, with the right tools and a little bit of patience, it can be a relatively straightforward process. Once you’ve removed the old faucet, preparing to install the new one is the next step. Before beginning, make sure you have all the necessary components including the new faucet, new washers, plumber’s tape, and any other components that may be included in the installation kit. After assembling the components, turn off the water valve and disconnect the water supply lines. Next, attach the water supply lines to the new faucet, making sure to use fresh plumber’s tape to ensure a watertight seal. Carefully lower the faucet into place and secure it with the mounting nuts. Finally, connect the sprayer hose to the faucet, and turn the water supply back on. Test the faucet to make sure it is functioning properly before you put everything back together. With a few simple steps, you can easily remove and replace your kitchen faucet with a sprayer.
Connecting the Sprayer
Connecting a kitchen faucet sprayer is a straightforward task that can be completed in a few minutes. Before getting started, make sure to have all the necessary tools nearby, such as a basin wrench, lubricant, and a Phillips head screwdriver. Begin by turning off the water supply to the faucet. Next, unscrew the mounting nuts that secure the sprayer hose to the faucet using the basin wrench. Then, remove the old sprayer and hose and discard them. Finally, attach the new hose to the faucet and secure it with the mounting nuts. Make sure to lubricate the threads before tightening the nuts. Once the connection is secure, turn the water supply back on and test the sprayer. With a few simple steps, you can easily and quickly replace a kitchen faucet sprayer.
Testing the New Faucet and Sprayer
Installing a new kitchen faucet and sprayer can be a daunting task, but with the right preparation and knowledge, it can be a breeze. Once the new faucet and sprayer are in place, the next step is to test them to make sure they’re working properly. To do this, you’ll need to turn off the water supply to the faucet, open the faucet, and then turn the water back on. Once the water is flowing, check the faucet and sprayer for any leaks or blockages. If everything is working correctly, it’s time to turn on the sprayer and test the pressure. Make sure it’s delivering the right amount of water for your needs. If everything looks good, you can move on to cleaning and maintaining your new faucet and sprayer.
FAQs About the How To Remove A Kitchen Faucet With Sprayer
1. What tools do I need to remove a kitchen faucet with sprayer?
A: You will need a wrench, pliers, a basin wrench, and possibly an adjustable wrench.
2. How do I disconnect the water supply lines?
A: First, turn off the shutoff valves or the main water supply. Then, use pliers to loosen the compression nuts connecting the hot and cold lines to the faucet.
3. How do I remove the sprayer hose?
A: Use a basin wrench to reach up inside the faucet and loosen the coupling nut that holds the sprayer hose in place.
4. How do I remove the faucet itself?
A: Use a wrench or adjustable wrench to remove the mounting nuts that hold the faucet to the sink.
5. How do I reinstall a new faucet?
A: First, attach the new faucet to the sink by inserting the mounting nuts and tightening them with a wrench or adjustable wrench. Then, attach the hot and cold lines with the compression nuts and tighten with pliers. Finally, reattach the sprayer hose and tighten the coupling nut with a basin wrench.
Conclusion
The process of removing a kitchen faucet with sprayer can be daunting but with the right steps and tools, it can be done easily. By following the steps outlined in this article, you can easily remove your kitchen faucet with sprayer in no time. Be sure to take all necessary precautions when working on plumbing and shut off the water supply before beginning the process. With the right tools and a bit of patience, you can replace your kitchen faucet with sprayer in no time.

