Replacing pipes under a kitchen sink can seem like a daunting task, but with the right tools, it doesn’t have to be! This tutorial will provide you with step-by-step instructions on how to easily replace the pipes underneath your kitchen sink. You’ll learn how to identify the existing pipes, how to disconnect them, and how to connect the new pipes to get your kitchen sink up and running again. With this guide, you’ll be able to take on this plumbing project with confidence and get the job done right the first time.

Gather Tools and Supplies
Replacing pipes under your kitchen sink is a fairly straightforward DIY project that anyone can do with the right tools and supplies. To get started, it’s important to make sure you have the right materials for the job. You’ll need a wrench, a hacksaw, a pipe cutter, a new sink drain, and the proper pipes and fittings. Other items you may need include a screwdriver, plumber’s tape, Teflon paste, and a basin wrench. Once you have all the required tools and supplies, you’re ready to begin replacing the pipes under your kitchen sink.
Shut Off the Water Supply
Replacing the pipes under your kitchen sink can be a daunting task, but it doesn’t have to be. One of the most important steps in replacing pipes is to turn off the main water supply to your kitchen. Doing so will prevent any leaks or flooding from occurring while you work. Shutting off the water supply can be done either at the main shutoff valve for the house or the kitchen if one is present. If no specific shutoff valve is present, locate the main line for the kitchen and shut it off. To do this, you may need to shut off the supply for the entire house. Once the main water supply is shut off, you can start to work on replacing the pipes under the sink.
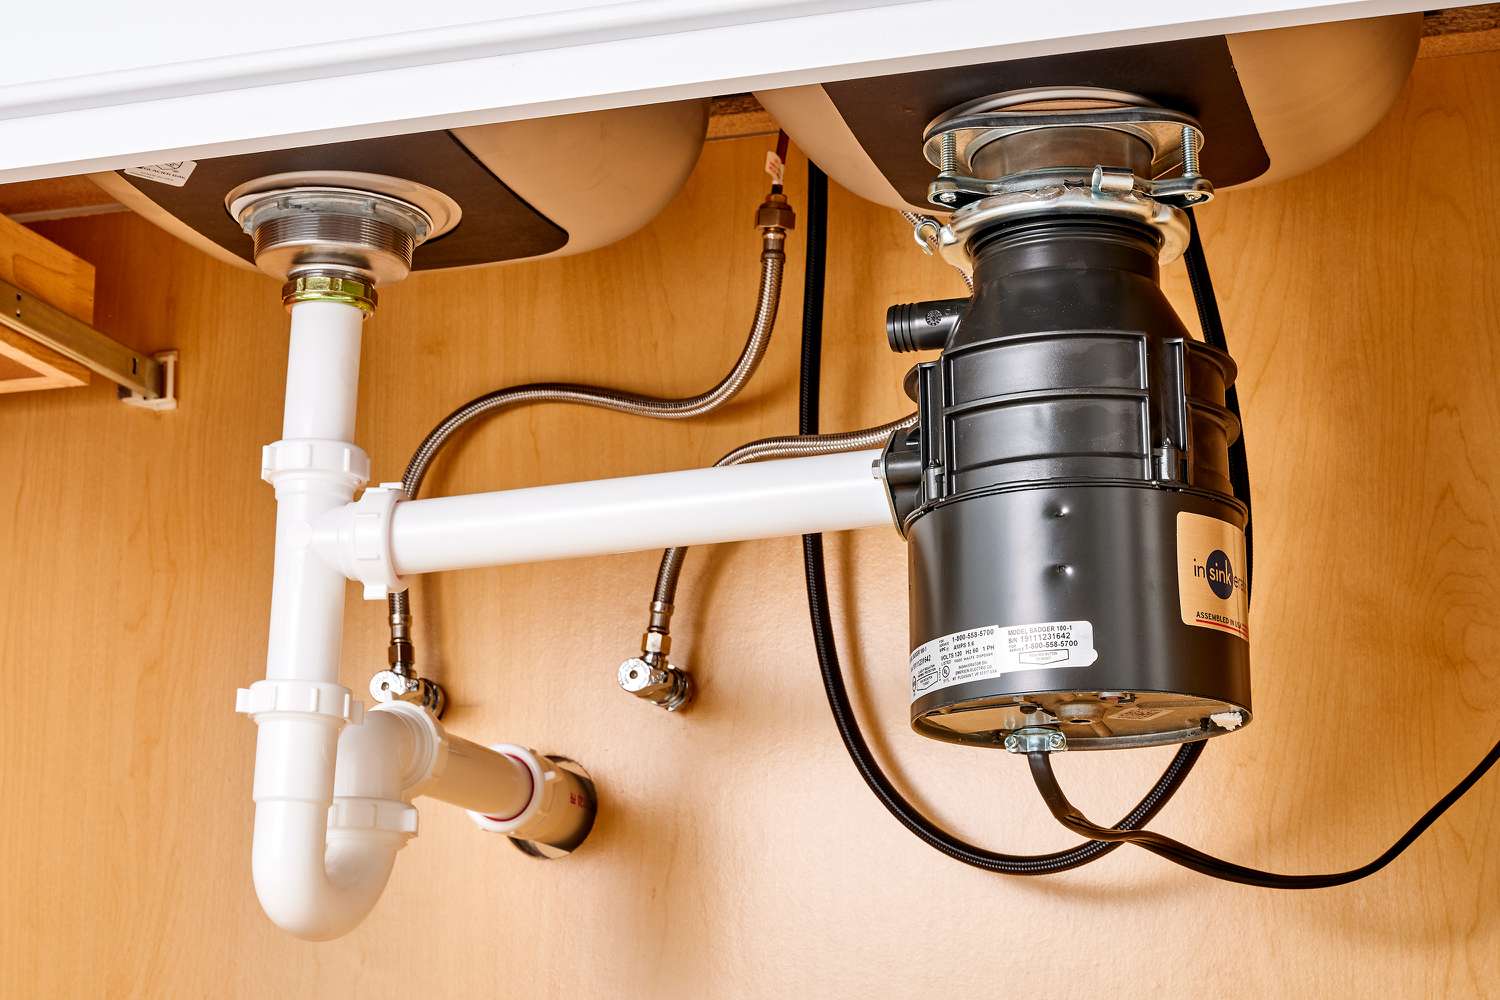
Remove Old Pipes
Replacing the pipes under your kitchen sink is not a difficult task, but it does require some planning and the right supplies. The first step is to remove the old pipes. This can be done by first turning off the water supply to the sink and then using a wrench or pliers to loosen the connections. After the connections are loose, the old pipes can be removed and discarded. It is important to take note of the configuration of the old pipes, as this will be helpful when installing the new pipes. Care should also be taken not to damage the sink itself as the pipes are removed. Once the old pipes are removed, the new pipes can be installed.
Connect Water SupplyLines
Underneath the kitchen sink, connecting the water supply lines to the shutoff valves and the faucet can seem intimidating and overwhelming. However, with the right tools and instructions, it is a manageable task that can be completed in a few hours. First, shut off the water supply at the main valve. Next, use a pipe wrench to loosen and remove the old supply lines from the valves and faucet. Carefully inspect the pipes for signs of corrosion or other damage before disposing of them.
Once the old pipes have been removed, you can begin the process of installing the new pipes. Start by measuring the length of the pipes and cutting them to the appropriate size with a hacksaw. Connect the new pipes to the valves and the faucet using the plumber’s tape and pipe fittings, then secure them in place with a pipe wrench. Finally, turn on the main water supply and test the connections to make sure there are no leaks. With patience and care, you can easily replace the pipes under your kitchen sink.
Test for Leaks
Checking for leaks is an essential step when replacing pipes under the kitchen sink. Start by turning the water supply back on and inspect all the connections to make sure they are secure. Check the fittings and connections for any signs of water. It is important to look for any leakage from the pipes, connections, and fixtures. If any signs of water are present, tighten the connection or replace the pipe to fix the issue. After all the connections are secure, turn the water back on and check the area for any signs of water leakage. If there is no water leakage, your new pipes are installed correctly and you can now enjoy the benefits of a functioning kitchen sink!
Reattach Fixtures
Once the pipes have been replaced, the next step is to reattach the fixtures. Before reattaching the fixtures, it is important to ensure that all the connections are properly tightened. Begin by connecting the drain pipe and the trap arm with the help of slip nuts. Then, connect the sprayer hose and water supply lines to the faucet. Use the wrench to tighten the connections. Make sure to remove any excess plumber’s tape. Last but not least, install the faucet and the sprayer and turn on the water supply.
Replacing the pipes under the kitchen sink can be a daunting task, but with the right tools and equipment, it can be done easily. By following the steps above, the task can be completed in no time. It is important to remember to take necessary safety measures when replacing pipes. Also, make sure to use the right tools to ensure that the job is done properly.
Put Everything Back in Place
Replacing the pipes under your kitchen sink can be a daunting task, but it is still a necessary one. To complete the job, you must first remove the old pipes and fittings, and then install new ones. Once the new pipes are in place, it’s important to put everything back together correctly. This can be tricky, but with the right tools and some patience, it can be done.
Start by ensuring the new fittings are of the correct size and that the pipe connections are properly secured. Next, attach the new drain pipes to the sink base. Make sure to use the appropriate plumber’s tape and a wrench to tighten the connections. After that, you can attach the tailpiece, trap, and any other fittings that are included in your kit. Finally, you’ll need to connect the pipes to the wall and secure them with screws and washers.
Once all the parts are in place, don’t forget to check for any leaks. If all is well, you can turn on the water to test your new setup. If any leaks occur, you’ll need to go back and tighten the connections. You may need to use a special tool such as a basin wrench to reach the hard-to-access areas.
Replacing the pipes under your kitchen sink can be a tricky job, but with the right tools and some patience, it can be done. Make sure to double-check your connections and test for any leaks before you consider your job complete.
Maintain Regularly
One of the most important steps in ensuring the long-term viability of your kitchen sink is to maintain it regularly. This means replacing old pipes under the sink at least every few years. Doing so can prevent damage from occurring and keep the sink functioning properly. Fortunately, replacing pipes under the kitchen sink is a fairly straightforward process. Here are some tips to help you do it yourself without having to call a plumber.
First, it is important to turn off the water supply to the kitchen sink before you begin. Next, remove the old pipes and fittings. Be sure to check for any signs of corrosion or damage. Then, clean the pipe area and install the new pipes. Make sure they are properly aligned and secure. Finally, attach the new fittings and turn the water supply back on.
By following these steps, you can easily replace the pipes under your kitchen sink. Doing so will help maintain the sink’s longevity and prevent any damage from occurring. Regular maintenance of your kitchen sink is essential to keep it functioning properly and looking its best.
FAQs About the How To Replace Pipes Under Kitchen Sink
1. How do I know what type of pipes I need to replace my kitchen sink pipes?
Answer: You will need to determine the type of pipe currently in place in your kitchen sink. This can be done by examining the pipe material (e.g. PVC, copper, etc.) and the pipe size (e.g. 1/2 inch, 3/4 inch, etc.).
2. What tools do I need to replace my kitchen sink pipes?
Answer: You will need a pipe wrench, a hacksaw, and a variety of pipe fittings (e.g. elbows, T-connectors, etc.) depending on the type of pipe you are replacing.
3. How do I know if I’m connecting the pipes properly?
Answer: Make sure to use pipe sealant on all connections and ensure that they are tightened securely. You can also consult a plumbing expert for help if you are unsure.
Conclusion
Replacing the pipes under your kitchen sink is a relatively simple process that can save you money in the long run. It is important to make sure you have the right tools and materials before starting the project. Make sure you turn off the water supply before starting and wear gloves to protect your hands. After removing the old pipes, be sure to clean the area and install the new pipes in the correct order. Once the new pipes are in place, turn the water back on and test for any leaks. With a little patience and care, you can easily replace the pipes under your kitchen sink.

