Cleaning the aerator on your kitchen faucet is an important part of maintaining your faucet and ensuring its proper functioning. The aerator is the small mesh screen that is located at the end of the faucet spout. It helps to regulate the water flow and can become clogged with debris over time. Cleaning the aerator regularly can help to remove any build-up and keep your faucet working properly. This guide will provide you with the steps needed to clean your kitchen faucet aerator.
Tools and Materials Needed
Cleaning your kitchen faucet’s aerator requires the right tools and materials to ensure the job is done correctly and efficiently. To get started, you’ll need a flathead screwdriver, needle-nose pliers, a cloth or sponge, and some dishwashing liquid. A toothbrush may also come in handy if there are any hard-to-reach areas. Additionally, you’ll need a few basic supplies such as a bucket or basin, a plumber’s wrench, and a drain stopper. Once you have all the required materials, you can start cleaning the aerator on your kitchen faucet.
Steps for Cleaning the Aerator
Cleaning your kitchen faucet’s aerator is an important part of good home maintenance. An aerator is a small device that fits onto the end of the faucet and is designed to reduce water waste and improve the overall flow of water. Over time, the aerator can become clogged with debris, which can reduce water pressure and affect the quality of the water coming out of the faucet. Fortunately, cleaning the aerator is a simple task that you can do yourself. Here are the steps for cleaning the aerator on your kitchen faucet.
First, make sure to turn off the faucet’s water supply before you start. Then, use a pair of pliers to unscrew the aerator from the faucet. Next, rinse the aerator in warm soapy water to remove any residue. Once the aerator is clean, inspect it for any signs of corrosion or damage. If the aerator looks okay, put it back on the faucet and turn the water supply back on.
Finally, check to make sure the aerator is functioning properly. If you still experience low water pressure or the water flow is blocked, you may need to replace the aerator. This is an easy task and can be done in a few minutes. With regular cleaning and maintenance, you can keep your kitchen faucet’s aerator in good shape and ensure your faucet is working properly.
Identifying Clogs and Blockages
Having a clogged aerator on your kitchen faucet can cause low water pressure and an uneven stream. It’s important to check for any blockages or clogs regularly and remove them. To start, identify the source of the clog. It could be caused by hard water build-up, mineral deposits, or other debris. If you have hard water, consider using a water filter or a water softener to reduce the buildup of minerals.
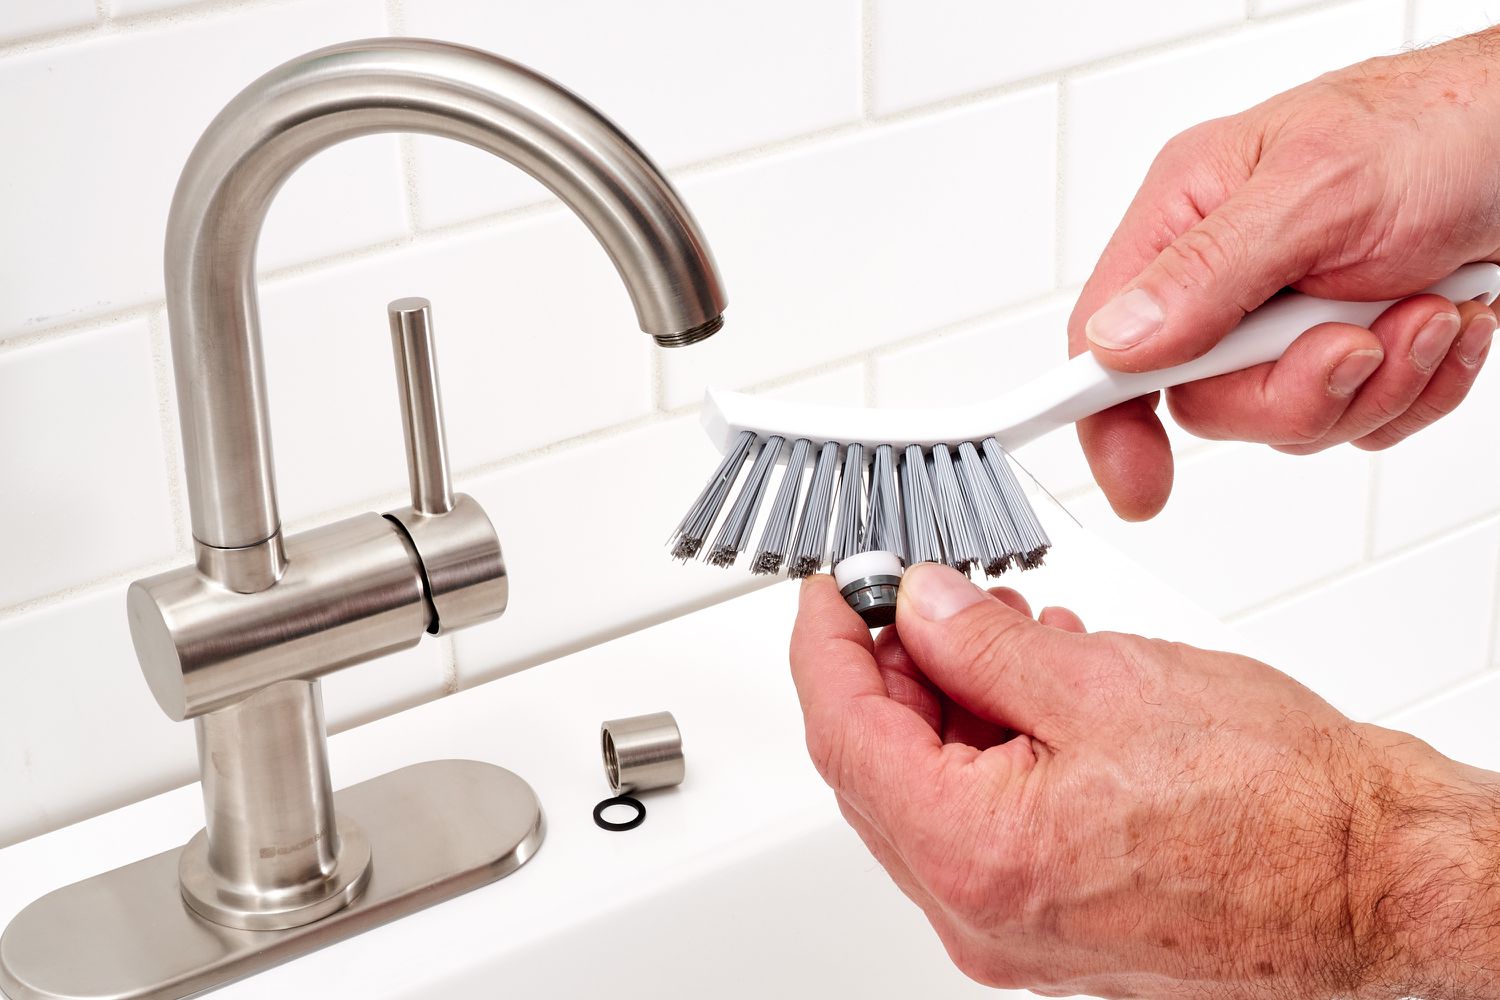
Check for any visible blockages or clogs. You may need to take apart the aerator to look inside for any debris. If the clog is deep within the aerator, use a pair of needle-nosed pliers to dislodge it. If all else fails, soak the aerator in a solution of vinegar and water, or use a hard-bristled brush to scrub away any buildup.
Once you have identified and removed the clog, use a damp cloth to wipe down the aerator. This will help to remove any lingering debris and help to keep the aerator in good condition. Finally, reassemble the aerator and you should be good to go. Cleaning the aerator on your kitchen faucet regularly will help to prevent any further blockages or clogs.
Troubleshooting Common Issues
Maintaining a clean kitchen faucet aerator is key to keeping your water running smoothly. An aerator is a small device that fits onto the end of the faucet, mixing air into the water flow to reduce splashing. However, due to its small size, it can get clogged with dirt, debris, and minerals over time, resulting in a decrease in water flow. Cleaning the aerator regularly can help ensure your faucet is performing optimally. In this article, we will explore how to clean an aerator on a kitchen faucet and discuss common issues to look out for.
The first step in cleaning an aerator is to remove it from the faucet. This can typically be done by unscrewing the aerator head from the faucet body. Once removed, use a small brush to clean the inside of the aerator, then rinse it with warm water. If there is a buildup of dirt or mineral deposits, use a vinegar and water solution to soak the aerator and dissolve the deposits. When the aerator has been thoroughly cleaned, reattach it to the faucet and test to ensure the water flow is restored.
When troubleshooting common issues with aerators, start by inspecting the aerator for any signs of damage or obstruction. If the aerator is blocked, try using a needle to remove any debris. If the aerator has been damaged, it is likely best to replace it entirely. Additionally, if the flow of water is weak or inconsistent, it could be a sign of sediment buildup inside the aerator, which can be cleaned as outlined above.
Aerators are essential to keeping your kitchen faucet running properly, and regular cleaning and maintenance can help prevent common issues from arising. By following the steps outlined in this article, you can keep your aerator clean and ensure your faucet is functioning optimally.
Benefits of Regular Cleaning
Regularly cleaning your kitchen faucet’s aerator is essential for keeping your kitchen faucet in good working condition. Not only does regular cleaning help reduce the build-up of sediment, but it can also help conserve water. A clogged aerator can reduce the flow rate of water through your faucet, leading to an increase in water usage. Additionally, cleaning your faucet’s aerator can help prevent the spread of germs and bacteria. By removing any built-up debris, you can reduce the chances of bacteria growth and contamination, keeping your kitchen faucet clean and safe. Finally, regular cleaning will help extend the life of your faucet, ensuring that it performs optimally for years to come.
Tips for Avoiding Future Clogs
Regular maintenance of your kitchen faucet’s aerator is key to avoiding future clogs. Over time, sediment can build up in the aerator, blocking water flow and leading to a clogged faucet. To keep your faucet functioning properly, it’s important to know how to clean the aerator on your kitchen faucet.
Fortunately, cleaning a kitchen faucet aerator is a quick and easy process. To start, you’ll need a few simple tools: a pair of pliers, a Phillips head screwdriver, and a cloth. First, use a pair of pliers to remove the aerator from the faucet. Next, unscrew the aerator with the Phillips head screwdriver, and use the cloth to clean any sediment from the interior. Finally, re-attach the aerator, and voila!
By following these simple steps, you can easily keep your kitchen faucet’s aerator clean and clog-free. Regular maintenance of the aerator will help ensure that your faucet continues to function properly and that you experience minimal clogs. Additionally, cleaning the aerator is a great way to save money on plumbing costs in the long run.
Frequently Asked Questions
(FAQs)
Have you ever noticed that your kitchen faucet has become clogged and hard to use? The cause of this is usually a buildup of sediment, minerals, and other debris in the aerator. Cleaning the aerator on your kitchen faucet can help restore normal water flow and make your faucet operate like new. Cleaning your aerator is simple and easy to do, and can be completed in just a few steps. However, some frequently asked questions should be addressed before beginning the cleaning process.
What is an aerator and why is it important? An aerator is a small device that fits onto the end of your faucet and is designed to regulate the flow of water. It helps to reduce water waste and conserve energy by mixing air with the water as it’s released from the tap. It also helps to reduce the amount of sediment and minerals that enter your water supply.
How often should I clean my aerator? It’s recommended to clean your aerator at least once a year. If you notice a decrease in water pressure or an increase in sediment buildup, you may need to clean it more often.
What materials do I need to clean the aerator? You will need a pair of pliers, a bucket, white vinegar, and a cleaning brush.
Once you have the necessary materials, cleaning your aerator is a simple process. First, remove the aerator from the faucet by grasping it firmly with the pliers and turning it counterclockwise. Place the aerator in the bucket and fill it with white vinegar, letting it soak for about an hour. Then, use the cleaning brush to scrub away any visible debris. Finally, rinse the aerator off with clean water and reassemble it on the faucet.
Cleaning the aerator on your kitchen faucet is an easy and effective way to restore normal water flow and help maintain your kitchen’s plumbing. By following the simple steps above, you can keep your aerator functioning properly and ensure your faucet is always operating at its best.
Conclusion
Cleaning your aerator is a simple task that can be done in just a few minutes. Depending on the type of faucet you have, the steps can vary slightly. However, the overall process of cleaning the aerator is more or less the same. All you need is a screwdriver, some vinegar, and a rag. By following these steps, you can easily and quickly clean your aerator and ensure that your kitchen faucet is working properly.

