Adding a backsplash to your kitchen is a great way to add a touch of style and personality to your space. Backsplashes can be made from a variety of materials such as glass, ceramic tile, stone, and even stainless steel. Installing a backsplash is a relatively easy job that can be done in just a few hours, and the result is a great way to give your kitchen a unique and stylish look. This guide will walk you through the steps of installing a backsplash in your kitchen.
Tools and Materials Needed
Installing a backsplash in your kitchen is a great way to add style and function to your kitchen. Before starting, it is important to have the right tools and materials on hand to ensure that your backsplash installation goes as smoothly as possible. Here are the most common tools and materials needed to put up a kitchen backsplash.
The first tool you will need is a measuring tape. You will use the measuring tape to measure the area to be covered by the backsplash. This will help you determine the amount of materials you will need to purchase.
Next, you will need a level to ensure that the backsplash is installed correctly. You will also need a utility knife to cut the backsplash material as necessary. Additionally, you will need a drill and the appropriate bits to install any hardware needed.
In terms of materials, you will need the tile or material that will make up the backsplash. If you are using tiles, you will also need grout, spacers, and adhesive. You may also need to purchase a matching edge trim, depending on the type of backsplash you are installing. If not included with your tile, you will also need a tile sealer.
Having the right tools and materials on hand will help ensure that you have a successful and stress-free backsplash installation. Taking the time to gather the right supplies before starting any project can help you save time and money in the long run.
Preparing the Walls
Installing a backsplash in your kitchen may seem like a daunting task, but with the right preparation and materials, it is easy to do. The first step to installing a backsplash is to prepare the walls. To do this, you need to clean and dry the walls and remove any old paint or wallpaper. Once the walls are thoroughly cleaned, you can then apply a mortar adhesive or a special tile adhesive to the walls. Be sure to spread the adhesive evenly and allow it to dry completely before moving on to the next step. This will ensure that the backsplash is securely attached to the wall and will last for years to come.
Cutting the Backsplash Tiles
Adding a backsplash to your kitchen can add a great look and style to the room. Before installing, it is important to understand the basics of cutting the tiles. This includes understanding the types of tools you need, the cuts you need to make, and the steps to making the cuts.
The first step in cutting the tiles is to measure and mark the area where the tiles will be placed. Measure the length and width of the area and mark the measurements with a pencil. After the area is marked, you need to decide the type of tiles you want to use for the backsplash. Choose the tiles that best fit the design of the room.
Once the tiles have been chosen, you will need the proper tools for cutting them. The most common tool used is a tile saw. A wet saw is also helpful if you are cutting ceramic or porcelain tiles. When using the saw, make sure to wear safety glasses and make sure the tile is firmly in place. Start the saw and cut along the marked lines. Make sure to keep a steady hand and don’t rush the process as you don’t want to make any mistakes.
Once the tiles are cut, it’s time to lay them out. Place the tiles on the wall and make sure they fit properly. If you need to make any adjustments, you can use a tile nipper to get the perfect fit. With your tiles in place, you are now ready to start the installation process.
Following these steps will help ensure that your backsplash is installed correctly and looks great. It may seem intimidating but with the right tools and instructions, you can easily install a backsplash in your kitchen.
Applying Adhesive
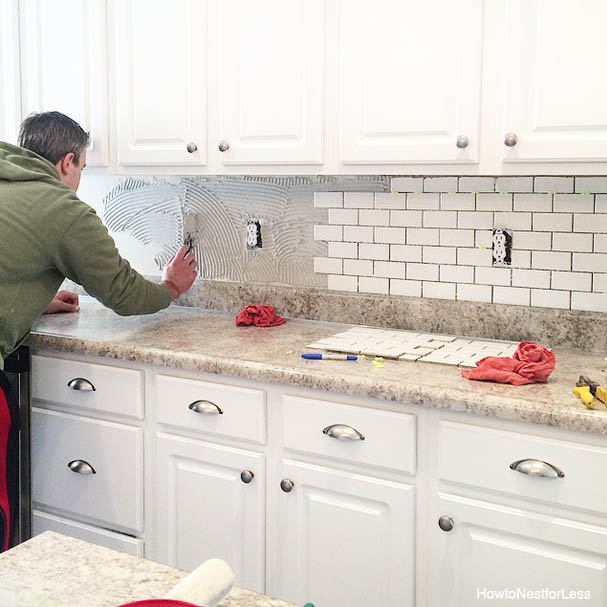
Adding a backsplash to your kitchen is a great way to add a touch of style and personality. The process of installing a backsplash is fairly straightforward, but it does require a bit of preparation and some careful attention to detail. The first step is to apply adhesive to the wall. This will help to ensure that the backsplash is properly secured and will help to prevent any potential water damage. When applying the adhesive, it is important to use a high-quality product that is designed for use in wet areas. Make sure to follow the manufacturer’s instructions for proper application and drying times. Once the adhesive is completely dry, you can begin to install the backsplash.
Installing the Backsplash
When it comes to giving your kitchen a makeover, you can never go wrong with adding a backsplash. Not only does it add a touch of style and beauty to the room, but it also has practical benefits such as protecting your walls from splashes and spills. Installing a backsplash isn’t hard, but it does involve some basic skills and tools. Here is a step-by-step guide on how to put a backsplash in your kitchen.
First, you will need to measure the area of your kitchen where you want the backsplash to go. Make sure to take into account any outlets or switches that may be present in the area. Once you have your measurements, you can purchase the tiles you need to complete the job. When selecting your tiles, make sure to get ones that are appropriate for the area, such as those that are heat-resistant or waterproof.
Next, you will need to prepare the area for your backsplash. You will need to remove any existing tile or wallpaper, as well as make sure the wall is clean and free of debris. Once the area is prepped, apply a coat of primer, which will help the tiles adhere better.
Once the primer is dry, you can start to lay your tiles. Start at the bottom and work your way up, making sure to use a level to ensure everything is even. Spread some adhesive onto the wall and then press the tile firmly into place. Repeat this process until you have covered the entire area.
Once all of the tiles are in place, you will need to grout the seams. Spread a layer of grout over the tiles and then use a damp sponge to wipe away the excess. You will also need to let the grout dry before you can use the backsplash.
Installing a backsplash in your kitchen is a great way to protect your walls and add style to the room. With a little patience and the right tools, you can have a stunning backsplash in no time.
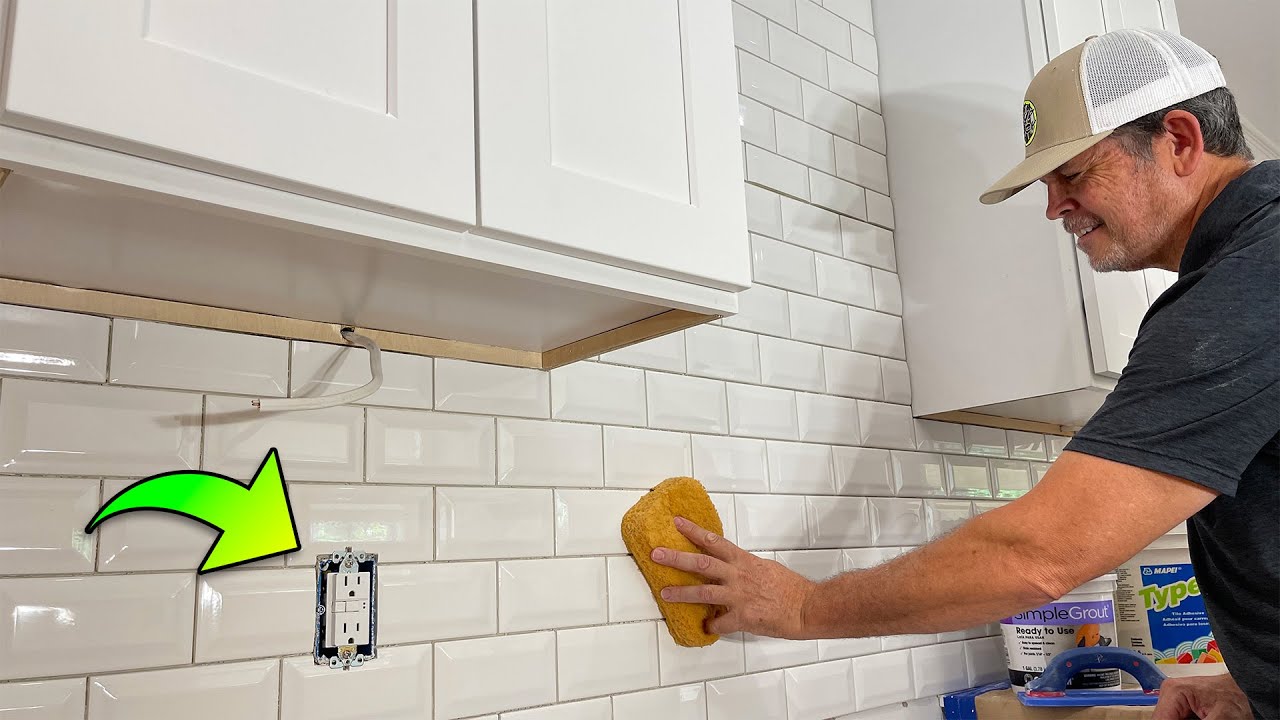
Grouting the Backsplash
Adding a backsplash to your kitchen is a great way to add a touch of personality to your space. When installing a tile backsplash, you need to make sure you grout it properly to ensure a long-lasting and beautiful finish. Grouting is the process of filling the gaps between the tiles with a cement-based mixture, and it can be a bit tricky to get it done right. Here are some tips to help you grout your kitchen backsplash like a pro.
First, make sure you select the right grout for your project. There are a few types of grout to choose from, so make sure you select the right type for your tiles and the environment. For example, if you’re using natural stone tiles, you’ll want to use an epoxy-based grout.
Once you’ve selected the right grout, you’ll need to mix it according to the instructions. Make sure you add the correct amount of water and mix thoroughly to make sure you get a nice, even consistency.
Now comes the fun part – grouting the tiles. Start by spreading the grout onto the tiles with a rubber float, and make sure to fill the gaps between the tiles. Then, use a damp sponge to remove any excess grout. Finally, wait for the grout to dry before applying a sealant.
By following these tips, you should be able to grout your kitchen backsplash like a pro. Don’t forget to check out our other articles for more tips and ideas on backsplash installation.
Finishing and Sealing
When it comes to putting backsplash in your kitchen, it’s not just a matter of selecting the right tiles and cutting them to size. The finishing and sealing of the backsplash are just as important. To ensure your backsplash is properly installed and lasts for years to come, here’s how to finish and seal it correctly.
First, apply grout between the tiles. Make sure to use the right type of grout and mix it following the manufacturer’s instructions. Then, use a damp sponge to remove excess grout and wipe down the tiles. Allow the grout to dry overnight.
Next, seal the grout and tiles. Choose a sealer specifically designed for kitchen backsplashes. Apply the sealer following the manufacturer’s instructions. Allow the sealer to dry completely before grouting any adjacent walls.
Finally, apply a top sealer. This will protect the grout and tiles from staining and water damage. It will also help to keep the backsplash looking good for years to come.
By taking the time to properly finish and seal your backsplash, you can ensure a job well done. For a kitchen backsplash that will stand the test of time, make sure to follow these steps.
Troubleshooting Common Issues
Troubleshooting common issues when installing a backsplash in the kitchen can be a tricky task. Fortunately, there are a few steps you can take to make sure that your installation runs smoothly. From identifying potential problems to knowing when to call an expert, this guide will cover all of the basics to help you troubleshoot any problems you may encounter when putting up a backsplash in your kitchen.
First, it is important to check that the wall surface is clean and free of any debris. This will help ensure that the adhesive adheres properly and that the backsplash sits flush against the wall. Next, it is important to make sure that the layout of the backsplash tiles is correct and that the cuts are precise. This will help to make sure that the tiles fit correctly and that there are no gaps between them.
Once the tiles are in place, it is important to check for any unevenness. Unevenness can be caused by a variety of factors, from poor installation to using materials of different thicknesses. If any tiles are uneven, they should be replaced or adjusted to ensure a level surface.
Finally, it is important to ensure that the grout lines are even. This will help to prevent the tiles from becoming loose and help to ensure that the backsplash looks neat and professional. If you have any doubts about your installation, it is recommended that you contact a professional for assistance.
By following these steps, you will be able to successfully troubleshoot any issues that may arise when installing a backsplash in your kitchen. With the right preparation and care, you can ensure that your backsplash looks great and lasts for years to come.
Conclusion
Adding a backsplash to your kitchen can be a great way to give your kitchen a more modern and updated look. With a few simple steps, you can easily install a backsplash and add a unique style to your kitchen. First, you will need to measure the area of the wall space you plan to cover with the backsplash. Next, you will need to choose the tile type and size, as well as any additional materials you may need to complete the installation. Finally, you will need to prepare the wall surface and use the appropriate technique to install the tile. With the proper tools and materials, your kitchen will have a new, stylish backsplash in no time.

