Installing crown molding in kitchen cabinets is a great way to add a decorative touch to your kitchen. Crown molding is an easy and relatively inexpensive way to give your cabinets a custom look. With a few simple tools and some patience, you can install crown molding to your kitchen cabinets and take your kitchen from ordinary to extraordinary. With the right steps and a little bit of practice, you can learn how to install crown molding to your kitchen cabinets quickly and easily.
Preparing Your Cabinets for Crown Molding
Installing crown molding in kitchen cabinets can be a great way to add character and charm to your kitchen. It can also be a bit of a challenge, as it requires precision and skill to ensure the molding looks its best. To ensure you have the best results, it is important to prepare your cabinets for crown molding. Here are some tips to help you do just that.
First, you will want to clean the cabinetry thoroughly. This will help the molding adhere better and last longer. Use a soft cloth and warm soapy water to wipe down the cabinets and remove any dust or debris.
Next, you will want to make sure the surface of the cabinets is level and even. If there are any nicks or bumps, you may need to use wood putty or sandpaper to even out the surface. Once the surface is smooth and level, you are ready to begin installing the crown molding.
Finally, you will want to measure the cabinets and the crown molding before you begin. Measure the length and width of the cabinets, and then measure the length of the crown molding you will be using. Make sure to double-check your measurements to ensure accuracy. This will ensure the crown molding fits properly and looks its best.
Choosing the Right Crown Molding
When it comes to choosing the right crown molding for your kitchen cabinets, there are several factors to consider. Crown molding is a decorative trim that adds a finished look to kitchen cabinets, and choosing the right style can be the difference between an average and an outstanding kitchen. To ensure that your cabinets look their best, there are a few things to consider when selecting crown molding.
First, consider the size of the crown molding. The size of the molding should match the size of the cabinets, so if you have larger cabinets, you’ll want to select larger molding. The shape of the molding is also important, as you’ll want to choose a style that fits the overall design of your kitchen. There are a variety of styles available, from traditional to modern, so you’re sure to find something that works with your kitchen’s aesthetic.
The material of the crown molding is also an important factor. Wood is a popular choice, but there are a variety of other materials available, such as MDF, PVC, and even metal. Each material has its unique characteristics, so it’s important to select one that fits your kitchen’s needs.
Finally, consider the color of the crown molding. The color should coordinate with the cabinets and other elements in the room. There are a variety of colors available, but it’s best to select one that works with the overall color scheme of your kitchen.
Measuring and Cutting the Crown Molding
Installing crown molding in kitchen cabinets is an easy and inexpensive way to upgrade the look of your kitchen. To ensure the crown molding is correctly installed, proper measuring and cutting is essential. It can be a challenging task, however, with the right tools and techniques, anyone can complete the task.
First, you need to measure the length and angle of the crown molding. Measure the length of the crown molding and then use a miter saw to cut the molding at the desired angle. Once the molding has been cut, use a coping saw to fit the ends of the molding together. Sandpaper can then be used to smooth out any rough edges.
In addition to measuring and cutting the crown molding, you will also need to attach it to the kitchen cabinets. You can use a power drill to attach the molding to the cabinet frame. Make sure the molding is flush against the cabinet frame before drilling. Once the molding is attached to the cabinet, caulking can be used to fill in any gaps or cracks.
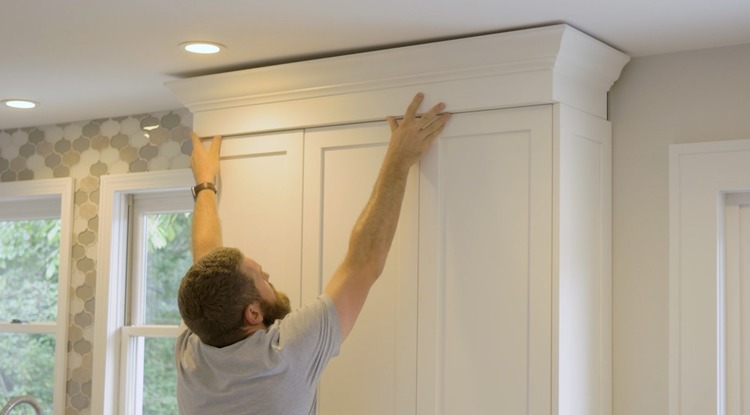
Securing the Crown Molding to the Cabinets
Installing crown molding in kitchen cabinets is a popular way to add a touch of sophistication and luxury to your kitchen. The process can seem intimidating, but with the right tools and supplies, the job can be completed in just a few hours. The most important step in the process is securing the crown molding to the cabinets. This can be tricky, so it’s important to take your time and follow the steps carefully.
The key to successfully attaching the crown molding to the cabinets is to use a strong adhesive. A construction adhesive such as Liquid Nails or PL Premium is recommended and can be found at most hardware stores. Before applying the adhesive, it’s important to make sure that the area is clean and free of dust and dirt. This will ensure that the adhesive will have a strong bond to the cabinet and the crown molding.
Painting or Staining the Crown Molding
Painting or staining the crown molding is the final step to complete your kitchen cabinet installation. Whether you choose to paint or stain, the process of applying the finish to the crown molding is an important part of the project. Applying the paint or stain correctly will ensure that the crown molding looks its best and lasts for years to come.
The first step in painting or staining the crown molding is to prepare the surface. Clean the molding with a damp cloth and sand lightly to ensure the finish adheres properly. Once the surface is properly prepared, apply the paint or stain with a brush or roller. Make sure to cover the entire surface and wipe away any excess paint or stain.
When applying the finish, use long strokes and work from the top of the molding to the bottom. This will help ensure a smooth finish and prevent streaks. Allow the finish to dry completely before adding any additional coats. Once the paint or stain is completely dry, you can install the crown molding on your kitchen cabinets.
Tips for Installing Crown Molding to Kitchen Cabinets
Installing crown molding to kitchen cabinets is a great way to add a luxurious and timeless feel to any kitchen. Crown molding is a three-dimensional embellishment that is typically installed along the top of kitchen cabinets, and it’s often the finishing touch that makes a kitchen look complete. Though crown molding may seem intimidating, it’s easier than it looks and can be a rewarding DIY project. Here are a few tips for installing crown molding on kitchen cabinets.
First, measure the width of the cabinet and then the depth from the wall to the cabinet. This will ensure that you buy the right size of crown molding. Next, measure the wall-to-cabinet depth at each end of the cabinet, as the depth can vary from one end to the other. Once you’ve determined the right size, you’ll need to cut the crown molding at a 45-degree angle.
It’s also important to consider the type of material you’ll use for the crown molding. PVC crown molding is lightweight and easy to install, while wood is more durable and offers a classic look. No matter which material you choose, make sure to use finished nails to attach the crown molding. This will ensure that the molding is securely attached to the cabinet and won’t come loose.
Troubleshooting Common Issues with Installing Crown Molding
Installing crown molding in kitchen cabinets can be a tricky process, but with the right tools and knowledge, you can get the job done quickly and correctly. That said, there are a few common issues that can arise when installing crown molding. Knowing how to troubleshoot these problems can be key to a successful installation.
First, if the crown molding does not fit the cabinets correctly, you may need to adjust the angle of the molding. This can be done with a miter saw. Alternatively, if the molding is too long, you can use a coping saw to cut the excess material off.
Another issue you may encounter is that the crown molding may not adhere to the cabinets properly. This is usually because of insufficient glue. To ensure a secure connection, use a construction-grade adhesive. Also, make sure the molding is clamped in place for about an hour before removing the clamps.
FAQs About the Installing Crown Molding To Kitchen Cabinets
1. What tools do I need to install crown molding to kitchen cabinets?
-You will need a miter saw, table saw, wood glue, finish nails, and a brad nailer.
2. How hard is it to install crown molding on kitchen cabinets?
-It is not difficult to install crown molding to kitchen cabinets, but it does require accuracy and precision to get a good result.
3. How long does it take to install crown molding on kitchen cabinets?
-The amount of time it takes to install crown molding to kitchen cabinets depends on the size of the project, but it typically takes a few hours.
Conclusion
Installing crown molding to kitchen cabinets is an easy way to add an elegant touch to any kitchen. It can be done with just a few basic tools and some patience. The finished result is worth the effort as it adds a touch of sophistication to the kitchen. Whether you want to add a touch of class to a contemporary kitchen or a rustic look to a traditional one, crown molding is a great way to do it. With a little time and effort, you can easily transform your kitchen with a few simple tools.