
A kitchen faucet spray head can be an invaluable tool in the kitchen. It’s great for washing dishes, filling large pots, and other tasks that require a high-powered stream of water. However, it can easily become clogged with soap scum, lime deposits, and other debris that diminishes its performance. Fortunately, with just a few simple steps, you can easily clean your kitchen faucet spray head and restore it to its original function. In this guide, we’ll show you how to clean a kitchen faucet spray head so you can get the most out of your faucet.
What You Will Need
To ensure your kitchen faucet spray head is sparkling clean, you will need a few basic supplies. These include a bucket, a sponge or microfiber cloth, a brush, some vinegar, baking soda, and a few rags. You may also need a screwdriver to remove the spray head, if necessary. With the right tools in hand, you can restore your kitchen faucet to its original luster.
Cleaning your kitchen faucet spray head is an easy task that can be done in just a few simple steps. Start by filling your bucket with warm water and adding some vinegar. Next, remove the spray head from the faucet, if necessary, and submerge it in the vinegar solution. Use a brush or cloth to scrub away any dirt or grime that is stuck on the head. After a few minutes, remove the spray head from the solution and rinse it with warm water.
For tougher stains, you can use baking soda and a damp cloth to scrub away any residue. Make sure to rinse the spray head thoroughly when finished. If your spray head is not removable, you can use a damp cloth and baking soda to wipe away any dirt. Then, rinse the cloth and wipe the head again with a clean, damp cloth.
Disassembling the Faucet Spray Head
Have you noticed an issue with your kitchen faucet spray head? Is it clogged or not spraying correctly? If so, it may need to be disassembled and cleaned. Disassembling the spray head can seem daunting, but with the right tools and techniques, it can be done quickly and easily.
Firstly, you’ll need to gather the correct tools and materials. You’ll need a screwdriver, a cloth, some water, a pair of pliers, and some dish soap. Once you have these items, you can begin disassembling the spray head.
Start by turning off the water supply to the faucet and then use the screwdriver to unscrew the spray head. Once the head is removed, take the cloth and wipe down the inside of the spray head. This will help remove debris and other particles.
Now, take the pliers and remove the screw at the top of the spray head. Once the screw is removed, you should be able to see the spray head opening. Use the cloth to wipe inside the opening and then use the dish soap to create some suds.
Cleaning the Spray Head Components
Cleaning the spray head components of your kitchen faucet is essential to maintain its functionality and performance levels. When it’s time to tackle the job, it’s important to be aware of the components that make up the spray head and how they should be handled.
The most common type of spray head has three main components: a spout, a handle, and a spray head. The spout is the part of the spray head that comes out of the wall and is connected to the handle. The handle is the part of the spray head that is turned to control the water flow. The spray head is the part that creates the spray of water.
Each of these components should be cleaned separately with a damp cloth and a non-abrasive cleaning solution. The handle and the spray head should be wiped down with a damp cloth and a cleaning solution. To clean the spout, a soft-bristled brush should be used with a gentle scrubbing motion. Once all the components have been thoroughly cleaned, the spray head should be reassembled and tested to ensure proper functioning.
With the right approach and proper maintenance, your kitchen faucet spray head can remain in top condition for years to come. By taking the time to clean the components of your spray head regularly, you can enjoy the convenience and functionality of your kitchen faucet for a long time.
Reassembling the Faucet Spray Head
Reassembling the kitchen faucet spray head requires the same attention to detail as disassembling it. Take care to ensure all parts are properly aligned before tightening any connections. Start by fitting the rubber seal into the housing, followed by the retainer. Make sure the seal is in the correct spot. Then, attach the nozzle and the spray head assembly. Secure the spray head with the retainer piece and the nut. Finally, attach the hose to the housing with a washer and nut. Reassembling a kitchen faucet spray head can be a tricky endeavor, but with enough time and patience, you can have your faucet working like new in no time.
Troubleshooting Common Problems
If you’ve noticed that your kitchen faucet spray head has lost its luster and is starting to look grimy, it’s likely time to give it a good deep clean. But before attempting to clean your faucet, it’s important to understand the common problems that may be causing it to become dirty and how to troubleshoot them. This article will give you a better understanding of how to clean kitchen faucet spray heads and how to troubleshoot any issues that might arise.
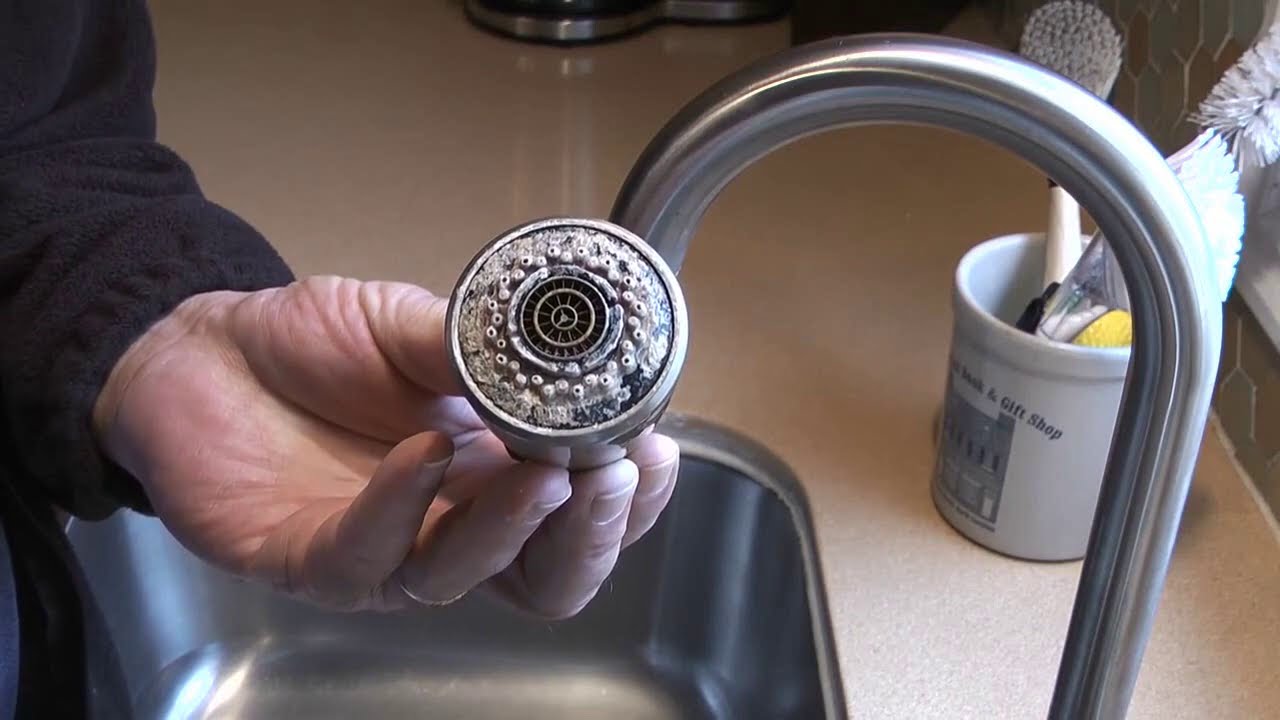
The most common issue with kitchen faucet spray heads is a build-up of dirt and grime. This can be caused by several factors, including regular use, not rinsing the spray head, and not cleaning it regularly. To prevent this buildup, it is important to regularly rinse the spray head and wipe it down with a damp cloth. In addition, it’s important to replace the spray head regularly, as old parts may become clogged with debris and cause a decrease in water pressure.
Another issue that can affect your kitchen faucet spray head is a broken seal or a blocked nozzle. If you notice that your faucet isn’t producing a steady stream of water, then it’s likely that the seal has worn out or the nozzle is blocked. To fix this problem, you’ll need to replace the seals or the nozzle.
Identifying the Type of Faucet You Have
Cleaning your kitchen faucet spray head can seem like an intimidating task, especially if you don’t know what type of faucet you have. Before you begin cleaning, it’s important to identify the type of faucet you have. Kitchen faucets come in a variety of styles, including pull-out, pull-down, single-handle, two-handle, and touchless. Knowing the type of faucet you have will help you determine the best way to clean it. Pull-down and pull-out faucets usually have a detachable spray head that can be removed for easy cleaning. Single-handle and two-handle faucets typically have a spray head that is attached to the faucet. Touchless faucets usually have a built-in sensor that allows them to turn on and off without being manually activated. Once you know the type of faucet you have, you can start to clean it.
Preventative Measures
When it comes to keeping your kitchen faucet spray head clean, it is important to take the necessary preventative measures. Taking the time to clean your faucet spray head regularly will save you time and energy in the long run, as it will help prevent stubborn buildup and hard-to-remove grime. Taking the following steps can help keep your spray head clean:
• Routinely wipe down the faucet with a damp cloth to remove any food or grease residue.
• Clean the faucet with a vinegar and water solution, or a specialized faucet cleaner, regularly.
• Make sure to check the spray head for any clogs or build-up.
• Replace the spray head if it is not functioning properly or if it is damaged.
By following these preventative measures, you can keep your kitchen faucet spray head clean and functioning properly. Taking the time to clean your faucet spray head regularly can help you avoid more difficult cleaning tasks in the future. Additionally, ensuring that the spray head is working properly and is free of any clogs will help to improve the efficiency of your kitchen sink.
Conclusion
Regularly cleaning your kitchen faucet spray head helps ensure that your faucet is free from mineral buildup and other contaminants. By following the simple steps of detaching the spray head, soaking it in vinegar, cleaning it with a brush, and reattaching it, you can have a sparkling clean kitchen faucet in no time. With regular maintenance, your kitchen faucet will remain in top condition for many years to come.