Installing a backsplash in the kitchen is an easy and inexpensive way to update the look of your kitchen. It can be a great way to add color, texture, and character to your space. With the right tools and materials, you can easily install a backsplash in your kitchen in no time. This guide will walk you through the steps of how to install a backsplash in your kitchen.
Gather Materials Needed
Installing a backsplash in your kitchen can be an exciting way to add pizzazz and character to your home. Before you begin, it is important to gather all the materials you will need. Depending on the type of backsplash you choose, you might need tile adhesive, mortar, grout, a trowel, a float, a notched trowel, spacers, a level, a utility knife, a wet saw, and a sponge. It is best to purchase a little extra material, just in case you need it. Once you have all the materials, you can begin the installation process.
Measure, Cut, and Place the Tiles on the Wall
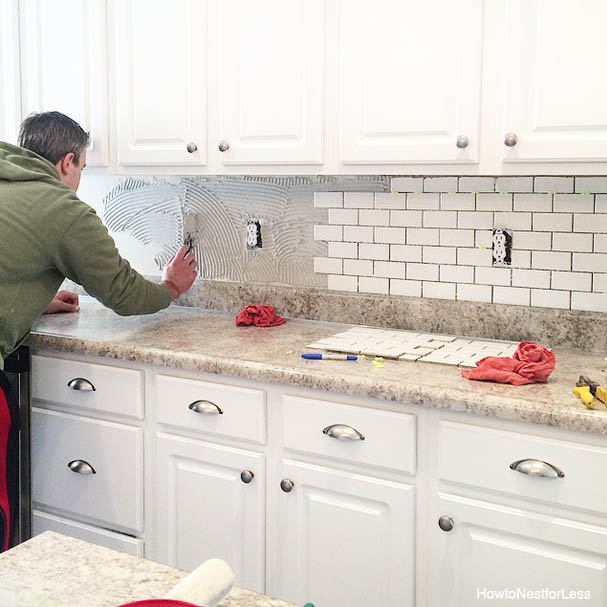
Installing a backsplash in your kitchen is a great way to add both style and functionality. It’s not difficult to do, and you can likely finish the project in just a day or two. To get started, you need to measure, cut, and place the tiles on the wall.
To begin, measure the space that you’ll be tiling. Take careful note of where outlets, switches, and other fixtures are located. To create a clean, professional finish, you may want to cut tiles to fit around them. Use a measuring tape and a level to ensure that your measurements are accurate.
Once the measurements have been taken, the next step is to cut the tiles to fit the wall. Use a tile cutter or a wet saw to accurately cut the tiles. When cutting, remember to wear safety glasses and gloves to protect your eyes and hands.
Finally, place the tiles on the wall. Start with the bottom row first, and use a trowel to spread adhesive over the wall. Then, press the tiles into the adhesive and use a level to make sure they’re even. Continue this process until the entire wall is covered.
By following these steps, you can easily install a backsplash in your kitchen. If you’re not comfortable with the project, you may want to hire a professional to complete it for you. Either way, your kitchen will look beautiful once the project is finished.
Seal the Tiles
Installing a backsplash in your kitchen is a great way to give it a new and improved look. One important step in the backsplash installation process is to ensure that the tiles are properly sealed. Sealing the tiles helps protect them from moisture and also prevents dirt and grime from getting trapped behind them. To properly seal your tiles, you’ll need to purchase a sealer made specifically for tile. Start by cleaning the area where you’ll be applying the sealer, then apply the sealer with a brush or roller. Make sure to cover the entire area, and allow it to dry before continuing with the installation. Once the sealer has dried, you can install the tiles and complete your kitchen backsplash.
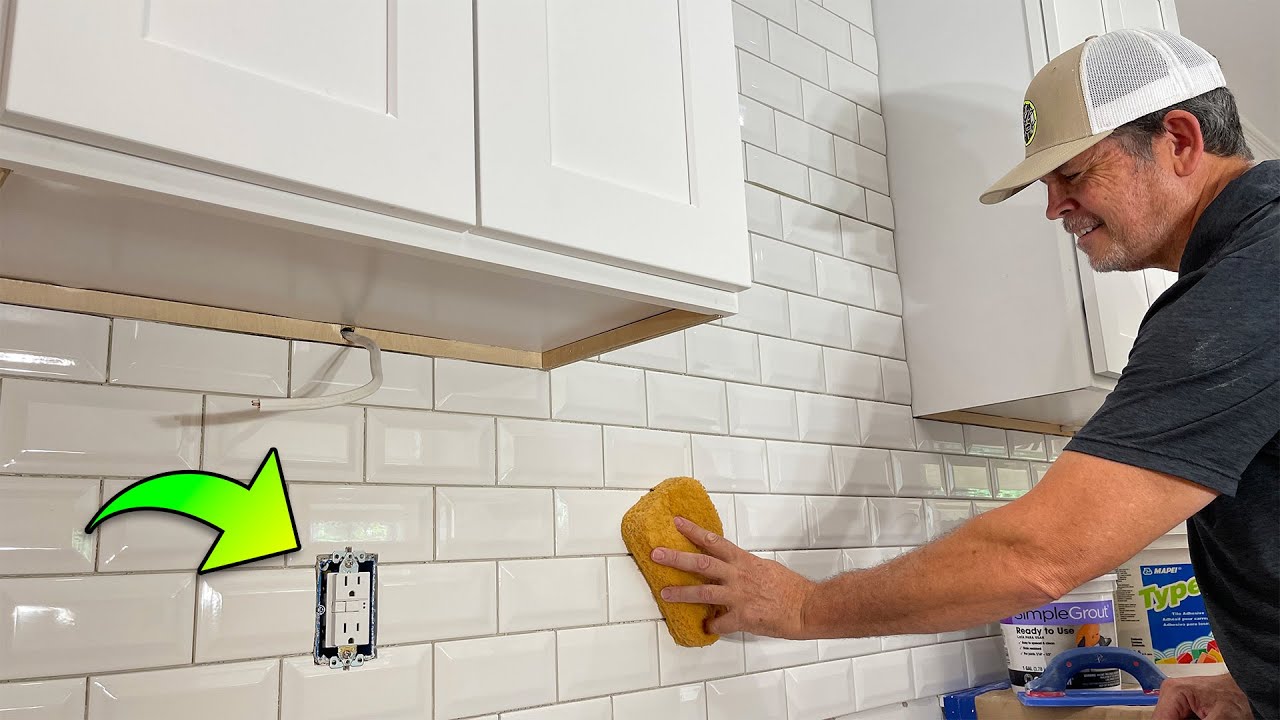
Let the Mortar and Grout Set
When installing a backsplash in your kitchen, the last step is to let the mortar and grout set. This is a crucial step in the process and needs to be done correctly to ensure that your backsplash is secure and looks great. Firstly, you will need to wait for the mortar to set. This can take anywhere from 24-48 hours, and you should avoid touching or manipulating it during this time. Once the mortar has set, you can then start to grout the area. Make sure to use a damp sponge to wipe away any excess grout. This will help to ensure that the grout is even and there are no gaps. Finally, leave the grout to set for at least 24 hours. After this time, you will have a secure and beautiful backsplash in your kitchen.
Caulk the Seams
Installing a backsplash in the kitchen can be a great way to add a unique touch to the space. While the process is relatively easy, it’s important to take your time and make sure that everything is properly installed. One important step is to caulk the seams between the backsplash and the wall. Caulking the seams will ensure that the backsplash is securely installed, as well as prevent moisture from seeping into the wall space.
To caulk the seams, start by cleaning the area with a damp cloth and allow it to dry completely. Then, use a caulking gun and apply a bead of caulk to the joint between the backsplash and the wall. Finally, use a damp finger to smooth out the caulk and remove any excess. Remember to allow the caulk to fully dry before continuing with the installation process. Following these steps will ensure your backsplash is securely installed and will last for years to come.
Clean and Enjoy Your New Backsplash
Installing a backsplash in your kitchen can instantly elevate the look of your space. But, it doesn’t stop there. After you’ve completed the installation, there are a few simple steps to take to keep your new backsplash looking its best.
Before you start, make sure to check the manufacturer’s instructions for cleaning and maintenance. This will ensure that you do not damage your backsplash.
Once you’ve installed your backsplash, it’s important to clean it regularly. A mild detergent and warm water should do the trick. Avoid using abrasive materials like steel wool or scrubbers as they can cause scratches. You can also use an all-purpose cleaner to make sure any dirt and grime is removed.
Once your backsplash is clean, it’s time to enjoy it! Add some new accessories like a tile backsplash border or a decorative tile to enhance the look of your backsplash. You can also hang artwork or add plants to make your kitchen feel like a home.
Installing a backsplash in your kitchen is an easy and affordable way to add a fresh look to your space. With a few simple steps, you can maintain and enjoy your beautiful new backsplash for years to come.
FAQs About the How To Install A Backsplash In Kitchen
Q1: What materials do I need to install a backsplash in my kitchen?
A1: To install a backsplash in your kitchen, you will need the appropriate tile, adhesive, grout, a tile cutter, a level, a putty knife, and a sponge.
Q2: What is the best way to measure and cut the tile for the backsplash?
A2: To measure and cut the tile, you will need to measure the area where the tile will be installed, draw a line following the measurements, and score the line with a tile cutter.
Q3: How do I apply the adhesive before installing the tile?
A3: Before installing the tile, you should spread the adhesive with a putty knife, using a zigzag pattern to make sure the adhesive sticks to the wall.
Conclusion
Installing a backsplash in your kitchen can be a fun and rewarding DIY project. It can add flair and style to the room while also protecting the walls from water and grease splashes. With the right tools, a bit of patience, and careful planning, you can have a beautiful backsplash that will last for years.

