Installing a kitchen faucet sprayer is a relatively simple task that can be done in less than an hour with the right tools and materials. In this guide, we will show you the step-by-step instructions for installing a kitchen faucet sprayer, including how to remove the old faucet, install the new one, and connect the water lines. We will also provide tips on how to ensure a proper seal and give advice on choosing the right tools and materials for the job. With this guide, you’ll be able to install your new kitchen faucet sprayer quickly and easily.
What Do You Need to Get Started?
Installing a kitchen faucet sprayer can be a daunting task, but with the right tools and a little bit of know-how, it’s a job that anyone can do. To get started, you’ll need a few supplies. You’ll need the faucet sprayer itself, as well as some basic plumbing tools such as a wrench, pliers, and a screwdriver. Depending on the type of faucet you’re installing, you may also need some putty, plumber’s tape, or a sealant. If you’re not sure what supplies you need, consult your local hardware store or the manufacturer’s instructions. Once you’ve gathered all the necessary supplies, you’ll be ready to start installing your kitchen faucet sprayer.
Preparing the Sink Area
When it comes to installing a kitchen faucet sprayer, proper preparation is key. To start, you’ll need to clear the sink area and remove any items that could get in the way. Next, you’ll need to turn off the water valve and disconnect the hot and cold water supply lines. You’ll also need to remove the existing faucet. Once these steps have been completed, you can begin installing the new sprayer. Make sure you have all the necessary tools and materials on hand before beginning the installation process. It’s also important to read and follow the installation instructions carefully to ensure a successful installation. Finally, after you have installed the faucet sprayer, you’ll need to test it and make sure it is working properly.
Installing the Faucet Sprayer
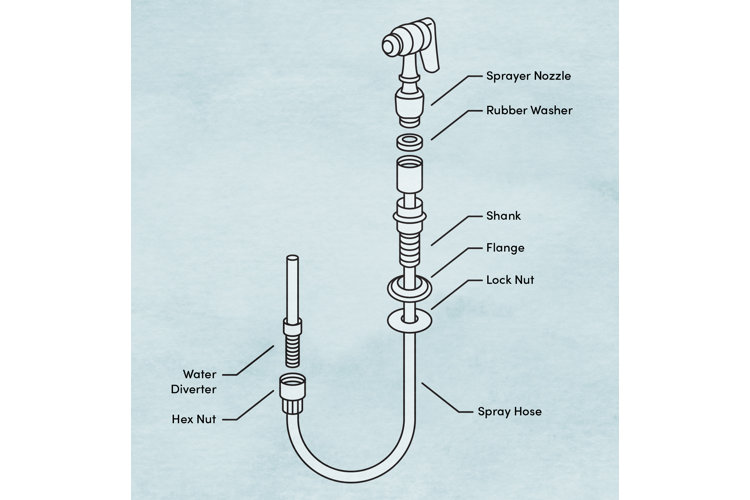
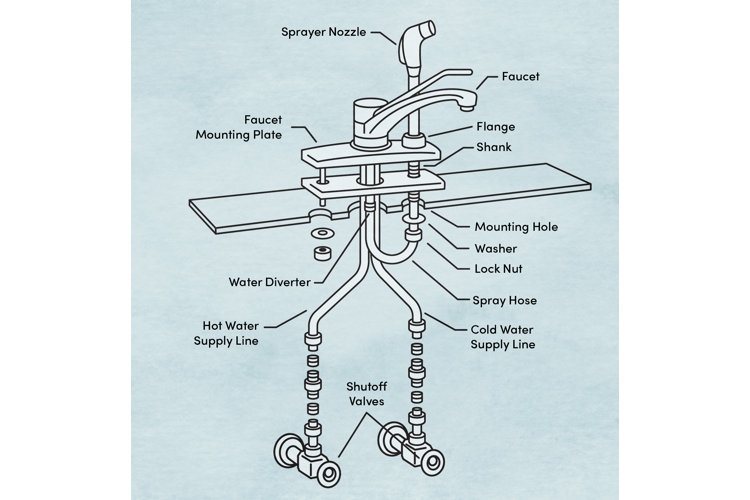
Installing a kitchen faucet sprayer is a relatively straightforward process, but there are some important steps to take to ensure a secure and successful installation. The first step is to assemble the faucet sprayer and attach it to the faucet. This is generally done by unscrewing the aerator from the faucet and then screwing in the faucet sprayer in its place. Once the faucet sprayer is securely attached, the next step is to attach the water supply line to the faucet sprayer. This is done by connecting the water supply line to the faucet inlet with a compression nut. Once the water supply line is connected, the final step is to turn on the water supply and flush out any air in the line. After this is done, the faucet sprayer is ready to be used with no further work required.
Connecting the Water Supply
Installing a kitchen faucet sprayer is a great way to upgrade your kitchen. Before you begin, make sure you have all the necessary components and tools. The most important part of the installation is connecting the water supply.
First, you’ll need to turn off the water supply. It’s important to shut off the water supply both at the source and at the shut-off valve. If you’re working with an existing faucet, disconnect the water supply line from the faucet.
Once you’ve turned off the water supply, you can begin connecting the water supply. The sprayer should come with the necessary parts and instructions to make the connection. If you’re using a flexible supply line, make sure it is the correct length and securely attached to both the faucet and the shut-off valve. If you’re using a rigid supply line, use a wrench to tighten the fittings.
Make sure to check for leaks after the installation is complete. If there are any, tighten the connections and check again. Once the water supply is securely connected, you’re ready to install the sprayer.
Testing the Sprayer
Once you have successfully installed your kitchen faucet sprayer, it is important to test it out to make sure it is working properly. Start by turning the water supply off. Next, turn on the faucet and check for any water leaks. If any leaks are present, make sure to tighten the connections. If there are no leaks, turn on the sprayer and check for any water pressure loss. Make sure the water pressure is equal and the sprayer is working properly. Test the sprayer by trying out different settings, like a wide spray, a narrow spray, and a pulsing spray. Make sure to check the temperature of the water that comes out, too. If you are satisfied with how the sprayer is performing, turn the water supply back on and enjoy your newly installed kitchen faucet sprayer!
Caring for and Maintaining Your Faucet Sprayer
Installing a kitchen faucet sprayer is a simple way to update the look and feel of your kitchen. A faucet sprayer can make daily tasks like rinsing dishes and filling pots easier to manage. Once installed, your faucet sprayer will need to be maintained to ensure it continues to work properly. Here are some tips for how to care for your new kitchen faucet sprayer.
First, regularly clean and inspect the faucet sprayer. Use a soft cloth to wipe away any dirt, dust, or debris from the sprayer and the faucet itself. Inspect the sprayer for any signs of wear or damage. If you notice any leaks or cracks, it’s important to replace the sprayer immediately.
Next, ensure the sprayer is connected properly to the water supply. If you notice any leaks or issues with the water supply, it’s essential to call a plumber to diagnose and repair the problem.
Finally, change the water filter regularly. Depending on the type of water filtration system you have, the filter may need to be changed as often as every six months. A clogged filter can cause water pressure issues, leading to a poor spray performance.
By following these tips, your kitchen faucet sprayer should remain in good condition for years to come. Taking the time to maintain your faucet sprayer will help you make the most of your investment, and it could even save you money on costly repairs.
FAQs About the How To Install A Kitchen Faucet Sprayer
Q: What tools will I need to install a kitchen faucet sprayer?
A: You will need a adjustable wrench, screwdriver, plumbers tape, and silicone grease.
Q: How do I connect the water supply lines to the faucet sprayer?
A: You will first need to turn off the water supply to the faucet, then you can connect the water supply lines to the faucet sprayer using the adjustable wrench and screwdriver.
Q: How do I check for leaks after the installation is completed?
A: You should turn the water back on and inspect the connections for any leaks. If there are any leaks, use the plumbers tape and silicone grease to tighten the connections and prevent any further leaking.
Conclusion
Installing a kitchen faucet sprayer is a relatively simple project that can be completed in just a few minutes. All you need is a few basic tools and supplies, and you can easily replace an outdated faucet sprayer and enjoy a more functional and up-to-date kitchen. Following the steps outlined above will help you install a kitchen faucet sprayer with ease and confidence.

