Installing kitchen cabinet crown molding is a great way to add a touch of elegance to any kitchen. This type of molding, which is typically made of wood or plastic, is placed at the top of your cabinets and adds decorative detail to your kitchen. While installing crown molding can seem intimidating, it is actually a fairly simple process. With the right tools and materials, you can easily install crown molding to give your kitchen a unique and stylish look.
What is Crown Molding?
Crown molding is an attractive and visually appealing type of trim that is used to finish off the top of kitchen cabinets. It adds a touch of elegance and sophistication to any kitchen, making it the perfect choice for homeowners looking to add value to their space. Installing crown molding can be somewhat tricky, as it requires a level of precision and accuracy. However, with the right tools and materials, it is a project that can be completed in a few hours. In this article, we will provide a comprehensive guide on how to install kitchen cabinet crown molding in your home. We’ll cover the materials and tools needed, the installation process, and tips and tricks for achieving professional-looking results. By following this guide, you can ensure that your crown molding installation is perfectly finished and will last for many years.
Types of Crown Molding
Installing crown molding to kitchen cabinets can be a great way to add character and a unique touch to your cabinets. However, it is important to understand the different types of crown molding available before starting your project. There are two main types of crown molding to choose from: polyurethane and MDF.
Polyurethane crown molding is lightweight and easy to install. It is also resistant to cracking and splitting. However, it is not as durable as MDF and will require more maintenance over time. MDF crown molding is the most popular type of crown molding. It is extremely durable and easy to install, but is more expensive than polyurethane.
No matter which type of crown molding you choose, it is important to take your time and measure accurately before beginning your project. This will ensure that the crown molding will fit properly and look its best. Additionally, it is important to use the proper tools and supplies to ensure a successful installation. With the right supplies and a bit of patience, you can successfully install crown molding to your kitchen cabinets with ease.
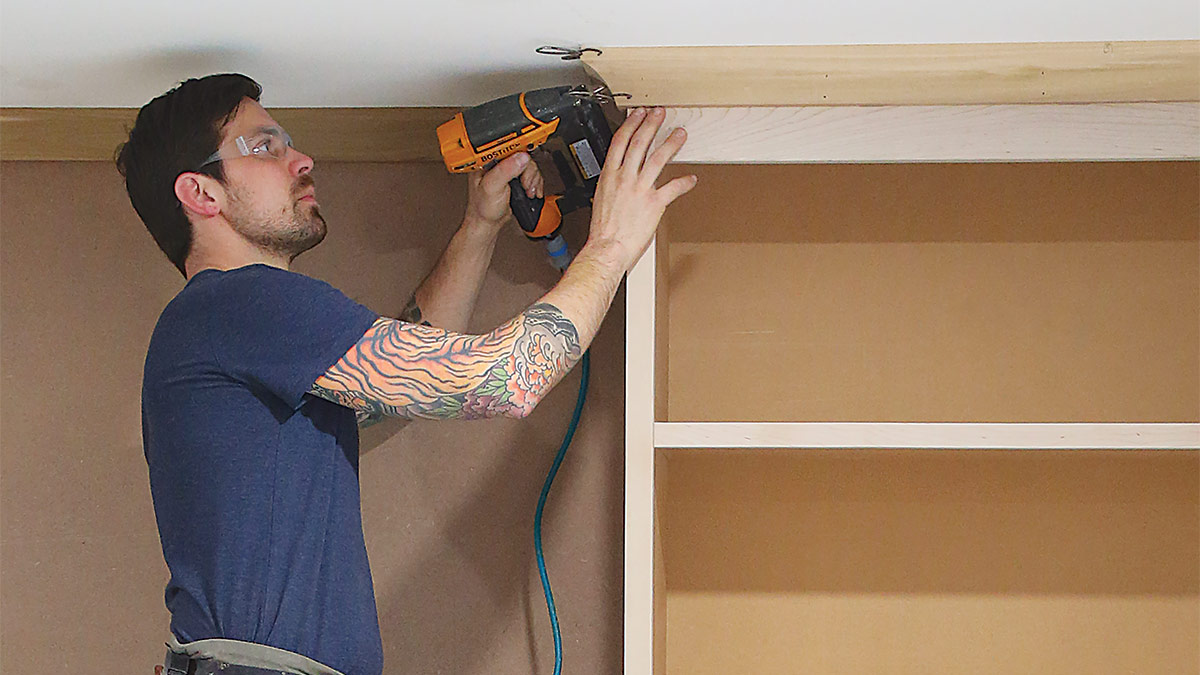
Tools & Materials Needed for Installation
Installing crown molding for kitchen cabinets adds an aesthetic touch to the room, and it’s a relatively straightforward task. But before you start the project, it’s important to know what supplies you’ll need. To install crown molding to your kitchen cabinets, you’ll need the following tools and materials: a miter saw, tape measure, level, nail gun, wood glue, wood screws, and crown molding.
The miter saw is the most important tool for this job, as it will allow you to make precise cuts for the perfect fit. Make sure you have a sharp blade, as this will help to ensure a clean cut. The tape measure and level will help you measure and ensure that each piece of crown molding is level. You’ll also need a nail gun or wood screws to attach the molding to the cabinet. Wood glue and wood screws can be used to join pieces of molding together and provide a stronger hold. Finally, you’ll need the crown molding itself. It’s important to buy the right size for your cabinets, as the wrong size could affect the overall look of the room.
With the right tools and materials, you can easily install crown molding to your kitchen cabinets. The task might seem intimidating, but with the right supplies, it’s a relatively simple job that adds a great touch to any kitchen.
Preparing the Cabinet for Installation
Installing kitchen cabinet crown molding can be a daunting task for many homeowners. However, with some preparation and the right tools, it can be done successfully. To start, it is important to ensure the cabinet is ready for installation. This includes removing any existing molding, checking for any gaps or imperfections, and sanding and priming the cabinet surface. Additionally, it is wise to measure the width of the cabinet to ensure the crown molding will fit properly. It is also recommended to ensure the crown molding is cut correctly before installation, as changing the size of the molding can be difficult. With the right preparation, the installation of kitchen cabinet crown molding can be a breeze.

Steps for Installing Crown Molding
Installing crown molding to finish off the top of your kitchen cabinets can be a daunting task. It requires precision and the right tools to make sure it looks just right. However, with the right steps and a bit of patience, you can get the job done in no time. Here are the steps for installing crown molding for your kitchen cabinets:
1. Measure the cabinet’s dimensions and calculate the needed length of crown molding.
2. Make sure that all the corners are square and the walls are plumb.
3. Cut the molding using a miter saw or other cutting tool.
4. Secure the crown molding in place with wood glue or construction adhesive.
5. Nail the molding in place with a finish nailer.
6. Fill any gaps or holes with wood putty or spackling.
7. Sand the molding to make sure it is smooth.
8. Paint or stain the molding to match the cabinet.
By following these steps, you can install crown molding to your kitchen cabinets quickly and easily. With a little bit of effort, you can create a beautiful and professional-looking finish that will make your kitchen cabinets look stunning.
Finishing Touches
When it comes to kitchen cabinetry, the finishing touches are what truly make the space stand out. Crown molding is one of the classic ways to add a touch of sophistication and elegance to your kitchen cabinets. Installing crown molding may seem intimidating, but with the right tools and directions, it can be an easy and straightforward process. Here are some tips to help you get started with installing crown molding on your kitchen cabinets.
First, make sure you have the necessary tools for the job. You’ll need a miter saw, tape measure, and clamps. Make sure you have the correct size and type of crown molding for your kitchen cabinets. Measure the cabinets and make sure the molding will fit before you begin. It’s also important to plan out the layout of the crown molding and mark off the installation points on the cabinet frames.
Next, use the miter saw to cut the pieces of crown molding to fit. Make sure all the cuts are accurate and precise. Secure the pieces of molding in place with clamps and then use a nail gun to attach the molding to the cabinets. Use wood filler to cover any nail holes and paint or stain the molding as desired.
Finally, take a step back and admire your work. Installing crown molding on your kitchen cabinets is a great way to give the room a more finished and polished look. With some patience and a few tools, you can make your kitchen look even more stunning.
Troubleshooting Common Installation Issues
Installing kitchen cabinet crown molding is a great way to add a touch of sophistication and style to any kitchen. However, the installation process can be tricky and there are several potential issues that can arise during the installation process. In this article, we will discuss the most common installation issues and how to troubleshoot them.
One of the most common installation issues is the cabinet crown molding not sitting flush. This can happen if the molding is cut too short, or if the molding is not properly supported. To prevent this issue, measure the molding properly before cutting and make sure that the molding is securely fastened.
Another common issue is gaps in the molding. This can be caused by uneven walls or by improper measuring and cutting. To avoid this, measure the wall carefully and use a level to ensure the wall is even. Additionally, double-check the measurements before cutting and use a saw or router to make any necessary adjustments.
Finally, when installing kitchen cabinet crown molding, it’s important to use the right tools and fasteners. Make sure to use a cordless drill and appropriate screws, and use a drill bit or countersink bit to ensure the fasteners fit properly.
By following these tips and troubleshooting any installation issues as they arise, you can ensure that the installation of your kitchen cabinet crown molding will go smoothly.
Maintenance & Care of Crown Molding
One of the most important steps in creating an aesthetically pleasing kitchen is installing cabinet crown molding. Crown molding is a decorative strip of wood, plastic, or metal that is used to complete the look of the kitchen cabinets. Installing crown molding adds a touch of luxury to the kitchen, and it also helps protect the cabinets from damage. But once you’ve installed it, it’s important to maintain and care for the molding so that it lasts as long as possible.
When caring for crown molding, it’s important to regularly check for any signs of damage or wear and tear. Look for chipping, cracking, or discoloration, and if you find any, you should replace the molding as soon as possible. Additionally, you should clean the molding regularly with a damp cloth and mild detergent to remove any dirt and grime.
To keep the molding looking its best, you should also apply a polish or wax to the surface every few months. This will help protect the molding from scratches and will keep it looking shiny and new. Finally, if you’re installing new crown molding, be sure to use the proper tools and techniques to avoid damaging the existing cabinets.
With the right care and maintenance, you can enjoy your beautiful kitchen cabinets with crown molding for years to come. By following these simple steps, you can ensure that your kitchen looks stunning and that your crown molding stays in good condition.
Conclusion
Installing kitchen cabinet crown molding is a great way to give your cabinets a more polished and professional look. With just a few simple tools and materials, the job can be done quickly and easily. Be sure to measure and cut carefully, and use a level to ensure the molding is installed straight and even. With a little bit of effort, you can have the kitchen of your dreams in no time.

