
Installing a kitchen island is a great way to add extra storage, workspace, and style to your kitchen. With the right tools and materials, you can easily install a kitchen island in just a few hours. This guide will walk you through the installation process step-by-step, from planning and preparation to the final touches. With a little bit of effort, you can create a beautiful and practical kitchen island that will be the focal point of your kitchen for years to come.
Determining the Necessary Supplies
Installing a kitchen island is a great way to improve the look and functionality of your kitchen. Before you start the installation process, it is important to determine the supplies and tools that you will need. To get the job done correctly, you will need the following supplies:
First, you will need the island itself. You can purchase an island from a home improvement store or online. When choosing an island, make sure it is the right size for your space and that it fits your design aesthetic.
Second, you will need to choose the type of countertop that you want for the island. This will depend on your budget, the size of the island, and your design preferences. Popular countertop materials include granite, quartz, marble, and laminate.
Third, you will need to select the type of cabinets and drawers that you will use for the island. This will also depend on the size of the island and the style of your kitchen. Cabinets and drawers come in many different materials, sizes, and colors, so you should have no problem finding something that will work for your kitchen.
Finally, you will need to purchase the necessary hardware to install the island. This includes screws and anchors that will help secure the island to the wall. You will also need to purchase the hinges and knobs to create the drawers and cabinets.
By determining the necessary supplies and tools ahead of time, you can make sure that your kitchen island installation goes smoothly.
Preparing the Room for Installation
Installing a kitchen island is a great way to add some extra space to your kitchen, but it can be an intimidating project for even the most experienced home DIYer. Before you start the actual installation process, there are a few steps you should take to ensure a successful installation. Preparing the room for installation is a critical step in the process and will ensure that you have the best possible experience.
Start by measuring the dimensions of your kitchen to make sure the island will fit. Measure the length, width, and height of the space you have available, and use the measurements to find an island that fits the space. Make sure that the island will fit through any doorways or narrow hallways that it needs to pass through to get to the kitchen.
Next, make sure that the island is placed in a spot that has sufficient space to walk around it and that it is not blocking any air vents or outlets. If the island is too close to an outlet, you will need to install an outlet extender or a power strip. Additionally, make sure that you have enough space to open any drawers or cabinets that the island may have.
Finally, you should make sure that the island is level and secure. If the island is not level, you may need to add shims to secure it. You can also use a level and place shims underneath the island to ensure it is level. Once you have completed these steps, you can move on to the actual installation process.
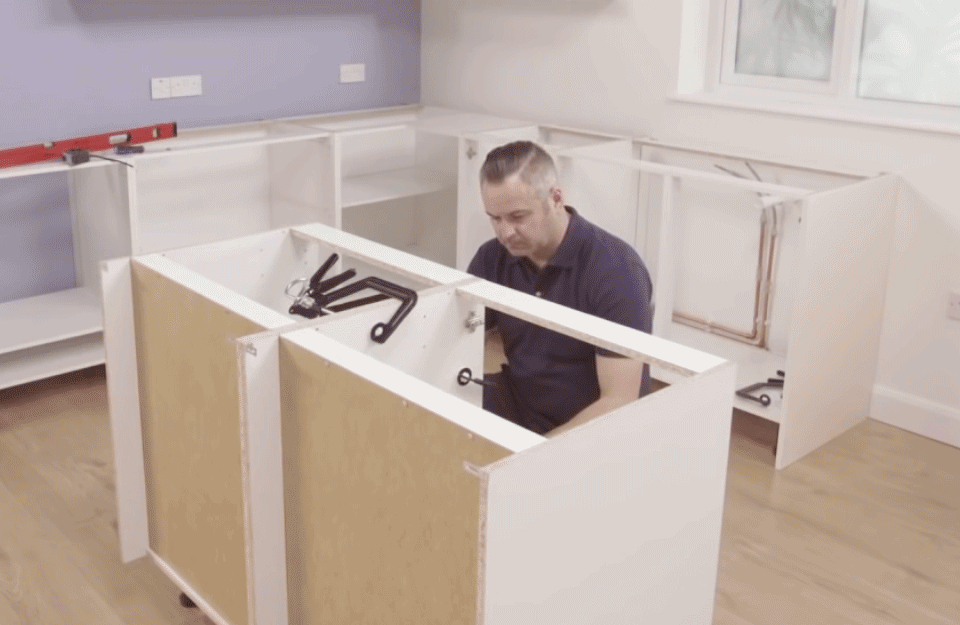
Assembling the Kitchen Island
Adding a kitchen island to your home can be a great way to create more space and functionality in the kitchen. Installing a kitchen island is a relatively simple process, but it is important to take into account the time and effort it takes to do it properly. This guide will walk you through everything you need to know about assembling a kitchen island, from the initial planning stages to the final installation.
Before starting the assembly process, it is important to make sure you have all the necessary tools and materials for the job. This includes screws, nuts, bolts, washers, and a power drill. You should also measure the space where the island will be placed, as this will determine the size and shape of the island. Once you have all the necessary supplies, you can begin the assembly process.
Start by laying out the components of the island and assembling them according to the instructions. Make sure each piece is securely fastened and aligned correctly. Then, use a power drill to attach the legs and supports. After that, install the countertop, and any other components of the island, such as drawers and shelves. Finally, attach the necessary hardware to complete the installation.
Installing a kitchen island is a great way to spruce up your kitchen and add more functionality. With a few simple steps, you can create a beautiful and functional kitchen island that will last for years to come.
Installing the Cabinetry
Installing a kitchen island can be a great way to add more storage and workspace to your kitchen. But first, you need to make sure the island’s cabinetry is installed correctly. In this blog, we’ll explore the steps you need to take to ensure your island’s cabinetry is properly installed.
Begin by gathering your supplies: cabinet screws, a drill, a level, and a stud finder. Once you have everything, measure the area where the cabinets will be installed. This will help you ensure that the cabinet is level and secure once it’s installed. Next, mark the wall studs with a pencil. This will make it easier to attach the cabinets to the wall.
Now it’s time to install the cabinets. Start by attaching the upper cabinets to the wall studs. Make sure to use long cabinet screws to ensure a strong connection. Once the upper cabinets are in place, move on to the lower cabinets. Make sure to use a level to ensure everything is lined up. Once the lower cabinets are in place, you can move on to installing the countertop.
Connecting the Island to the Plumbing
Installing a kitchen island is a great way to add style and functionality to any kitchen. Connecting the island to the plumbing is an important step in the installation process. Depending on the type of island you have, you will need to run new plumbing lines from the main line or connect the island to existing water and drain lines.
To connect the island to plumbing, you will need to first shut off the main water line. Next, you will need to determine the type of plumbing lines that will be used for the island. Depending on the type of island, you may need to use PVC pipes, copper pipes, or other materials. Once you have determined the type of plumbing lines you will use, you will need to measure and cut the pipes to size.
Once the pipes are cut to size, you can then begin the installation process. You will need to attach the supply lines to the island. This will involve attaching fixtures such as a faucet and sink. You will also need to attach the drain lines to the island. This will involve connecting the drain lines to the main drain line.
Once all of the plumbing is connected, you will need to check for leaks. If there are any leaks, you will need to repair them before continuing with the installation process. Once all of the plumbing is secure, you can then turn the main water line back on.
FAQs About the How To Install Kitchen Island
1. Do I need professional help to install a kitchen island?
No, you can install a kitchen island yourself. However, it is important to read and follow the instructions included with the island and to seek professional help if needed.
2. What tools do I need to install a kitchen island?
You may need a drill and drill bits, screwdriver, hammer, level, and other basic tools. The exact tools needed will depend on the type of island you are installing.
3. What are the steps for installing a kitchen island?
The steps can vary depending on the type of island you are installing but typically include: selecting the right spot, assembling the island, connecting plumbing and electrical, and securing the island to the floor.
Conclusion
Installing a kitchen island is a great way to add extra storage and counter space to your kitchen. With the right preparation and tools, you can easily install a kitchen island and enjoy its many benefits.

