Installing a kitchen sink drain can be a daunting task for even the most experienced DIYer. However, if you take the time to properly prepare and follow some basic steps, you can easily complete the project in a few hours. The installation process involves attaching the drain pipes to the sink, connecting the pipes to the disposal and vent, and caulking the drain to the sink. Once the drain is installed, you can enjoy a functioning sink for years to come.
Gather the Necessary Tools
Installing a kitchen sink drain is a relatively simple task, but it does require the right tools. To accomplish this job, you will need a set of adjustable pliers, an adjustable wrench, a bucket, some pipe-thread tape, a putty knife, and a basin wrench. Each of these tools is essential for completing the job safely and efficiently. The adjustable pliers will help you loosen and tighten nuts and bolts, while the adjustable wrench will be used to ensure that the connections are secure. A bucket will be needed to catch any excess water, and the pipe-thread tape will help prevent any leaks. The putty knife will be used to apply the plumber’s putty, while a basin wrench will help you attach the faucet to the sink. With these tools in hand, you are ready to begin the installation process.
Remove the Existing Drain
Removing the existing drain is the first step to installing a new kitchen sink drain. Before you start, you’ll need to make sure that you have the right tools to do the job. You’ll need a basin wrench, pliers, and a screwdriver. Start by turning off the water supply to the sink. Next, take off the old drain, making sure to use the basin wrench to loosen the nuts and bolts. Then, using the pliers, unscrew the drain trap from the sink drain. Finally, remove the sink strainer by using the screwdriver to unscrew the screws that hold it in place. Once the old drain is removed, you can begin to install the new one.
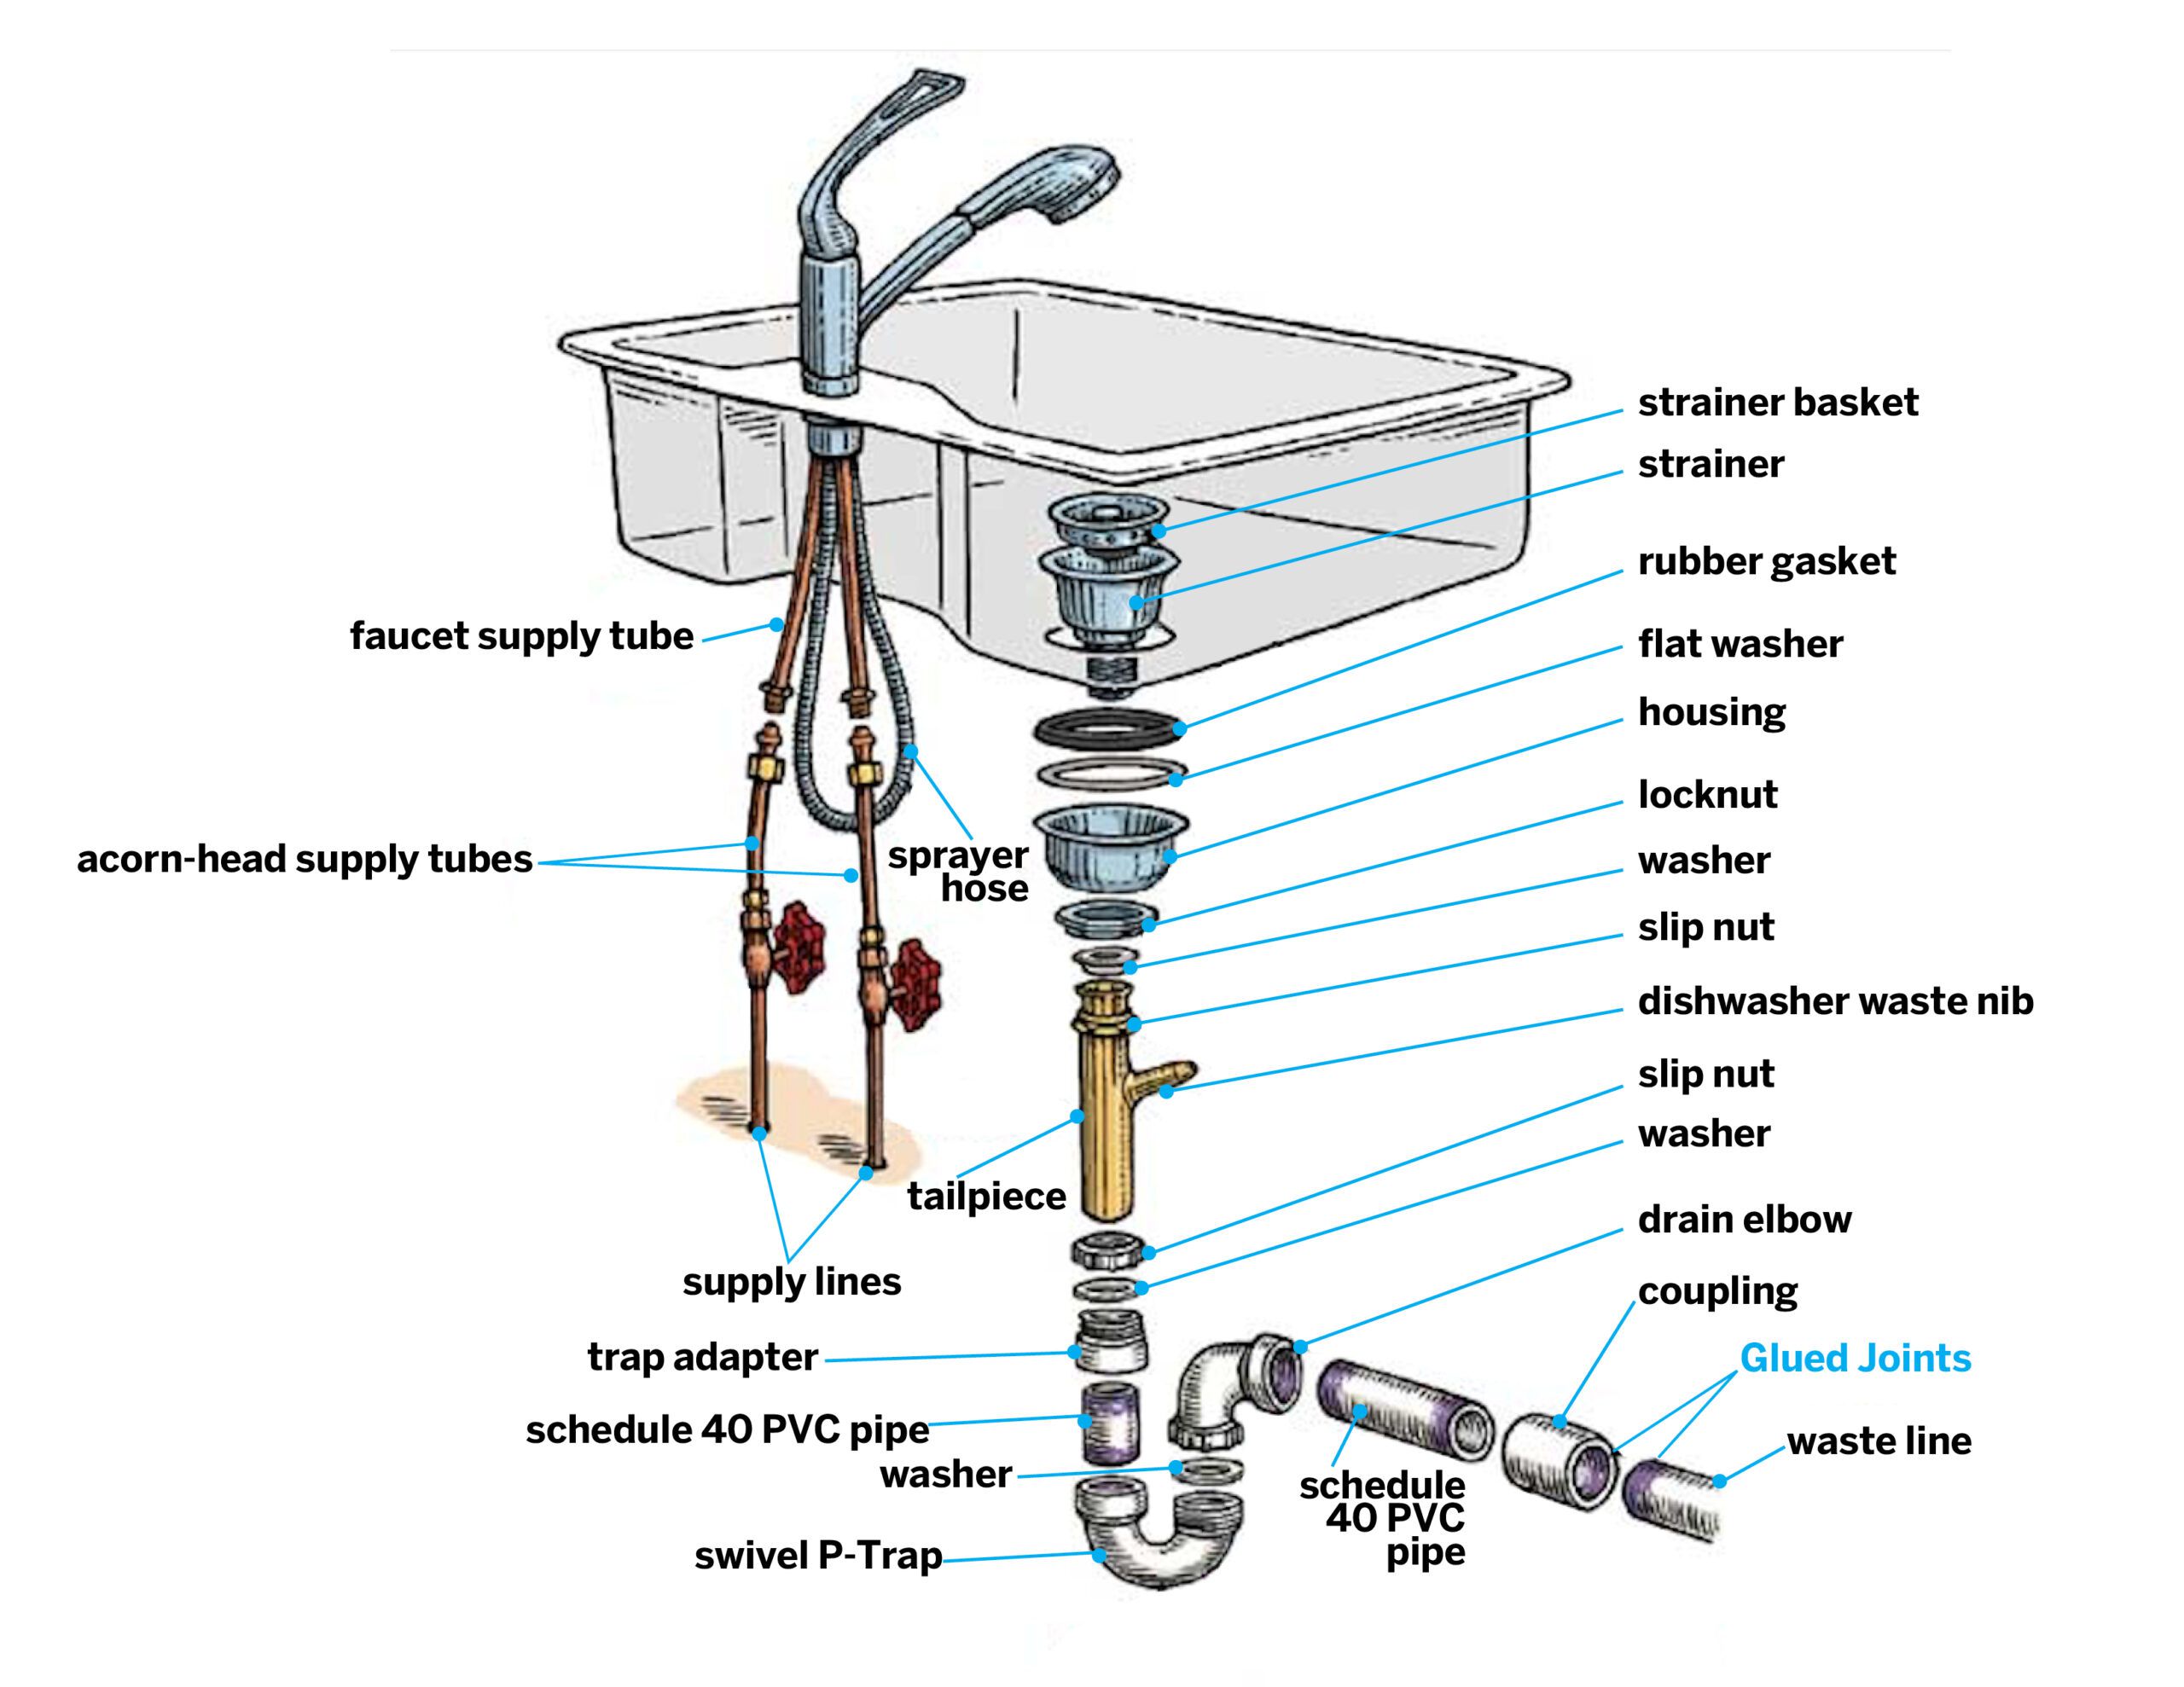
Install the P-Trap
Installing a new kitchen sink drain can be a daunting task for homeowners, but it doesn’t have to be. With the right tools and a few simple steps, you can easily install a kitchen sink drain in no time. One of the key components of a kitchen sink drain is the P-trap, which is the curved pipe that connects the sink drain to the drainpipe. Installing the P-trap is a relatively simple process, but it’s important to do it correctly so that your sink will function properly.
To install the P-trap, start by attaching the slip joint nuts to the bottom of the sink drain. Then, slide the P-trap onto the tailpiece of the sink drain. Secure the P-trap to the tailpiece using the slip joint nuts. Make sure to apply a generous amount of plumber’s putty to the underside of the sink drain to ensure a watertight seal. Next, attach the P-trap to the drainpipe using the slip joint nuts and washers. Finally, tighten the slip joint nuts with a wrench to complete the installation.
Installing a kitchen sink drain doesn’t have to be hard. With the right tools and a few simple steps, you can easily install the P-trap and have your sink functioning properly in no time.
Connect the Drain Pipe
Installing a kitchen sink drain is a relatively simple process, but it requires a few specific steps to ensure that it fits properly and functions correctly. Once you have gathered all the necessary supplies and tools, the next step is to connect the drain pipe. To do this, you will need to use a pipe wrench and some plumber’s putty. First, take the drain pipe and attach it to the tailpiece of the sink. Make sure that the connection is secure and that there are no gaps or air leaks. Once the pipe is secure, use the plumber’s putty to seal the connection. Finally, use the pipe wrench to tighten the connection, ensuring that the drain pipe is secure and ready for use. With these steps, your kitchen sink drain is now ready to be used.

Connect the Disposal
Installing a kitchen sink drain can be a daunting task, but with the right tools and supplies, it can be a breeze. One of the most important steps of installing a kitchen sink drain is connecting the disposal. The disposal is an important component of the kitchen sink drain, as it helps to break down food and other items for easy disposal. Before connecting the disposal, you should turn off the power to the sink and make sure the area is clear. Once the area is clear, you should check the sink for any obstructions and disconnect the old disposal, if necessary. Once the old disposal is disconnected, you can begin connecting the new disposal. To do this, you should use a putty knife to apply the plumber’s putty around the sink drain flange. Place the disposal into the hole, then run the discharge tube to the tee fitting. Secure the disposal with the mounting screws, then attach the discharge tube to the sink drain using the slip nut and washer. Finally, turn the power back on and test the disposal to make sure it is working properly. With the right supplies and a few simple steps, you can quickly and easily install a kitchen sink drain and have your kitchen sink up and running in no time.
Install the Faucet
Installing the kitchen sink faucet is the next step in completing a sink drain installation. Before you begin, make sure to gather all the necessary tools and materials, such as a basin wrench, plumber’s putty, and mounting hardware. Also, it’s important to measure the distance between the sink and the wall to ensure the faucet will fit properly.
Start by placing the faucet in the sink. Then, secure it with the mounting hardware, using the basin wrench to tighten the bolts. Finally, apply the plumber’s putty around the base of the faucet before securing it to the sink. Make sure to follow the instructions included with the faucet for a successful installation.
Once the faucet is installed, you can attach the sink drain. If all the steps have been followed correctly, you should have a fully functioning sink drain. Installing a kitchen sink drain and faucet may seem daunting, but with the right tools and instructions, it can be a relatively simple process.
FAQs About the How To Install Kitchen Sink Drains
1. What tools are needed to install a kitchen sink drain?
A: You will need a drain tailpiece, a drain basket, a drain stopper, a plumber’s putty, a pipe wrench, an adjustable wrench, and a pair of pliers.
2. How do I connect the drain pipes to the sink drain?
A: First, connect the tailpiece to the sink drain and secure it with the pipe wrench. Next, connect the drain basket to the tailpiece and secure it with the adjustable wrench. Finally, connect the drain stopper to the basket and secure it with the pliers.
3. Should I use a plumber’s putty when installing a kitchen sink drain?
A: Yes, the plumber’s putty should be used to ensure a tight seal between the sink drain and the tailpiece.
Conclusion
Installing kitchen sink drains may seem like a daunting task, but with the right tools and instructions, you can do it yourself in no time. With this step-by-step guide, you will be able to easily install your own kitchen sink drain without any complications. It is important to ensure that the drain fittings are properly connected and secured and that you use the right materials for the job. With a bit of patience and the right tools, you can install your kitchen sink drain in no time.

