
Kitchen drawers are an essential part of any kitchen design and can make it easier to store and organize your kitchen items. Making your own kitchen drawers is a great way to add personalized touches to your kitchen and make it more efficient. With a few basic tools and supplies, you can easily build your own kitchen drawers to fit any size kitchen. This guide will provide you with the step-by-step instructions to make kitchen drawers.
Tools and Materials Needed
Outfitting your kitchen with drawers is an excellent way to maximize storage space. But before you can install drawers, you’ll need to know what tools and materials you’ll need. To make your drawers, you’ll need a saw, a drill, wood screws, wood glue, drawer slides, and wood for the drawer boxes.
A saw is necessary to cut the pieces of wood for the drawer boxes. You’ll need a drill to bore holes for the drawer slides and wood screws. Wood screws and wood glue will be used to attach the sides of the drawer boxes to the front and back panels. Drawer slides attach the drawer boxes to the cabinet frame and provide a smooth, effortless pull. Last but not least, you’ll need to select the type of wood for your drawer boxes. Consider the style of your kitchen when selecting wood. Maple, oak, and cherry are popular options.
Once you’ve gathered the necessary tools and materials, you’ll be ready to start making your kitchen drawers. With the right tools and materials, you can easily create custom drawers that will provide extra storage and a touch of style to your kitchen.
Preparing the Drawer
Preparing the drawer is an essential step before you begin to make kitchen drawers. First, start by measuring the space for the drawer, and then cut a piece of wood to fit the desired measurements. Following that, you should determine the desired height, depth, and width of the drawer. Once the measurements are taken, use sandpaper to smooth out the edges and surfaces of the wood. Mark and drill holes for the drawer slides, and use the screws to attach them to the frame of the drawer. Now, you are ready to assemble the drawer and attach the pulls and handles.
When making kitchen drawers, it is important to remember to account for space when measuring and cutting the wood. Additionally, be sure to use quality wood, materials, and screws to ensure the drawer is both secure and long-lasting. It is also important to use sandpaper to smoothen the edges and surfaces to avoid splinters and scratches. Finally, be sure to attach the drawer pulls and handles properly to ensure the drawer can open and close without difficulty. With these tips, you should be able to make beautiful and functional kitchen drawers!
Installing the Drawer Glides
If you want to make the most of your kitchen drawers, installing the drawer glides is an important step. Drawer glides provide support and stability to drawers while also ensuring they open and close smoothly. Installing drawer glides in your kitchen drawers can be a straightforward process, but it’s important to make sure you have the right tools and materials to complete the job.
First, you’ll need to make sure you have the right drawer glides for your drawers. Take measurements of the inside of the drawer and compare it to the size of the drawer glides you have. It’s important to make sure the drawer glides fit the drawers perfectly. Once you have the right glides, you can attach them to the drawer.
Next, you’ll need to attach the drawer glides to the cabinet. Make sure to measure the distance the glides need to extend to ensure the drawer will fit properly when closed. Once you have the measurements, you can use glue or screws to attach the glides to the cabinet.
Finally, you’ll need to attach the drawer to the glides. Use the screws provided with the drawer glides to attach the drawer to the glides. Make sure the drawer is level and secure before you close the drawer.
Installing drawer glides in your kitchen drawers is a simple process that can help make your kitchen drawers more efficient and easier to use. With the right supplies and a few simple steps, you can make sure your kitchen drawers are safe and secure.
Attaching the Drawer Face
The drawer face is the most visible part of a kitchen drawer, so it is important to get it right! Before attaching the drawer face to the drawer box, you need to make sure that the drawer box has been properly aligned and secured in its place. Once the drawer box is in position, you can start attaching the drawer face with screws. To do so, you first have to measure the thickness of the drawer box and then use a jig saw to cut to the right size. Once the size is cut, you can attach the drawer face with screws, making sure to keep it level and secure. Finally, you can add handles and knobs to give your kitchen drawer a finished look. With these steps, you can easily attach the drawer face and enhance the look of your kitchen.
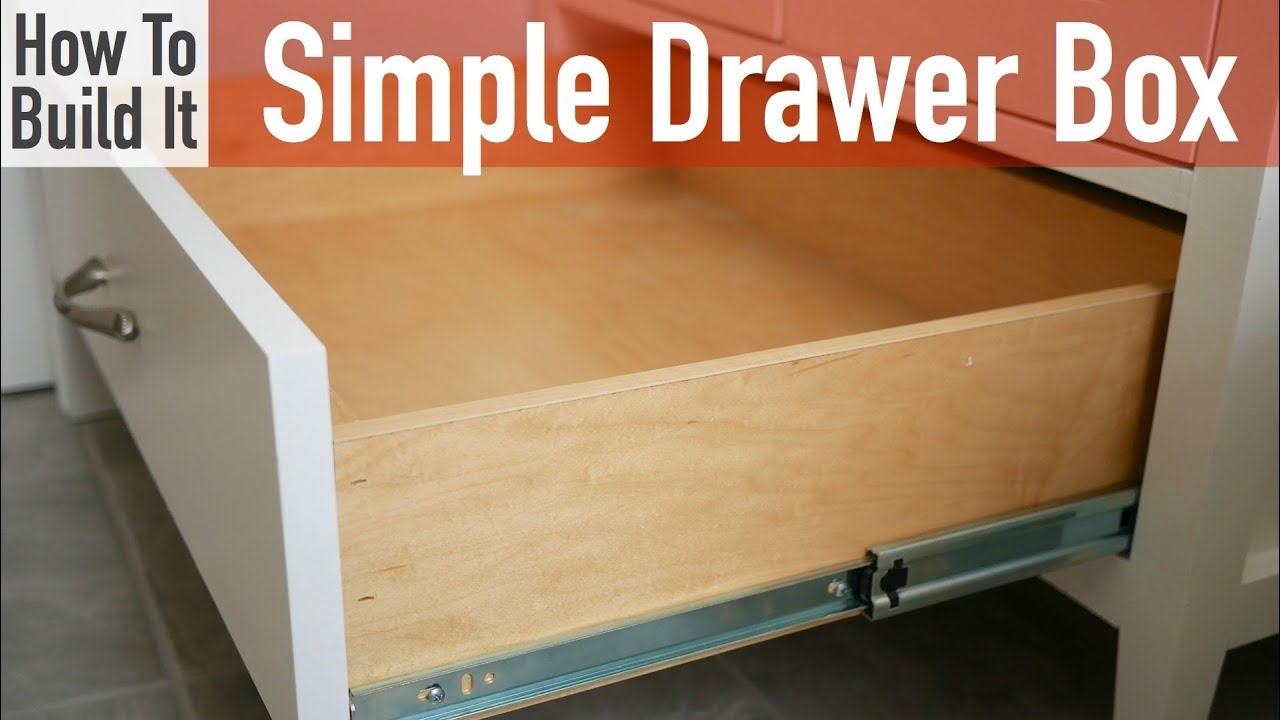
Making the Drawer Box
From the outside, kitchen drawers look like simple boxes. But, they are actually a complex construction made up of multiple parts. To make a drawer, you will need to assemble the sides, bottom, back, and optional front of the drawer box.
Start by measuring and cutting the sides of the drawer box. Plywood or MDF is the most common material used for drawer boxes. The sides should all be cut to the same size and have rabbets cut into the back side for the back panel of the drawer.
Next, attach the bottom panel to the sides. You can use either nails or screws for this step. Make sure the bottom panel is flush with the sides and back for a perfect fit. If you plan to add drawer slides, you may need to drill holes for the slides in the sides.
Then, attach the back panel to the sides. This step must be done carefully to ensure the back panel is straight and flush with the sides. If the back panel isn’t flush, the drawer box won’t fit correctly.
Finally, you can add a solid wood front panel to finish the drawer box. This is optional, as you can just leave the drawer box open. If you do choose to add a front panel, you’ll need to drill holes in the panel for the drawer pulls.
With a few simple steps, you can make a strong and durable kitchen drawer box.
Finishing the Drawer
Finishing the drawer is the final step in making a kitchen drawer. This involves putting a protective finish on the drawer to prevent damage. There are a few options for this. One option is to use a clear sealer. This will help protect the wood and make it look more attractive. Another option is to use a stain or paint for a more decorative look. It’s important to choose the right finish for the type of wood and the look you’re going for. Applying the finish can be done with a brush or a spray gun. Make sure to apply the finish evenly and use multiple coats for the best protection. Finally, it’s important to let the drawer dry completely before putting it in the kitchen. With the right finish, your kitchen drawers will look great and last for years to come.
Installing the Drawer
Installing the drawer is one of the most important steps in making a kitchen drawer. It’s a process that requires precision and careful attention to detail. To ensure a successful installation, you’ll need to follow a few simple steps. First, measure the available space for the drawer and determine the type of drawer slides that will be used. Next, mark the appropriate measurements on the drawer and prepare the drawer slides for installation. After that, attach the drawer slides to the drawer and the cabinet. Finally, test the drawer for proper operation and secure any remaining hardware. If you do not feel comfortable completing this task, enlist the help of an experienced carpenter or contractor. With the right supplies, careful preparation and the right tools, anyone can successfully install kitchen drawers.
Troubleshooting and Maintenance
Kitchen drawers can be a great way to maximize the storage and organization potential of any kitchen. But, like any piece of furniture, they require regular maintenance and troubleshooting. To ensure your drawers are working optimally, there are a few things to watch out for. One of the most common issues is drawer jamming. If your drawers aren’t gliding smoothly, check to make sure nothing is blocking the movement of the tracks. Additionally, if your drawers are not aligned properly, they may not open or close properly. The solution is to adjust the tracks and make sure they’re level. Another issue that can arise is drawer slippage. If your drawer fronts are not attached properly, they may detach or fall off entirely. To fix this, make sure the drawer slides are properly aligned and that the screws are tightened securely. Finally, if your drawers are loose or wobbly, check to make sure the screws are tightened adequately.
By taking the time to troubleshoot and maintain your kitchen drawers, you can extend their life and enjoy their functionality for years to come.
Conclusion
Making kitchen drawers is an easy project for the DIY enthusiast. With basic tools, some wood and a few hours of your time, you can create a beautiful and functional kitchen drawer. You simply need to measure and cut the wood to size, assemble the drawer using glue and screws, and add the drawer slides and handles. With a few simple steps, you can make a custom drawer that will look great in your kitchen and last for years to come.

