Plumbing a kitchen sink can seem like an intimidating task, but with the right tools and a little know-how, it can actually be quite simple. In this guide, we will walk you through the steps of how to plumb a kitchen sink, from choosing the right parts to connecting the drain to the wall. By the end, you’ll be ready to tackle this project with confidence.
:max_bytes(150000):strip_icc()/how-to-install-a-sink-drain-2718789-hero-24e898006ed94c9593a2a268b57989a3.jpg)
Preparing for Installation
Installing a kitchen sink is a job that can be done by anyone with some basic DIY skills and the right tools. Before beginning the installation process, it is important to properly prepare for the job. This includes gathering the necessary tools and materials, making sure your plumbing is up to code, and ensuring that you have the necessary space and clearance for the sink.
First, check that your plumbing is up to code and that you have the necessary water supply lines and drains. If any of these need to be replaced or upgraded, do this before beginning the installation process. Next, measure the area where the sink will be installed, and make sure that there is enough space and clearance for the sink. You should also gather all the necessary tools and materials for the job, including a shut-off valve, a supply line, a drainpipe, a P-trap, a sink strainer, putty, and plumber’s tape. Once you have all the tools and materials ready, you are ready to begin the installation process.
Measuring for the Sink Cutout
Getting the right fit for your kitchen sink is essential for a successful installation. To achieve this, it’s crucial to measure for the sink cutout with precision. There are several key measurements to consider, and once you have them all, you’ll be able to cut the countertop opening with confidence.
When measuring for the sink cutout, it’s important to take into account the size of your cabinet, the position of the sink on the countertop, the existing plumbing, and the size of the sink itself. First, measure the inside of your cabinet. This will give you the maximum size of the cutout. Then, measure the space between the sink and any surrounding fixtures. This will help you figure out the best position for the sink on the countertop.
Next, measure the existing plumbing to ensure that the sink will fit in the space. Measure the length and width of the sink, and add an extra two inches on each side. This will help you determine the size of the sink cutout. Finally, mark the countertop where you’d like to place the sink cutout. Use a straight edge to draw a square or rectangle, and use a jigsaw to cut out the shape.
By following these steps to measure for the sink cutout, you’ll be sure to get the perfect fit for your kitchen sink. With accurate measurements and the right tools, you’ll be able to install your sink with ease.
Cutting the Hole in the Countertop
When it comes to plumbing a kitchen sink, the most important step is cutting the hole in the countertop. This is a job best left to a professional, as it requires a great deal of precision and accuracy. To begin, the plumber will measure the size of the sink and the countertop to ensure that the hole is the correct size. Then, they will use a circular saw, jigsaw, or other cutting tool to carefully cut the hole in the countertop. If the sink has two basins, the plumber will then need to ensure that the two basins are cut at the correct distance apart. Once the hole is cut, the plumber will then need to seal the edges so that no water is able to escape. Finally, the plumber will install the sink and ensure that all the pipes and connections are secure. By taking the time to properly cut the hole in the countertop, a plumber can ensure that the kitchen sink will be installed correctly and safely.
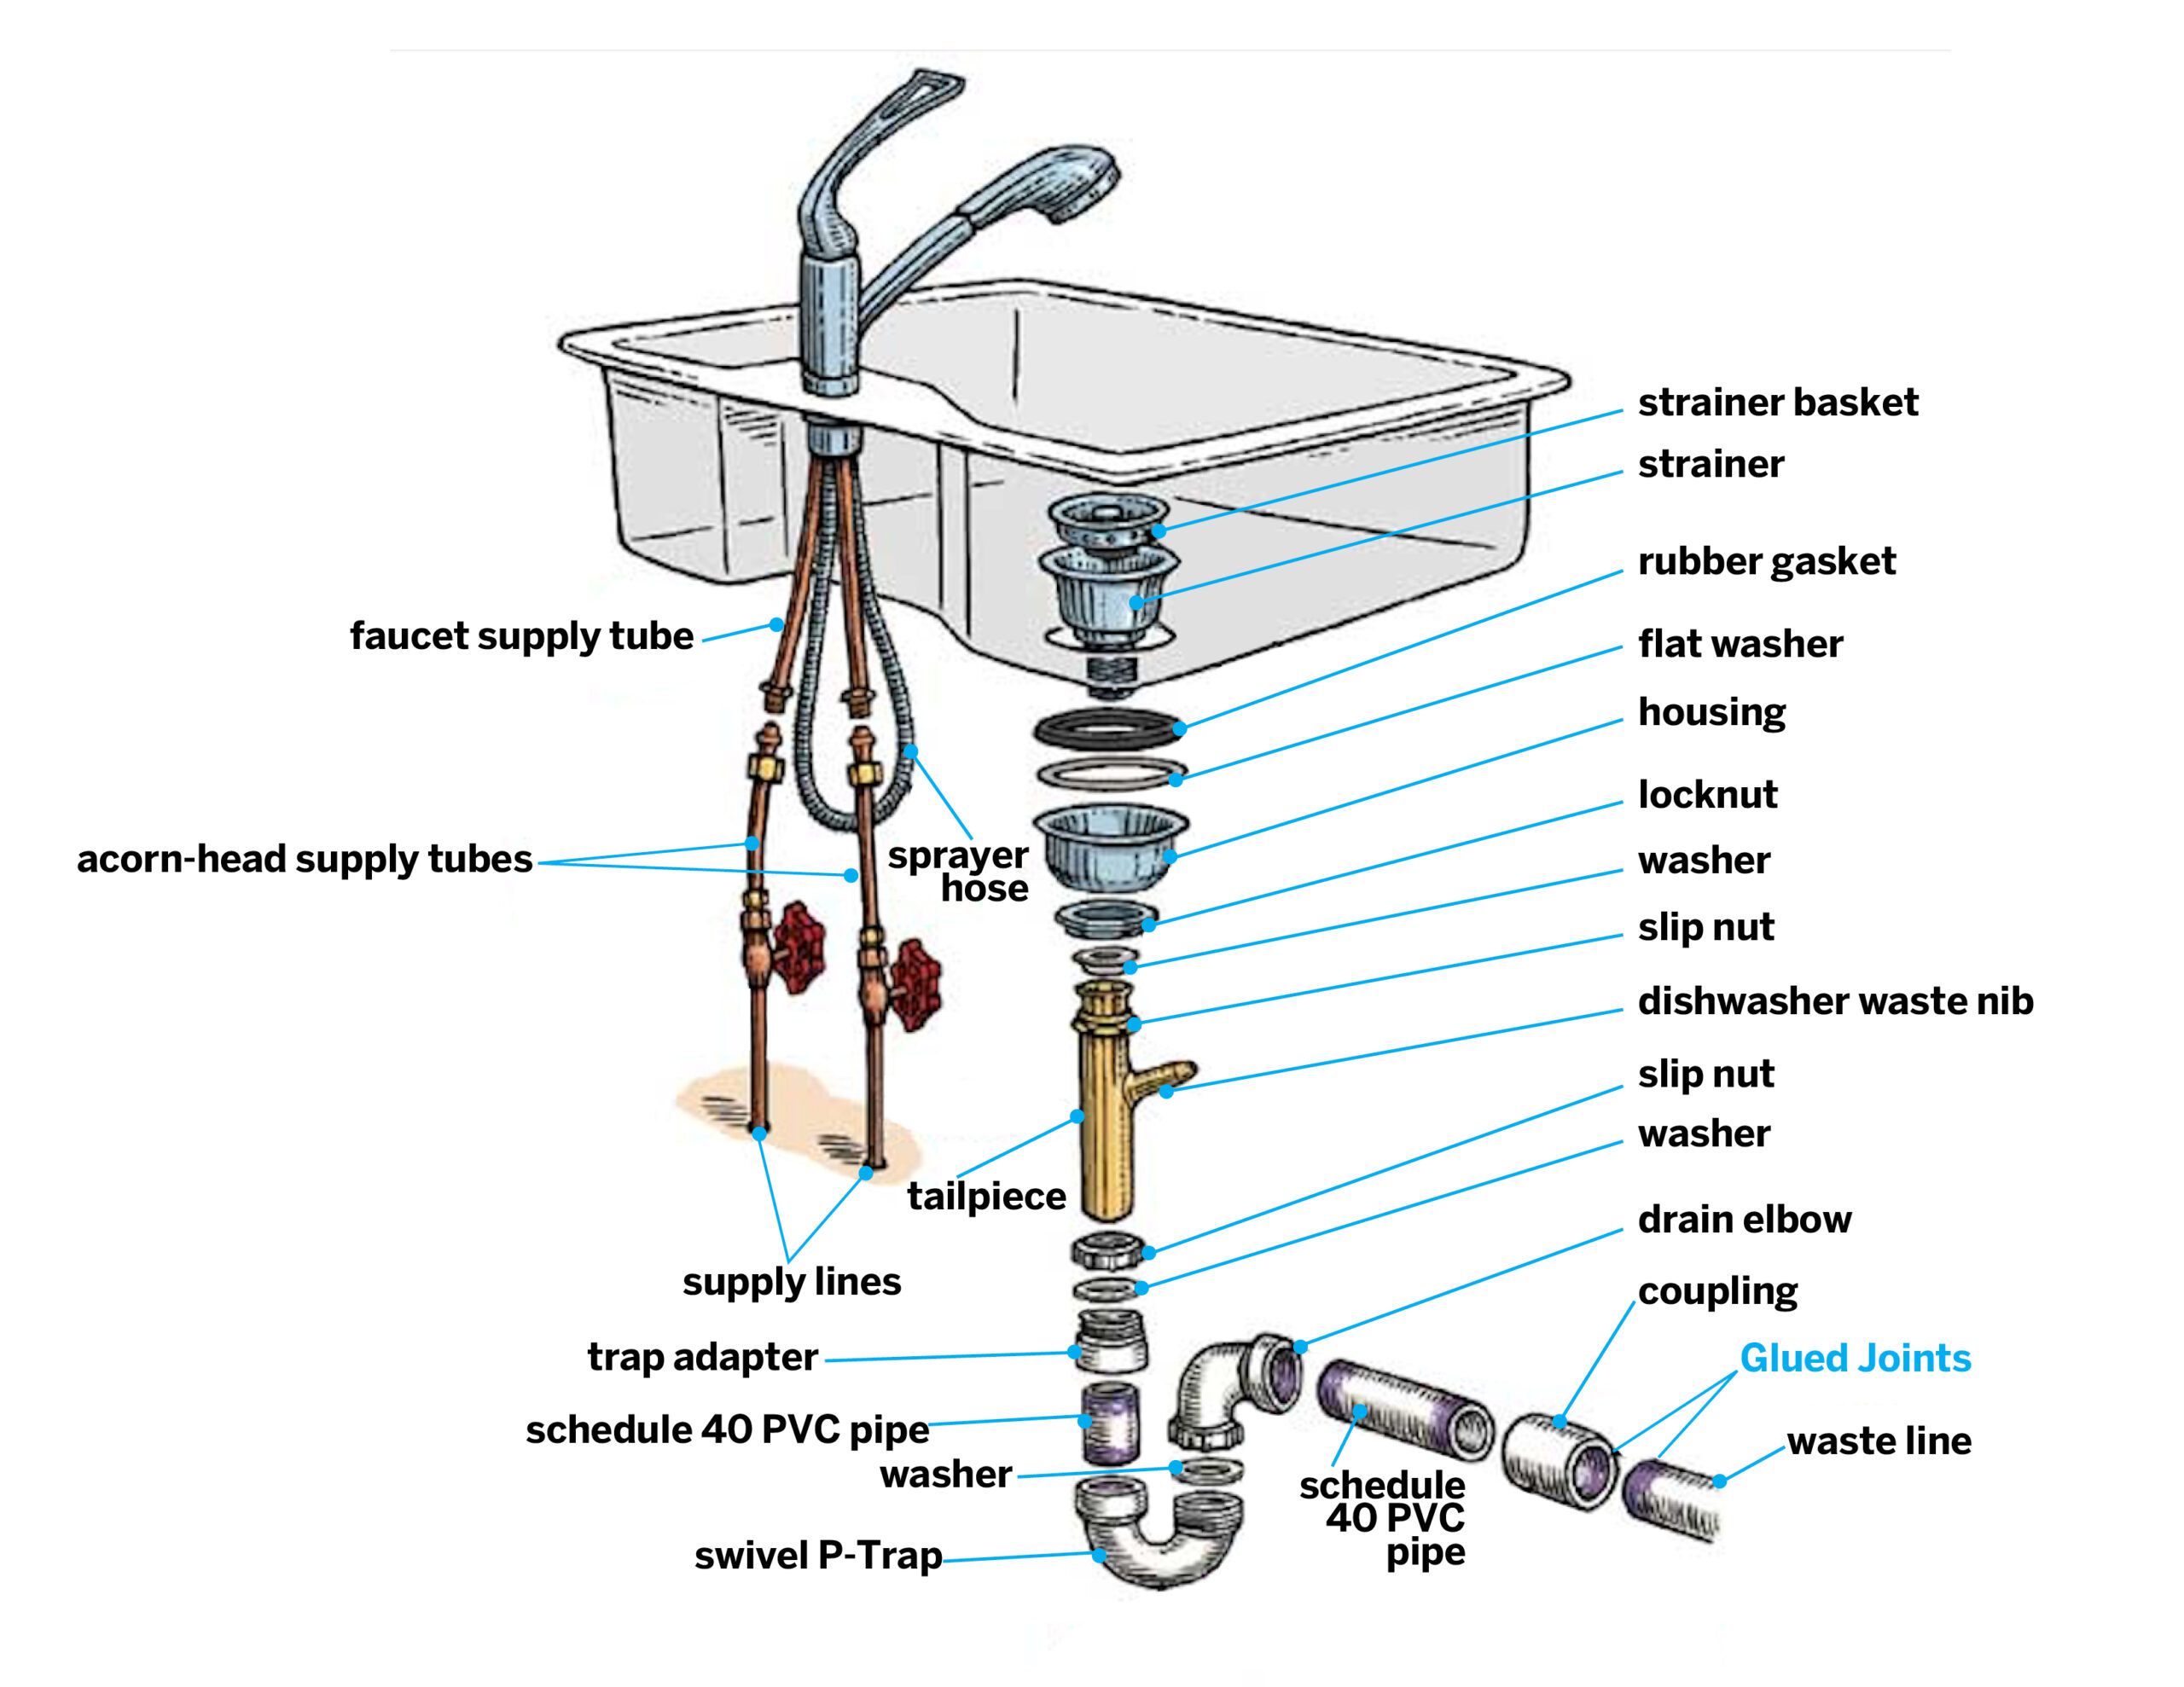
Connecting the Faucet and Drain
Plumbing a kitchen sink is an important task that requires the right parts, tools, and knowledge to do it properly. To ensure a successful installation, it’s essential to understand how to connect the faucet and drain. The faucet is the main tap that controls the water flow, while the drain is what takes the water out of the sink. Connecting these two components can be a bit tricky but with the right guidance, it’s possible to do it correctly.
First, it’s important to make sure that the faucet and drain are compatible with one another. Different models may have different parts, so it’s important to double-check that they are compatible before starting the project. Once the parts are compatible, the next step is to assemble the faucet and drain components. Depending on the model, this may require the use of tools such as a wrench, pliers, or screwdriver. After assembling the parts, the next step is to connect the faucet and drain with the appropriate fittings and connectors.
Finally, the faucet and drain must be sealed and tested to ensure that there are no leaks. To do this, it’s important to use the appropriate plumber’s putty or caulk to create a water-tight seal. Once the seal is in place, it’s time to turn on the water and test the connection. If all goes well, the sink should be ready to use.
With the right tools, parts, and knowledge, connecting the faucet and drain of a kitchen sink is a job that almost anyone can do. It’s important to make sure that the parts are compatible, assemble the components correctly, and use the right sealants to ensure a watertight connection. Following these steps will ensure a successful installation and a properly functioning kitchen sink.
Installing the Sink
Installing the kitchen sink is the final step in the plumbing process. Before you begin, make sure you have all the supplies you need, such as a wrench, plumber’s putty, a hacksaw, and a bucket. Once you have everything ready, it’s time to get started. First, place the sink on a flat surface and use the template that came with it to mark the holes for your faucet and drain. Next, use a hacksaw to cut the hole in the countertop, then place the sink in the hole. Use plumber’s putty to seal the sink and make sure it is firmly in place. Finally, attach the faucet and drain pipes to the sink using a wrench. Once everything is in place, you can turn the water back on and check for any leaks. With this guide, you have all the steps you need to install your kitchen sink correctly.
Connecting the Supply Lines
Connecting the supply lines to the kitchen sink is an important step in the plumbing process. It is important to understand the components needed, the materials used, and the steps involved. Knowing how to properly plumb the kitchen sink will help ensure a successful installation.
Materials such as copper, plastic, and flex lines are used for the supply lines. Copper is the most durable and long-lasting option, but it can be more expensive. Flex lines are a good option for areas that are difficult to access, while plastic is the least expensive and easiest to use.
The first step in connecting the supply lines is to attach a shutoff valve to the cold and hot water supply lines. This will allow you to shut off the water if there is a leak or other issue. The next step is to attach the supply lines to the shutoff valves. It is important to make sure the connections are tight and secure.
Once the supply lines are connected, the next step is to attach them to the kitchen sink. It is important to make sure the connections are secure and the lines are not twisted. Then, connect the drain line to the sink. Finally, turn on the water to check for leaks.
Plumbing a kitchen sink can be a daunting task, but it is important to take the time to understand the components, materials, and steps involved. By following these steps, and taking the time to make sure the connections are secure, the kitchen sink can be plumbed correctly and safely.
Final Testing and Cleanup
Once the kitchen sink plumbing is complete, it’s time for the final testing and cleanup. It is important to do a thorough test of the sink plumbing to ensure that everything works as it should. Start by turning on the faucet to test the water flow. Check for any leaks or weak points in the plumbing. If any are present, they should be addressed immediately. After the faucet test, close the sink stopper and fill the sink with water. Check the drain and garbage disposal for proper operation. If the sink isn’t draining properly, check for clogs and adjust the trap as needed. Finally, use a soft cloth to wipe away any dirt and debris that may have accumulated during the installation process.
By following these steps, you can ensure that your kitchen sink plumbing is properly installed and functioning correctly. Doing a final test and cleanup will also help ensure that your kitchen sink looks great and functions as it should. With a little patience and attention to detail, you can easily learn how to plumb a kitchen sink.
FAQs About the How To Plumb Kitchen Sink
Q1: What type of pipes should I use for a kitchen sink installation?
A1: The recommended type of pipes to use for a kitchen sink installation is PEX, PVC, or CPVC.
Q2: Do I need to use any special tools to install a kitchen sink?
A2: Yes, you will need a few basic tools such as pliers, a pipe wrench, plumber’s tape, and a hacksaw.
Q3: What type of sealant should I use to seal the joint where the sink meets the counter?
A3: The recommended type of sealant to use is silicone caulk.
Q4: Are there any special steps I should take to ensure a successful installation?
A4: Yes, you should measure the sink before you begin to ensure it fits properly and then use plumber’s putty to seal the drain before connecting the pipes.
Q5: How do I connect the water supply lines to the sink?
A5: You will need to connect the hot and cold water supply lines to the valves connected to the sink. Make sure the connections are tight and use plumber’s tape to ensure the connections are sealed.
Conclusion
Installing a kitchen sink is a relatively straightforward job that can be completed with the right tools and supplies. By following the steps outlined above, you should be able to complete the plumbing for your kitchen sink with relative ease. Once the installation is complete, be sure to check for leaks and other problems. With the right preparation and a bit of patience, you should be able to get your kitchen sink up and running in no time.

