Removing an old kitchen faucet can be a daunting task. It requires some knowledge of plumbing and the ability to work in tight spaces. This guide will provide step-by-step instructions on how to safely and effectively remove an old kitchen faucet. It includes the necessary tools and materials, a list of safety precautions, and detailed instructions for removing the faucet. With this guide, you’ll be able to safely and confidently remove your old kitchen faucet.
Tools and Materials Needed
Removing an old kitchen faucet is a task that can easily become overwhelming due to the variety of tools and materials required. Knowing which tools and materials are necessary to complete the job can make the process much simpler. To help you get started, here is a list of the most commonly used tools and materials for removing an old kitchen faucet.
Tools: adjustable wrench, basin wrench, screwdriver, pliers, putty knife, hammer, and wire brush.
Materials: replacement faucet, plumber’s tape, Teflon tape, silicone caulk, and pipe joint compound.
Having the right tools and materials on hand can make the process of removing an old kitchen faucet much easier and less stressful. Make sure to take the time to research the tools and materials required and have them all available before attempting to remove a faucet. Doing so will help ensure the job is completed in a timely and efficient manner.
Shutting Off the Water Supply
One of the most important steps when it comes to replacing an old kitchen faucet is shutting off the water supply. Before starting the removal process, you need to make sure you have properly shut off the water supply to the faucet. If you don’t, you could end up with a flood in your kitchen. To shut off the water supply, you’ll need to locate the main shutoff valve. This is usually found under the sink or in the basement. Once the water is shut off, you can begin to unscrew the faucet. Make sure to have a bucket or towel on hand to collect any water that may still be in the pipes.
Removing the Old Faucet
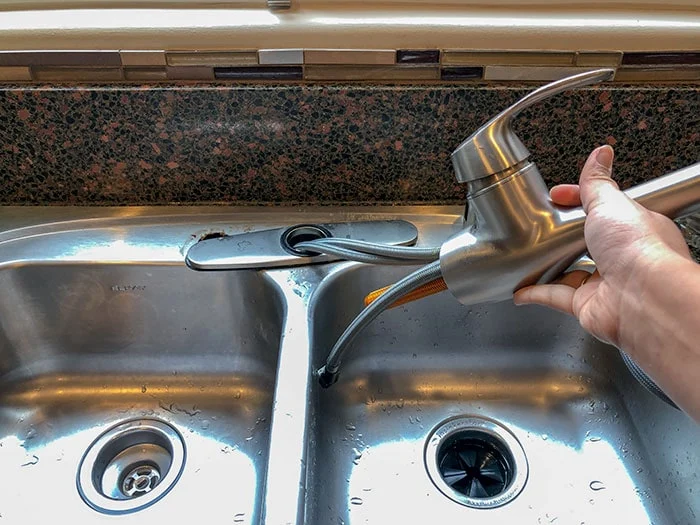
Removing the old kitchen faucet is the first step in replacing it with a new one. This process can be a bit tricky, depending on the type of faucet you have, but with the right tools and knowledge, you can easily remove the old faucet and have a new one in no time. To start, you’ll need to turn off the water supply to the faucet and then remove the mounting hardware from the sink. Next, you’ll need to disconnect the supply lines from the faucet and use a pair of pliers to loosen the retaining nuts that secure the faucet to the sink. Once the nuts have been removed, you can lift the old faucet away from the sink and dispose of it. With the old faucet gone, you’re now ready to install the new faucet, so you can start enjoying it in your kitchen.
Installing the New Faucet
Installing a new kitchen faucet is a great way to update your kitchen space. Whether you’re replacing an existing faucet or installing a completely new one, the process is relatively simple. To begin, you’ll need to remove the old faucet from its current location.
Removing an old kitchen faucet requires some basic tools and a bit of elbow grease. Start by turning off the water valves and disconnecting the supply lines. If you have an existing faucet, use a wrench to loosen and unscrew the nuts securing the faucet to the sink. Once the faucet is loose, carefully pull it away from the sink. If you’re dealing with an old faucet, you may have to use a pair of pliers to remove the mounting nuts.
Once the old faucet is removed, you’ll need to prepare the sink for the new faucet. Clean the sink surface and remove any old caulk or sealant. Dry fit the new faucet to ensure it fits properly. Next, it’s time to install the new faucet. Apply a thin layer of plumber’s putty around the base of the faucet, and then secure it to the sink. Use a wrench to tighten the mounting nuts and make sure the faucet is secure. Finally, connect the supply lines to the faucet and turn on the water valves.
Installing a new kitchen faucet is a relatively simple process. With the right tools and a bit of patience, you can easily remove an old faucet and install a new one. With the new faucet in place, you can enjoy a stylish and updated look in your kitchen.

Connecting the Water Supply Lines
Removing an old kitchen faucet can be intimidating, but it is an important part of any kitchen remodel. One of the most crucial steps in replacing a kitchen faucet is connecting the new water supply lines. Doing this correctly will ensure that the faucet works correctly and is leak-proof. To properly connect the water supply lines, you will need a set of wrenches and some plumber’s tape.
Begin by turning off the water supply valves located underneath the kitchen sink. Next, use your wrench to loosen the nuts that secure the existing supply lines to the valves and faucet. Once the nuts are removed, pull the supply lines off the valves and faucet. Then, wrap a few layers of plumber’s tape around the threads of the valves and the new supply lines.
Once the plumber’s tape is secure, insert the new supply lines into the valves and faucet. Secure the lines with the nuts and make sure they are tight. Lastly, turn the water supply valves back on, and check the lines for leaks. If there are no leaks, the new water supply lines are correctly connected, and you can move on to installing your new kitchen faucet.
Testing the New Faucet
When replacing an old kitchen faucet, it’s important to test the new one before installing it. To do this, turn off the water supply and remove the old faucet. Then, attach the new faucet to the sink and turn on the water supply. Test the hot and cold water to make sure the faucet is working properly. Check the pressure of the water as well as the water temperature to ensure that the faucet is functioning properly. If there is an issue, make sure to adjust the faucet accordingly or contact a professional for help. Don’t forget to tighten all the screws and nuts before using the faucet. Finally, check the water flow to make sure it won’t be too strong or weak for your needs. Testing the new faucet is the last step of the installation process and a crucial one to ensure that you are getting the desired results.
Troubleshooting Tips
When it comes to removing an old kitchen faucet, it can be a daunting task. It requires a lot of patience and skill, and it’s easy to make mistakes if you don’t know what you’re doing. Fortunately, with a few simple troubleshooting tips, you can make sure your faucet removal goes off without a hitch.
The first step in removing an old kitchen faucet is to turn off the water supply to the house. This will prevent any accidental flooding or water damage while you’re working. Once the water supply is off, it’s time to start disassembling the faucet. Carefully remove the handle, the spout, and any other components that may be attached.
Next, you’ll need to locate the mounting nuts that are holding the faucet in place. These are usually located underneath the sink, and you’ll need a wrench or a pair of pliers to loosen them. Once the mounting nuts are loose, you can carefully lift the faucet out of the sink.
If your faucet is stuck, you may need to use a lubricant to help loosen the connection. Be sure to use a lubricant that is safe for use on plumbing. If that doesn’t work, you may need to use a putty knife or a flathead screwdriver to pry the faucet off.
Finally, once the faucet is removed, you’ll need to clean up the sink area and replace the mounting nuts with new ones. This will ensure a secure installation for your new faucet.
With these troubleshooting tips, removing an old kitchen faucet can be a simple and painless process. Just remember to turn off the water supply, carefully remove the components, locate the mounting nuts, use a lubricant if needed, and replace the mounting nuts when finished. With a little patience, you’ll have a new faucet in no time.
Maintenance and Care for Your New Faucet
Installing a new kitchen faucet is a big investment, and with proper care and maintenance, it can last for years to come. To make sure that your new kitchen faucet works as expected, there are several steps you can take to ensure its longevity. Cleaning your faucet regularly with a gentle cleaner is the best way to keep it looking new. Make sure to pay special attention to the handle and the aerator, as these areas are prone to buildup. Additionally, you should ensure that the faucet is well-lubricated and all parts are tightened properly. Doing this will help keep your faucet in good working condition and prevent any unnecessary problems. Furthermore, it’s important to keep an eye out for leaks and address any that you find as soon as possible. Taking the necessary steps to properly maintain your new faucet will help extend its life and ensure you get the most out of your investment.
Conclusion
Removing an old kitchen faucet can be a time-consuming task, but with the right tools and some basic knowledge, it can be done relatively quickly. Before beginning, it is important to shut off the water supply and disconnect the water lines. Once this is done, the old faucet can be removed by unscrewing the retaining nuts and then lifting it away from the sink. It is important to remember to save the old parts, as they may be needed for the installation of the new faucet. With the right tools and a bit of patience, it is possible to remove an old kitchen faucet and install a new one.

