Removing a Delta kitchen faucet single handle is a relatively easy task that can be done with basic tools. In this guide, we will go over the steps required to safely and correctly remove a Delta kitchen faucet single handle. This is a great project for a DIY enthusiast who wants to give their kitchen a facelift without breaking the bank. After following these steps, you will be able to replace the handle with a new one of your choosing.
Tools and Materials Needed
The key to successfully removing a Delta single-handle kitchen faucet is having the right tools and materials at your disposal. To ensure an easy installation, you should prepare the following before you start: a screwdriver, adjustable wrench, plumber’s putty, basin wrench, and replacement faucet parts. Depending on the type of faucet you are replacing, you may need additional tools or materials.
Once you have gathered all of the necessary items, you can start the project with confidence. Make sure you wear protective gloves and eye protection to protect yourself from any potential hazards. Additionally, it is important to turn off the water supply before starting your project to prevent any leaks or flooding. With the right tools and materials, you can easily remove your Delta kitchen faucet single handle.
Steps to Dismantle Delta Kitchen Faucet Single Handle
Having a Delta kitchen faucet handle in your kitchen can be a great addition to your home. However, the process of removing it can be tricky. To help you out, we have compiled a step-by-step guide on how to safely and effectively remove a Delta kitchen faucet single handle.
Start by turning off the water supply to the faucet. This can be done either by turning off the valves underneath the sink or by shutting off the main water supply. Once the water supply is off, prepare to dismantle the faucet. You will need a set of pliers, a basin wrench, and an adjustable wrench.
Next, use the pliers to remove the retaining nut, which will be located underneath the faucet. Once the retaining nut is removed, use the adjustable wrench to unscrew the handle and the basin wrench to loosen the mounting nuts which are located on the back of the faucet. Finally, pull the faucet off the sink and unscrew the mounting nuts and screws that hold the faucet in place.
Now that the faucet has been removed, use a damp cloth or rag to wipe off any residue or debris from the sink and the faucet. Once the area is clean, you can begin the installation process on your new Delta kitchen faucet single handle.
Removing a Delta kitchen faucet single handle requires a bit of patience and effort, but the result is worth it. Follow these steps to make sure that the process goes as smoothly as possible.
Troubleshooting Common Issues with Delta Kitchen Faucet Single Handle
Are you having trouble with your Delta Kitchen Faucet Single Handle? Don’t worry, you’re not alone! Many homeowners encounter issues with this type of faucet, from leaks to strange noises. Fortunately, some easy troubleshooting steps can help you identify and fix the problem.
First, start by checking for any visible damage or signs of wear and tear. If you spot any, be sure to replace the faucet as soon as possible. If there are no visible signs of damage, then you’ll need to diagnose the issue.
Start by checking the pipe connections. Make sure all the pipes are connected properly, and that there are no loose connections. If a connection is loose, tighten it up using a wrench.
Next, check the water pressure. If the pressure is too low, it can cause the faucet to malfunction. You can easily check the water pressure by purchasing a water pressure gauge from your local hardware store.
If the water pressure is normal, then it’s likely that the issue is with the faucet itself. Check the filter to make sure it’s not clogged, and then check the diverter valve to make sure it’s functioning properly. If all else fails, you may need to replace the entire faucet.
Troubleshooting common issues with your Delta Kitchen Faucet Single Handle can be a frustrating experience, but it doesn’t have to be. By following the above steps, you can quickly diagnose and fix the issue. Good luck!
Tips for Reinstalling Delta Kitchen Faucet Single Handle
Removing and reinstalling a Delta single-handle kitchen faucet can be a challenging task. However, with the right tools and a little bit of patience, you can get the job done quickly and easily. Here are some tips for reinstalling a Delta kitchen faucet single handle.
First, make sure you have the correct parts for the job. You’ll need a basin wrench, adjustable wrench, screwdriver, faucet handle, and a putty knife. You may also need a few extra parts, such as a faucet stem, washers, and a gasket.
Next, turn off the water supply to the faucet and disconnect the supply lines. Remove the old faucet handle by unscrewing it with an adjustable wrench. With the handle removed, use a putty knife to pry off the old gasket. The gasket is typically located between the faucet body and the sink.
Once the old gasket is removed, clean the area around the faucet body with a damp cloth. Then, use a basin wrench to loosen the mounting nuts. You may need to use an adjustable wrench to loosen the nuts if they are very tight. Remove the mounting nuts and lift the faucet out of the sink.
Now you can install the new faucet. Place the new faucet into the sink and use the mounting nuts to secure it. Then, attach the handle, and use a screwdriver to tighten the screws. Finally, attach the supply lines and turn the water back on.
With these tips, you can easily remove and reinstall a Delta kitchen faucet single handle. This simple task can be done quickly and easily if you have the right tools and know-how.
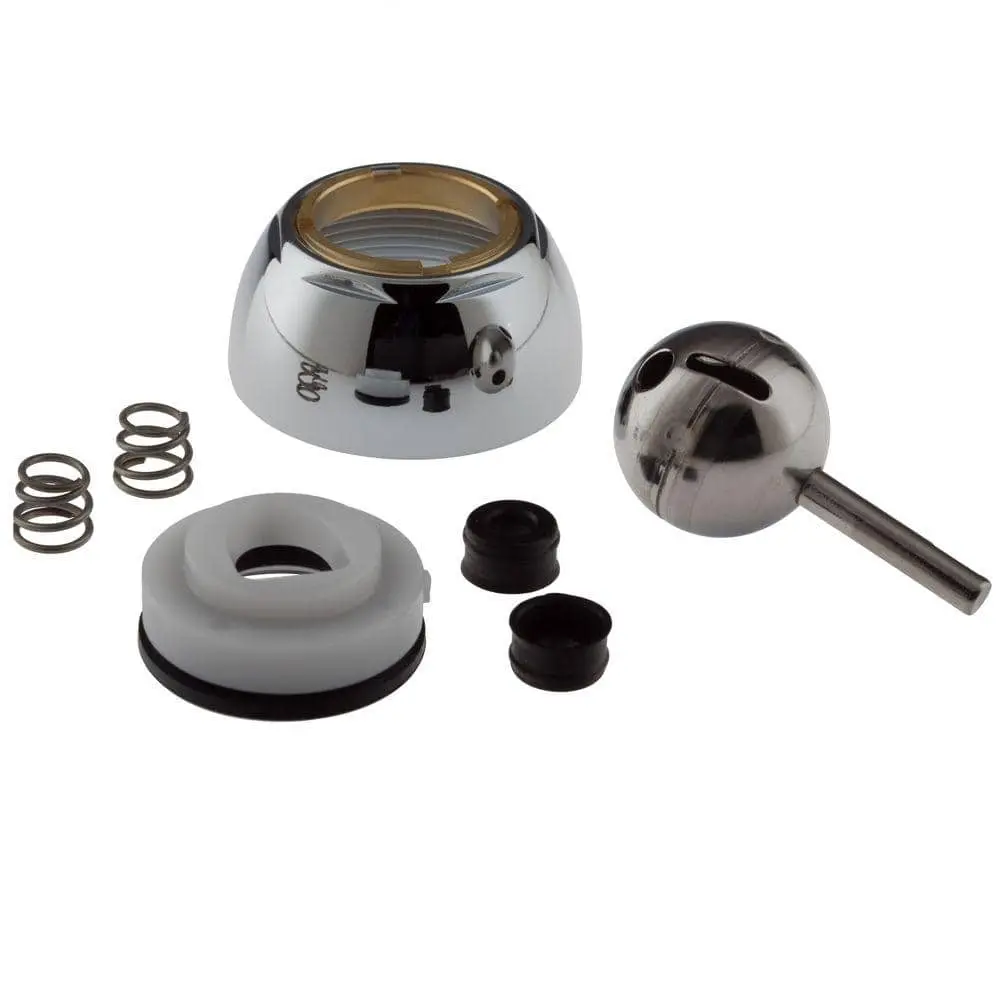
Potential Replacement Parts for Delta Kitchen Faucet Single Handle
When it comes to replacing parts of your Delta kitchen faucet single handle, it’s important to understand what makes up the faucet. A Delta kitchen faucet single handle consists of different parts such as the handle, valve, cartridge, and spout. To replace any of these parts, you need to know what you are looking for. This article will guide you through the potential replacement parts for a Delta kitchen faucet single handle, and how to go about replacing them.
The handle of a Delta kitchen faucet single handle can be replaced with a variety of handles. These handles come in a variety of styles, sizes, and colors. You can find a handle that suits your needs and matches the decor of your kitchen.
The valve is the mechanism that controls the flow and temperature of water. You can replace this with a variety of valves, including ceramic discs, compression, and ball-type valves. It’s important to make sure that the valves you choose are compatible with your Delta kitchen faucet single handle.
The cartridge is what controls the flow of water. To replace this, you will need to find a replacement cartridge that is compatible with your Delta kitchen faucet single handle. You can also find cartridges with various flow rates, pressure ratings, and other features.
Lastly, the spout is the part that connects the faucet to the sink. You can find replacement spouts for Delta kitchen faucet single handles in a variety of shapes, styles, and colors. It’s important to make sure that the spout you choose is compatible with your Delta kitchen faucet single handle.
Replacing parts of your Delta kitchen faucet single handle can be a daunting task, but with the right knowledge, you can do it yourself. Knowing what parts you need and how to go about replacing them is essential to getting the job done correctly. With the help of this article, you now have the information you need to replace the parts of your Delta kitchen faucet single handle.
Clean Up and Maintenance of Delta Kitchen Faucet Single Handle
Cleaning and maintaining a Delta kitchen faucet single handle can be a difficult task. If you want to ensure your faucet remains in top condition, it is important to ensure you are regularly cleaning and removing the faucet. Here are some tips on how to successfully remove a Delta kitchen faucet single handle.
First, turn off the water supply to the faucet. Use an adjustable wrench to loosen the mounting nuts and bolts that hold the faucet in place. If necessary, use pliers to loosen any nuts that may be stuck. After the mounting nuts and bolts have been removed, gently pull the faucet away from the sink.
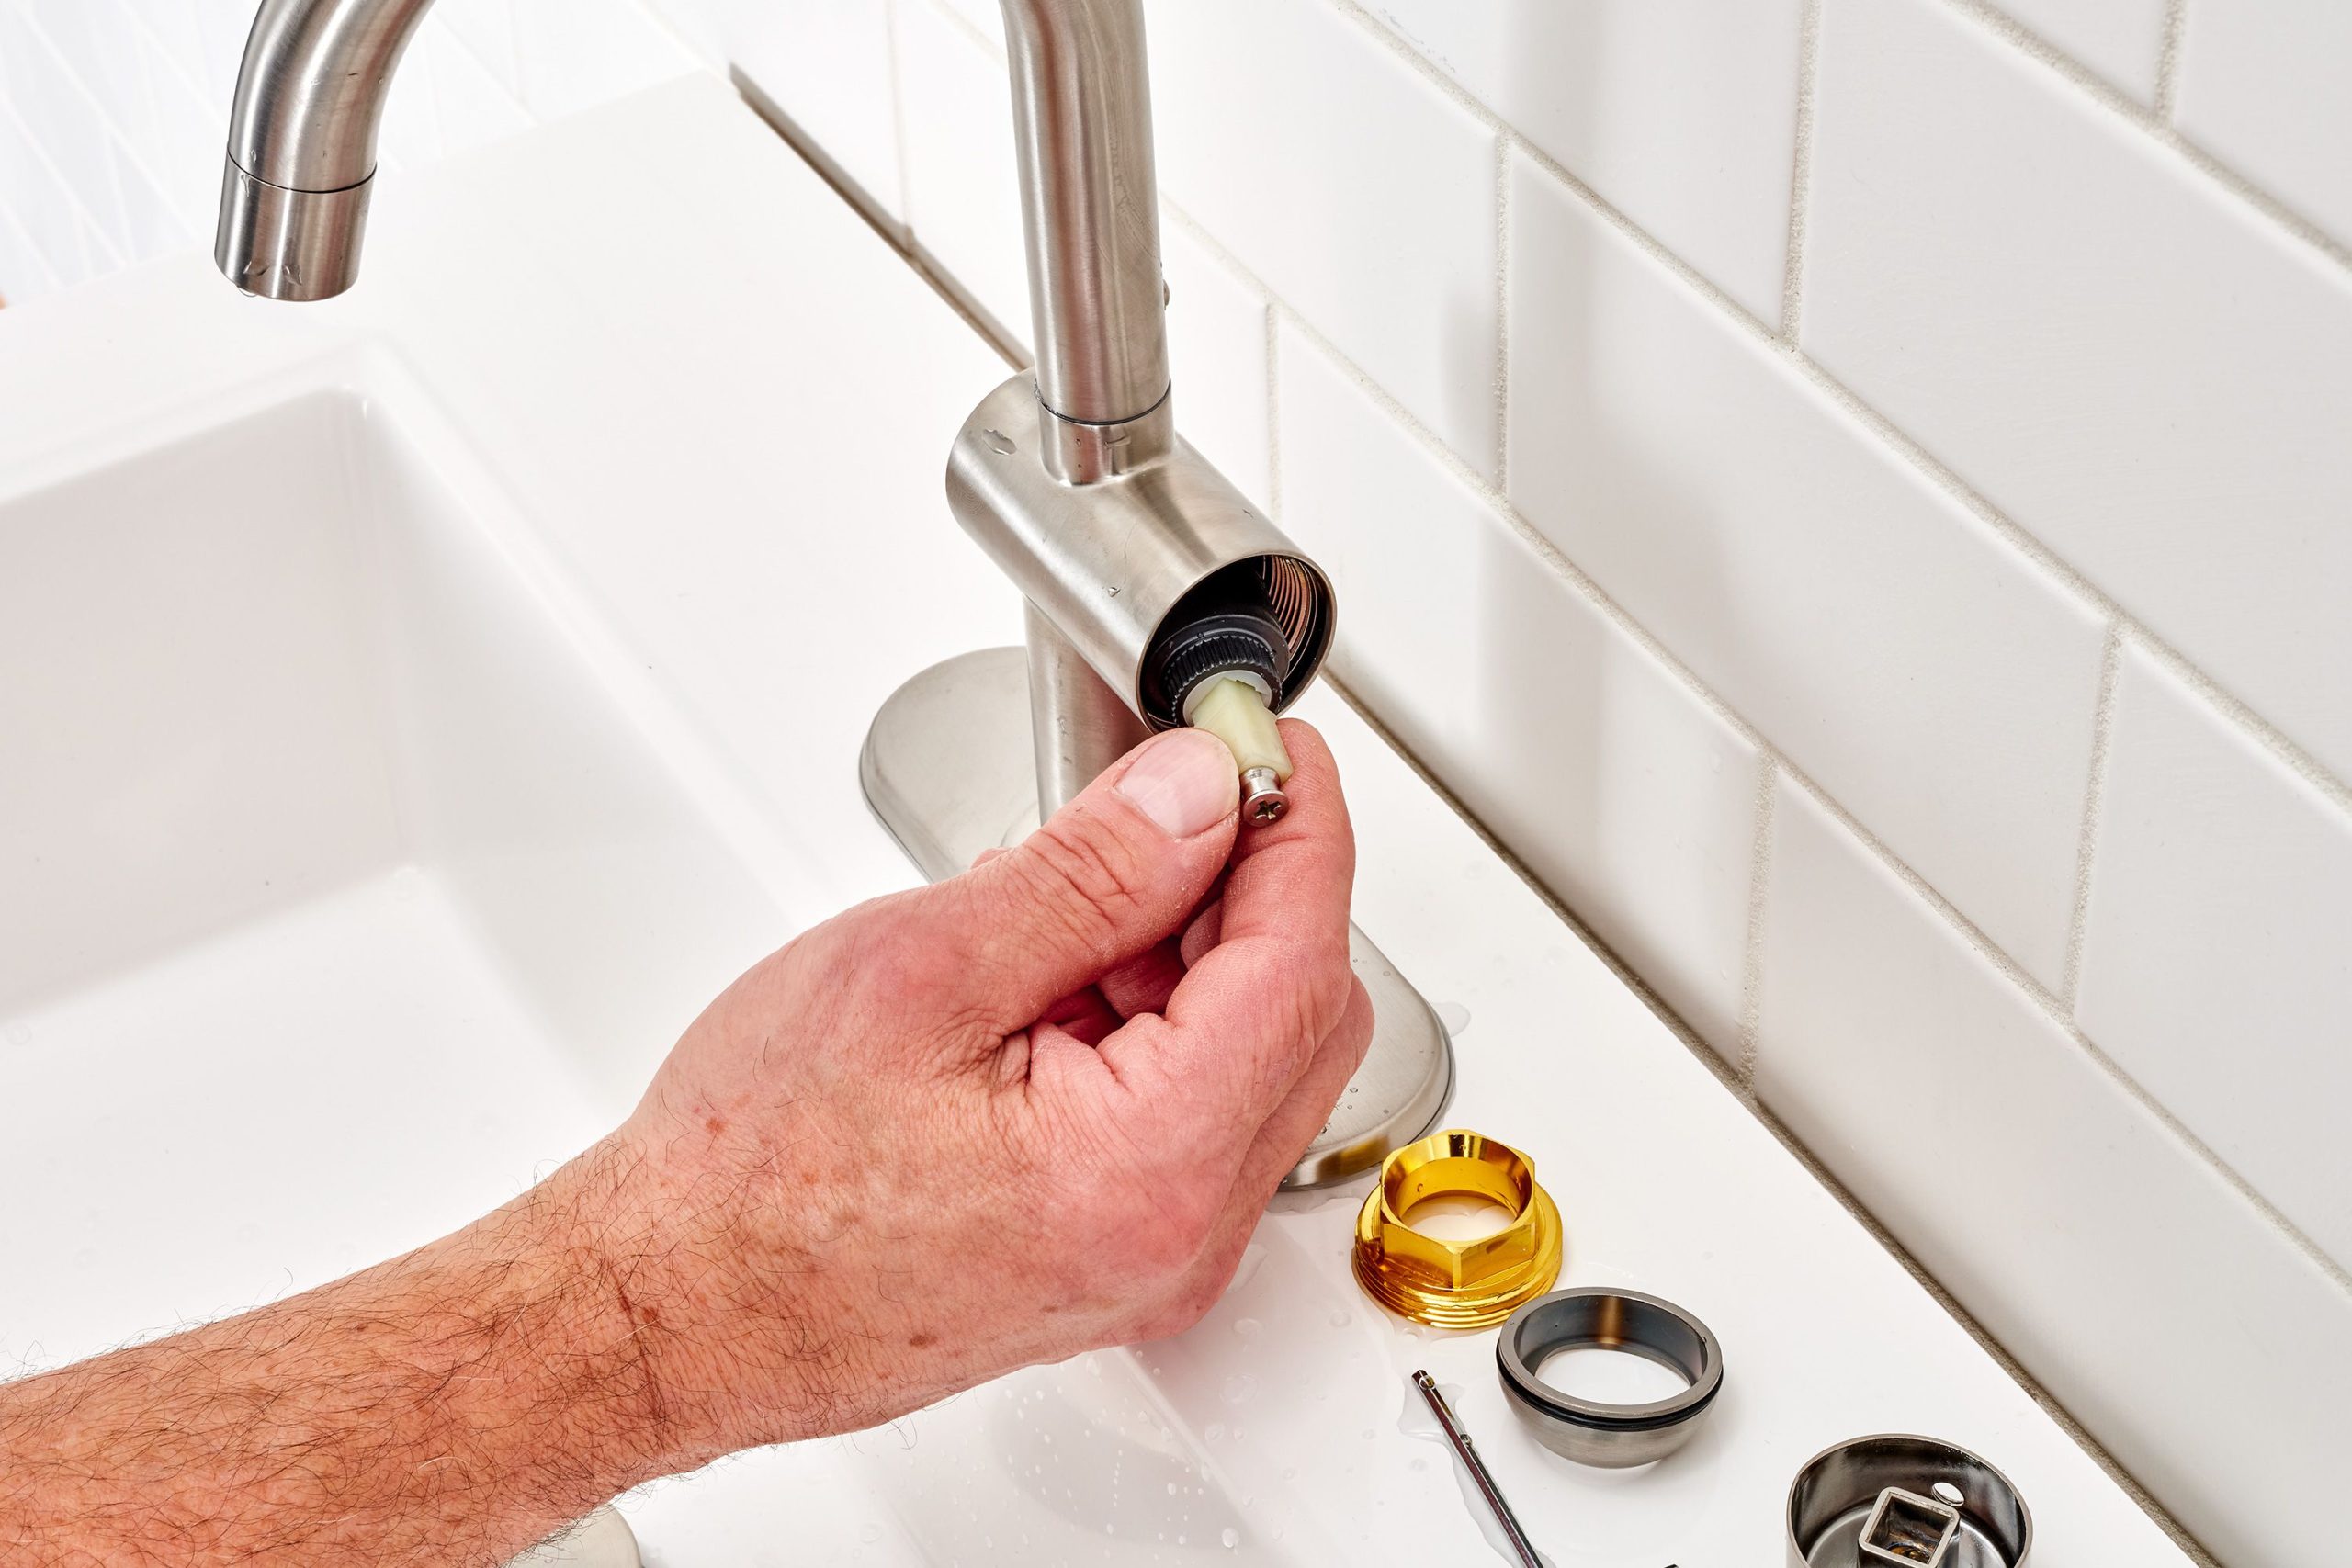
Next, you will need to remove the handle. Depending on the model, you may need to unscrew the handle from the shaft or you may need to use a turner to unscrew the handle. Once the handle has been removed, you should be able to see the cartridge inside the faucet.
To remove the cartridge, use a flathead screwdriver to unscrew the retaining clip that holds the cartridge in place. Once the clip is removed, the cartridge should be easy to remove. Once the cartridge has been removed, you should be able to see the valve seat and o-ring. Use a cloth and soapy water to clean the valve seat and o-ring.
Finally, reassemble the faucet and turn the water supply back on. Test the faucet to make sure it is working properly. With regular maintenance, you can ensure that your Delta kitchen faucet single handle remains in top condition and performs as expected for years to come.
FAQs About the How To Remove Delta Kitchen Faucet Single Handle
1. How do I remove the handle of a Delta single-handle kitchen faucet?
A. To remove the handle of a Delta single-handle kitchen faucet, start by shutting off the water supply to the faucet and opening the faucet to release pressure. Then, use a Phillips screwdriver to remove the handle set screw, located underneath the handle. You can then pull off the handle.
2. How do I remove the cartridge of a Delta single-handle kitchen faucet?
A. To remove the cartridge of a Delta single-handle kitchen faucet, first locate the retaining clip located on the faucet. Once you locate the retaining clip, use a flat-head screwdriver to remove it. After the clip is removed, use a pair of pliers to pull out the cartridge.
3. How do I replace a Delta single-handle kitchen faucet?
A. To replace a Delta single-handle kitchen faucet, first shut off the water supply to the faucet and open the faucet to release pressure. Then, use a Phillips screwdriver to remove the handle set screw, located underneath the handle. You can then pull off the handle and unscrew the bonnet nut to remove the valve. Finally, install the new valve and secure it in place with the bonnet nut before reattaching the handle.
Conclusion
Removing a Delta single-handle kitchen faucet is a fairly simple process that can be completed in a few steps. The first step is to turn off the water supply and disconnect the water hoses from the faucet. Next, unscrew the base nut from the faucet and pull it away to expose the mounting nut. Once the mounting nut is removed, the faucet can be lifted out of the sink. Finally, the gaskets and mounting plate can be removed and the hole sealed to prevent leaking. With the right tools and a bit of patience, anyone can easily remove a Delta single-handle kitchen faucet.

