Replacing the kitchen sink strainer is a relatively simple home repair task that can help to improve the functionality and appearance of your sink. This guide will walk you through the steps necessary to replace a kitchen sink strainer, including the tools you’ll need, how to remove the old strainer, and how to install the new one. With the right preparation and care, you’ll have your new strainer installed and ready to go in no time.
Gather Materials and Tools
Replacing a kitchen sink strainer can seem like a daunting task, but it doesn’t have to be. With the right preparation and materials, you can get the job done quickly and efficiently. Before starting the project, it’s important to gather the right tools and materials. You’ll need a basin wrench, a plumber’s putty, a new strainer, and a replacement washer. You may also need a screwdriver, depending on the model of your kitchen sink. After you have all the tools and materials, you’re ready to get started.
Remove the Old Strainer
Removing the old kitchen sink strainer can be a daunting task, but it doesn’t have to be. To successfully replace the strainer, start by turning off the water supply to the sink and draining any excess water. Then, use a screwdriver and wrench to remove the screws and bolts that secure the strainer in place. Lift the strainer out of the drain opening, being careful not to scratch the surface of the sink. Afterward, you can discard the old strainer and prepare to install the new one.
Measure for a New Strainer
Replacing a kitchen sink strainer is a straightforward, but important process for any homeowner. Taking the time to do it properly can save money and time in the long run. Before you begin, however, it’s important to understand how to measure the right sink strainer size for your kitchen.
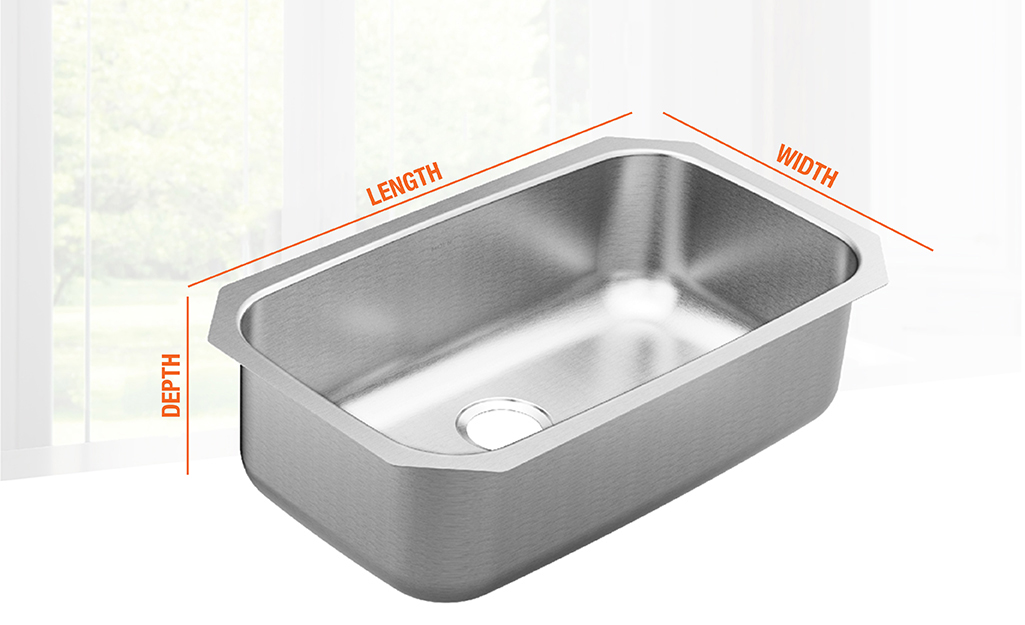
The first step is to measure the size of the sinkhole and the height of the sink’s rim. Measure the hole from the inside edge to the inside edge and write down the diameter. Measure the rim from the top of the sink to the bottom of the sink.
The next step is to measure the depth of the sink. Use a ruler or measuring tape to measure the depth of the sink from the top of the sink to the bottom of the sink.
Once you have these measurements, you can use them to determine the size of the strainer that you will need. Most kitchen sink strainers come in either three-and-a-quarter-inch or four-and-a-half-inch sizes. If your sink has a three-and-a-quarter-inch hole, you’ll need a three-and-a-quarter-inch strainer. If your sink has a four-and-a-half-inch hole, you’ll need a four-and-a-half-inch strainer.
By measuring your kitchen sink before shopping for a new strainer, you can ensure that you get the right size the first time and avoid having to return it or make an exchange, saving you time and money.
Install the New Strainer
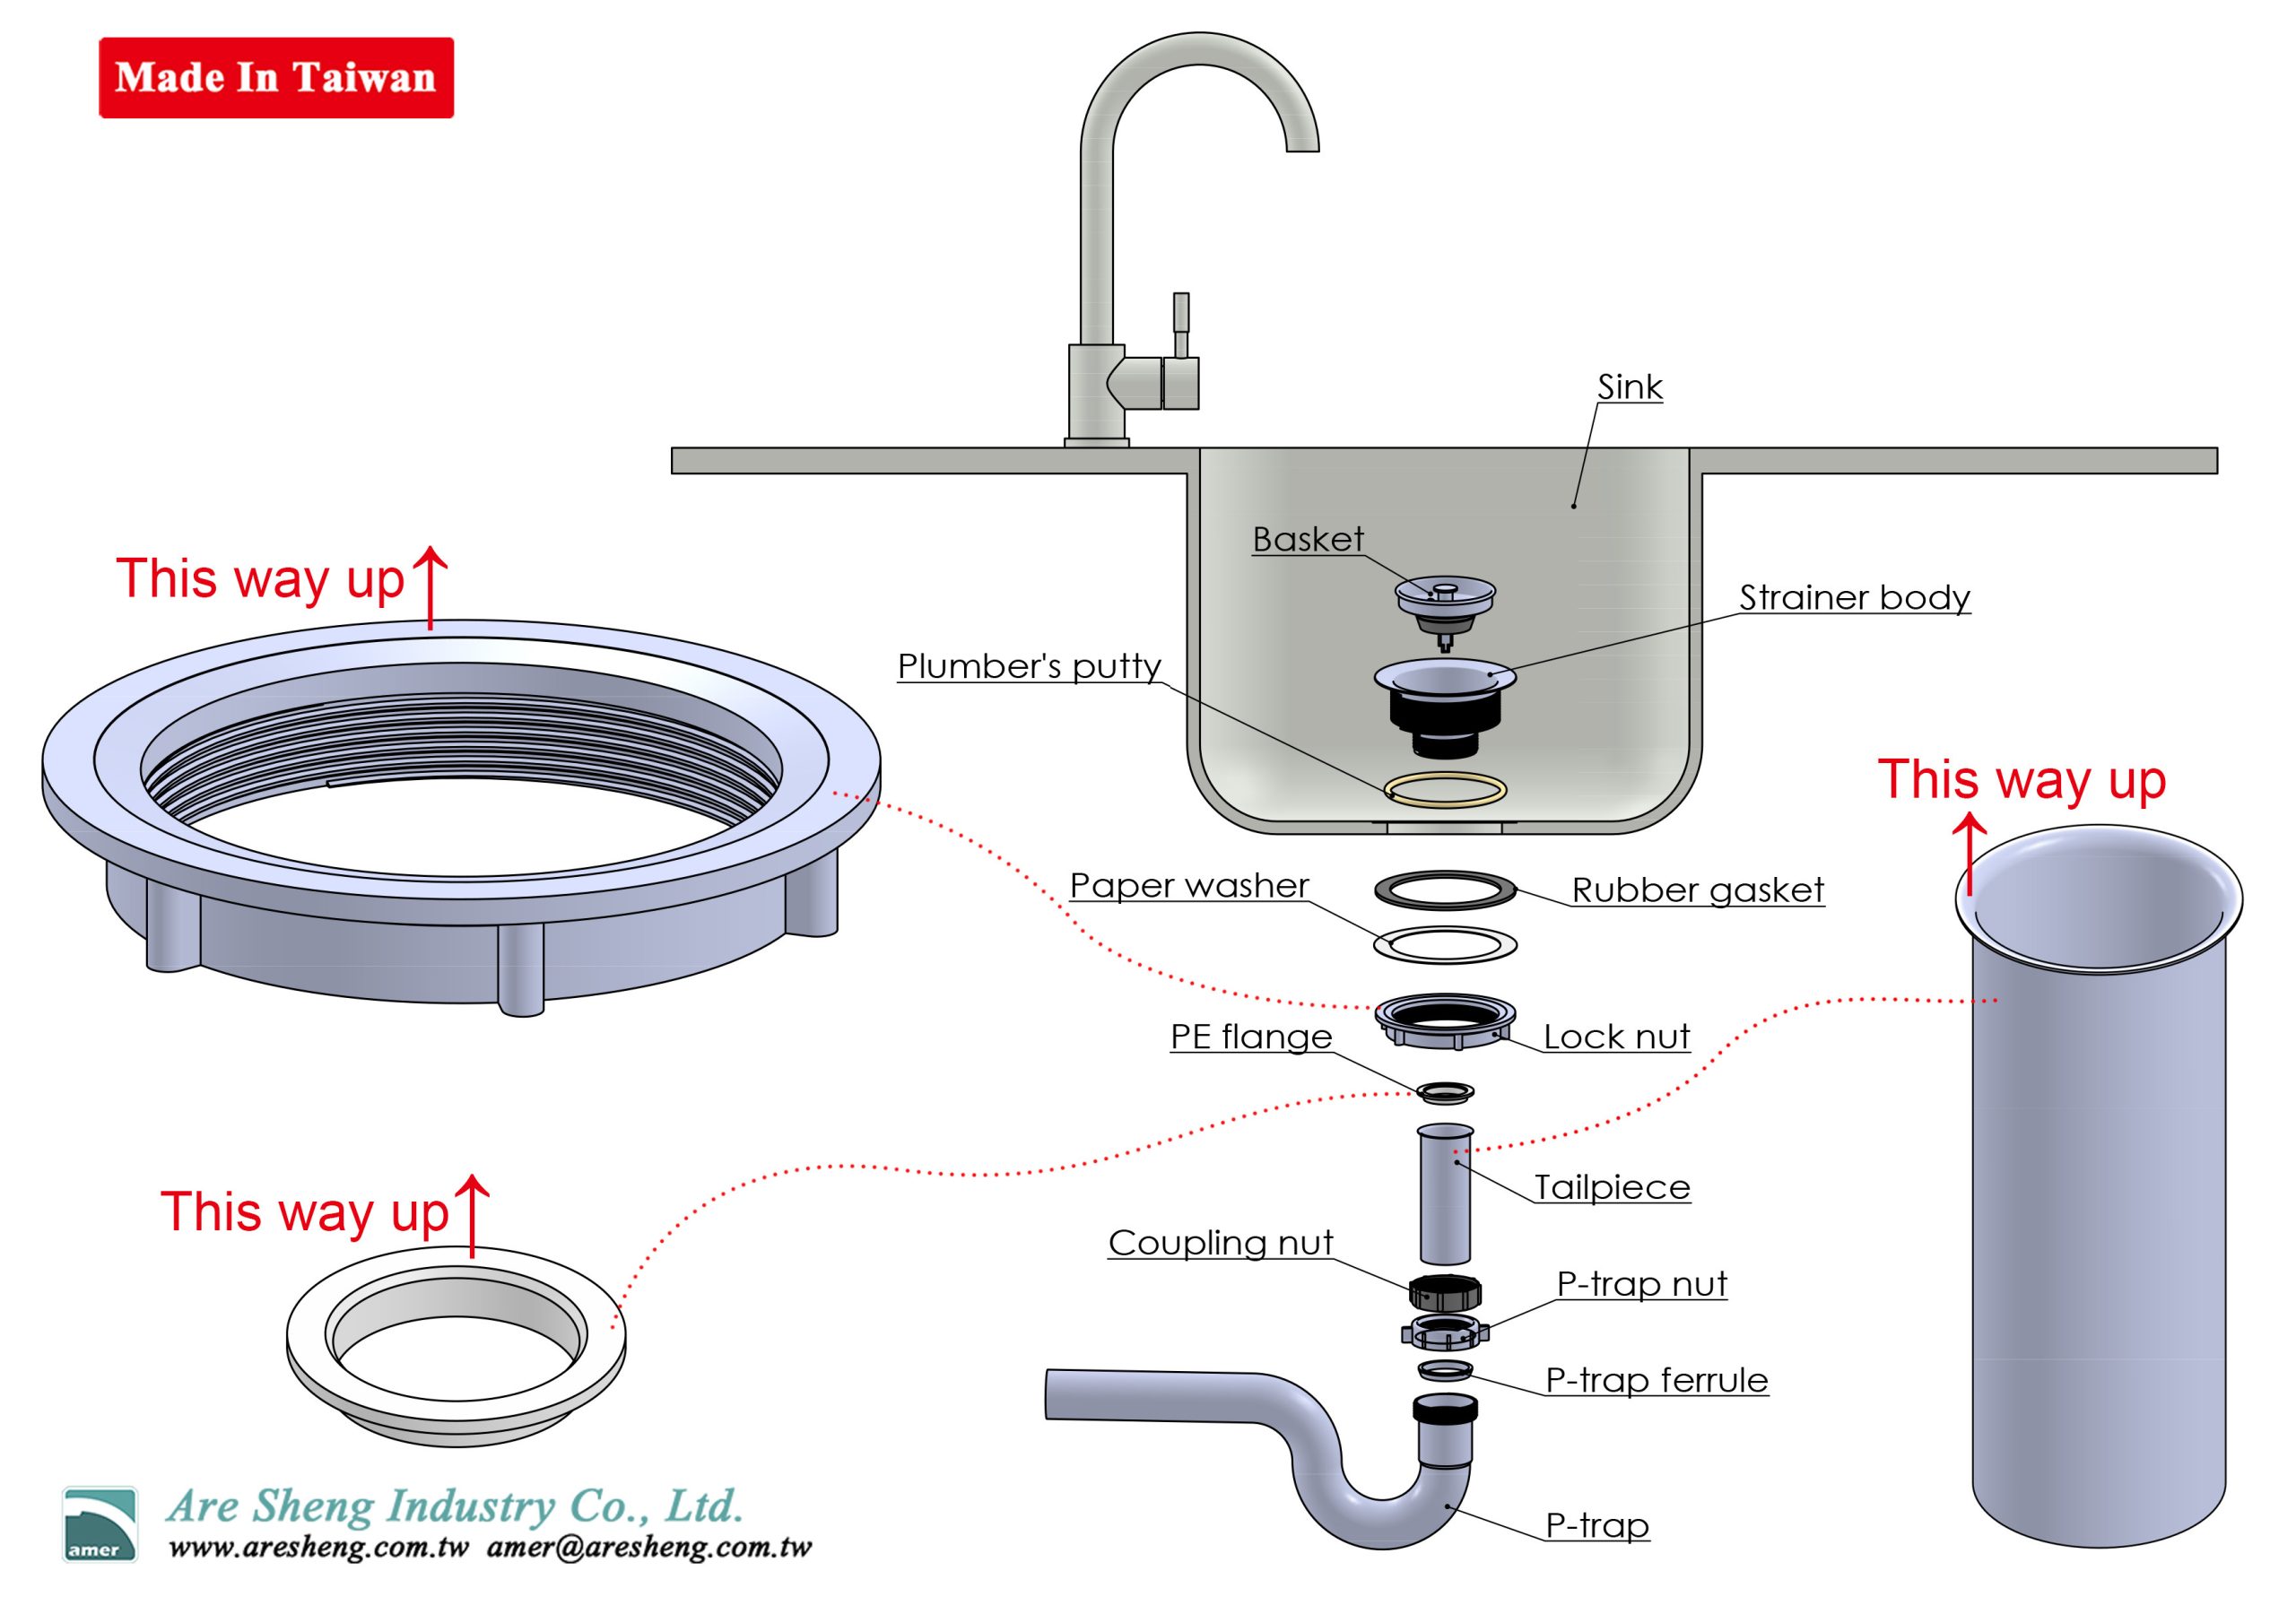
Replacing a kitchen sink strainer can be a daunting task for any homeowner, but with a few simple steps and the right tools, it can be done quickly and easily. To start, make sure you have the correct size strainer. This is important, as the wrong size can cause issues with the drain and create a mess. Then, turn off the water supply and disconnect the drain pipes. After that, unscrew the old strainer and remove it. Once the old strainer is removed, use a putty knife to scrape away any debris or dirt that has accumulated in the drain opening. Clean the area thoroughly and dry it with a cloth. Finally, place the new strainer into the opening and secure it with the nut and washer provided. Make sure the rubber gasket is properly seated and that the strainer is tight and secure to prevent any leaks. With the new strainer in place, turn on the water supply and test the drain for any leaks. With these simple steps, you can easily replace a kitchen sink strainer.
Seal the New Strainer
When replacing your kitchen sink strainer, it’s important to make sure you securely seal the new strainer in place to avoid leaks and other damage. To do this, you’ll need to use a sealant or a plumber’s putty. First, ensure that the surface of the strainer is completely clear and dry. Then, apply a bead of sealant or putty around the lip of the strainer, pressing it into place. Once you have firmly secured the strainer, wait for the sealant or putty to dry for the appropriate amount of time according to the product instructions. Sealant is typically the better option since it creates a long-term, water-tight seal, while putty is best used for temporary solutions. After applying the sealant or putty, you’re now ready to attach the sink strainer to the sink drain.
Test the New Strainer
Replacing a kitchen sink strainer is a relatively straightforward task, but it should not be taken lightly – a correctly installed strainer will ensure proper drainage and a long-lasting seal. Before finally installing the new strainer, it is important to test it first. This step is necessary to ensure that it fits correctly and that it is working as it should.
Begin by placing the new strainer on the sink and make sure it sits flat and secure. Use a level to check if the strainer is even and straight. If it is not, adjust the strainer until it is. Next, fill the sink with water and watch for any leaks. If the strainer does leak, it means the seal is not tight enough and should be adjusted. Lastly, check if the strainer drains water properly. If it does, the installation is complete.
Replacing a kitchen sink strainer is not a difficult task, but it does require attention to detail. By taking the time to properly test the strainer, you can be sure that it is correctly installed and that it will last for many years.
Clean Up After Installation
Replacing a kitchen sink strainer is an easy DIY project, but it’s important to clean up after installation. After the new strainer is in place, you’ll need to clean up any excess grout or sealant. Also, make sure to wipe down the sink bowl and strainer to remove any excess dirt or debris. Doing so will help ensure your strainer is properly sealed.
If you use a putty knife to scrape old sealant, make sure to clean up any residual particles. You can do this with a damp cloth and a bit of dish soap. Additionally, check the edges of the sink bowl for any debris or dirt and remove it with a damp cloth.
Before you start using the sink again, it’s important to ensure the strainer is properly sealed. Run water over the strainer and check for any leaks. If you notice any, you may need to apply additional sealant or grout. Finally, make sure to clean the sink bowl and strainer regularly to prevent buildup and clogs.
Troubleshooting Tips
Have you ever had an issue with your kitchen sink strainer? Don’t worry, replacing a kitchen sink strainer is not as difficult as it may seem. With the right tools and a bit of patience, it can be done quickly and efficiently. Here are some troubleshooting tips to help you with the process.
First, make sure you have the right tools and replacement parts. You’ll need a wrench, a basin wrench, and a replacement strainer. The basin wrench is best for loosening and tightening the nuts on the strainer. It’s also important to make sure your replacement strainer is the proper size and shape to fit in the hole in your sink.
Next, turn off the water supply to the sink and disconnect the pipes. Carefully remove the old strainer, and clean the sink area. If necessary, use a wire brush or other abrasive to get rid of any buildup.
Before you install the new strainer, apply the plumber’s putty around the edges of the sinkhole. This will help create a water-tight seal. Place the strainer into the hole, and use the wrench to tighten the strainer nuts.
Finally, reconnect the pipes and turn the water supply back on. Test the new strainer by running water through it. If everything is working properly, you have successfully replaced your kitchen sink strainer!
Conclusion
Replacing a kitchen sink strainer is a simple task that anyone can do with the right tools and a few minutes of their time. By following the steps outlined in this guide, you’ll be able to quickly and easily replace your kitchen sink strainer and have it look and function like new. Be sure to adhere to all local plumbing codes and regulations when replacing your sink strainer to ensure the job is done properly and safely.

