Sealing a kitchen sink is an important part of any kitchen renovation or remodeling project. It is important to ensure that all the joints and seams of the sink are properly sealed to prevent water from leaking into other areas of the kitchen. Sealing a kitchen sink also helps to prevent water damage and mold growth. In this guide, we will show you how to properly seal a kitchen sink to ensure a successful installation. We will cover the materials needed, the steps to take, and tips for a successful seal. With these tips, you can easily complete the task of sealing a kitchen sink.
Reasons for Sealing a Kitchen Sink
Sealing a kitchen sink is an important maintenance job that should not be overlooked. Even though sinks are made of durable materials, they are still prone to wear and tear. Sealing the sink can help to prevent any water or moisture from seeping into the material, which can lead to rusting and other structural damage. Additionally, sealing the sink can help to keep the area tidy and prevent dirt and bacteria from building up. In this blog, we discuss the reasons why it is important to seal a kitchen sink and how to do it correctly.
Firstly, sealing a kitchen sink can help to protect the material from corrosion. This is especially true of sinks made from metal, such as stainless steel. Sealing the sink can prevent water from seeping in, which can cause rust and weaken the structure of the sink. Furthermore, sealing the sink can help to keep the area clean and reduce the risk of bacteria and dirt building up on the surface.
Secondly, sealing a kitchen sink can help to improve its longevity. By preventing water from entering the material, you can help extend the life of the sink and keep it looking its best for longer. Additionally, sealing the sink can help to reduce the risk of damage caused by accidental spills and splashes.
Finally, sealing the sink can help to make it easier to clean. Sealing the sink can help to prevent dirt and bacteria from building up, which makes it easier to keep the area tidy. Additionally, sealing the sink can help to reduce the amount of effort required to clean it, as it will prevent liquid from seeping into the material.
Necessary Tools and Materials
A kitchen sink is an essential part of any kitchen, so it’s important to ensure it’s in good working order. To do this, you’ll need to have the right tools and materials on hand. To seal a kitchen sink, you’ll need to have some sealant, a putty knife, a utility knife, a wet/dry vacuum, a bucket, a sponge, a rag, a screwdriver, and a sealant gun. Depending on the type of sink you have, you may also need a special sealant specifically designed for that type of sink.
Before you begin, make sure you have all the necessary tools and materials on hand. You’ll also want to clean the sink and remove any debris that might be blocking the drain. Once you have the necessary tools and materials, you can start the process of sealing your kitchen sink. It’s important to follow the manufacturer’s instructions when using any sealant products. After you’ve successfully sealed the sink, it’s important to check for any leaks and make sure everything is properly sealed. With the right tools and materials, you can easily seal a kitchen sink and keep it in good working order.
Preparing to Seal the Sink
Sealing your kitchen sink is an important part of home maintenance that will help protect it from damage and damage-causing elements. It is important to take the time to properly prepare the sink before you seal it to ensure that it will last. Here are some tips on how to properly prepare to seal your kitchen sink.
First, make sure that the sink is completely clean and free of dirt and debris. Use a stiff bristled brush and mild soap to scrub the sink and remove any residue. Once the sink is clean, use a damp cloth to wipe the sink down and remove any moisture.
Next, check for any cracks or chips in the sink. If the sink has any damage, it should be repaired before it is sealed. Use a putty knife to fill any cracks and use epoxy fillers to repair any chips.
Finally, make sure that the sink is completely dry before you seal it. Allow the sink to air dry for at least 24 hours before applying the sealant. This will ensure that the sealant properly adheres to the sink and will create a durable seal.
Applying the Sealant
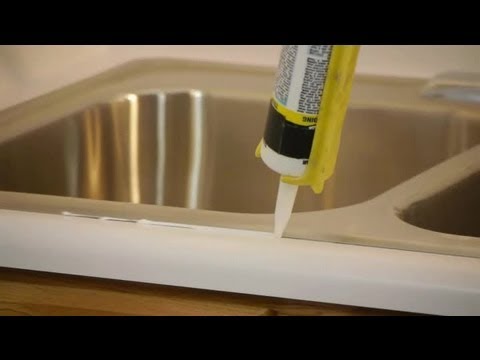
Sealing a kitchen sink can be a challenging task, but with the right preparation and materials, it can be done with ease. The first step is to apply the sealant. It’s important to carefully read the instructions on the sealant product before beginning. Once the sealant is ready, use a caulking gun to apply it around the edges of the sink, making sure to get into the crevices and corners. A thin layer of sealant should be applied evenly to the entire area. Once the sealant is in place, use a damp cloth to wipe away any excess and ensure an even seal. Allow the sealant to dry for the recommended time before proceeding to the next step. With the right preparation and materials, applying the sealant to a kitchen sink can be done with ease.

Removing Excess Sealant
Having a kitchen sink that is properly sealed is essential to protecting your kitchen from damage caused by water leaks and other plumbing problems. Sealing a kitchen sink can seem like a daunting task, but with the right tools and guidance, it can be completed quickly and easily. One of the most important steps of the process is removing any excess sealant from around the sink.
Removing excess sealant is an essential part of sealing a kitchen sink properly. Excess sealant can cause problems such as water leakage and can be difficult to remove if left for too long. It is important to remove excess sealant before it dries to ensure that the sealant adheres properly to the sink. To remove excess sealant, start by wiping away any excess sealant from around the sink with a damp cloth. Once the excess is removed, use a razor blade to scrape away any remaining sealant. Be sure to use caution when scraping away the sealant to avoid damaging the sink or countertop. Once all of the excess sealant has been removed, wipe away any remaining residue with a damp cloth.
Following these steps will help ensure that your kitchen sink is properly sealed and that any excess sealant is removed. With the right tools, guidance, and a bit of patience, you can easily and quickly seal your kitchen sink.
Caring for the Sealed Sink
It’s not enough to simply seal a kitchen sink – proper maintenance is essential to keeping it sealed and free of any potential leaks or water damage. To ensure that the kitchen sink remains in top condition, it’s important to clean it regularly and inspect it frequently for signs of wear or damage. Additionally, consider sealing the sink again after five or more years to ensure that the sealant remains intact and effective. This can be done by applying a sealant to the entire sink, including the edges, making sure to clean the surface thoroughly before applying the sealant. For added protection, consider using a damp cloth to wipe away any excess sealant and applying a waterproof sealant around the seams. With the proper maintenance and care, your sealed kitchen sink should remain in great condition for many years to come.
Troubleshooting Common Problems
Sealing a kitchen sink seems like a simple task, but when it comes to dealing with common problems, it can be quite tricky. Knowing how to properly seal a kitchen sink is important to prevent water damage and maintain a healthy and safe kitchen. Troubleshooting common problems can help you get the job done correctly.
Leaks are the most common issue when it comes to sealing a kitchen sink. To prevent leaks, make sure that the sealant is applied evenly and tightly around the sink. You may also need to check the drain for any damaged or misaligned parts, as this can cause leaking. If you suspect that the problem is with the pipes, you may need to call a professional plumber to take a look.
Another issue that may arise is the sealant not sticking properly to the sink. This can be caused by several factors, from dirt and grease to improper application. To ensure the sealant sticks, make sure to clean the surface of the sink thoroughly before applying the sealant and follow the instructions carefully.
Finally, it’s important to remember that sealing a kitchen sink should be done correctly and with care. Before attempting to seal your kitchen sink, make sure you are properly equipped with the right materials and tools. If you’re unsure, consider seeking professional help to ensure the job is done right.
Conclusion
Sealing a kitchen sink is a relatively simple process that can be completed in a short amount of time. Once you have the sink sealed, you can be sure that it will remain watertight and leak-free for years to come. With the right supplies and a bit of patience, you can seal your kitchen sink in no time.

