
Taking apart a Moen kitchen faucet is a relatively straightforward process that doesn’t require any specialized tools. This guide will walk you through the steps needed to remove the handle and spout of the faucet, and then take the faucet apart. With the right steps, you’ll be able to easily take apart your Moen kitchen faucet and replace any necessary parts.
Tools and Materials Needed
When performing a Moen kitchen faucet repair, it is essential to have the necessary tools and materials on hand to ensure that the job is done correctly. To disassemble the faucet, you will need a Phillips screwdriver, a flat-head screwdriver, an adjustable wrench, a basin wrench, and a container to catch any water that may escape during the process. Additionally, you may need to purchase a new cartridge or other replacement parts if the faucet is damaged or worn.
Before beginning the repair, make sure that the water supply to the faucet is off. This is important to ensure that no water escapes during the repair process. Once the water is turned off, you can begin to take apart the faucet.
It is important to follow the manufacturer’s instructions and to take your time when disassembling the faucet. With the right tools and materials, you can easily take apart a Moen kitchen faucet and make the necessary repairs.
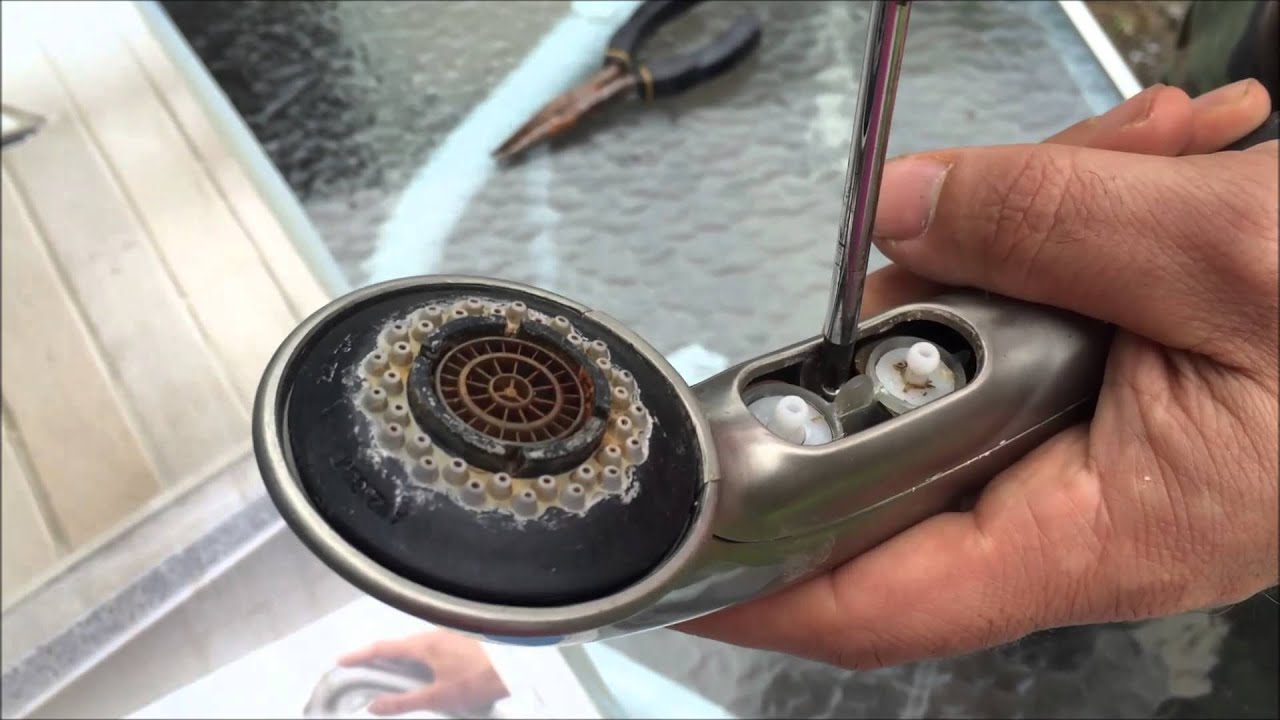
Steps to Remove the Handle
Removing the handle of a Moen kitchen faucet is an easy process that requires minimal tools. Before you begin, you should turn off the water supply to the faucet and open it up to release any built-up pressure. Once you’ve done this, it’s time to begin the process of taking the handle apart.
Firstly, you will need to locate the screw that holds the handle in place. This is usually located at the base of the handle and can be removed with a standard screwdriver. Once you have removed the screw, you will need to carefully pull the handle off the faucet. It is important to be gentle to avoid damaging the faucet.
Once the handle is removed, you will need to remove the bonnet nut. This is located at the base of the faucet and can be accessed by turning the handle counterclockwise. You may need to use a pair of pliers to loosen the bonnet nut. Once the nut is loosened, you can remove it and the handle will be free.
Now that you’ve removed the handle, you can take the faucet apart and inspect it for any damage or wear. If you find any, you will need to take the necessary steps to repair or replace the parts. With just a few simple steps, you can easily take a Moen kitchen faucet apart and keep it in top condition.
Steps to Remove the Faucet Spout
Removing the faucet spout is a crucial step in taking apart a Moen kitchen faucet. To do this, you’ll need a few tools, such as an Allen wrench, a flathead screwdriver, and a basin wrench. First, locate the set screw on the side of the faucet spout and use the Allen wrench to unscrew it. Then, use the flathead screwdriver to pry off the spout from its base. If the spout is stuck, use the basin wrench to loosen the connection. Once it’s loosened, you can then unscrew the spout and take it apart. Be sure to be careful and be sure to unplug your sink before attempting to take apart the faucet. This will ensure your safety and the safety of your kitchen sink. With a few tools and a bit of patience, you can take apart your Moen kitchen faucet in no time.
Steps to Remove the Valve
Removing the valve from a Moen kitchen faucet is not as difficult as it may seem. All you need is the right tools, a little patience, and some know-how. Here are the simple steps to take your Moen faucet apart and remove the valve:
1. First, turn off the water supply to the faucet. Then, unscrew the cap from the faucet handle and use a flathead screwdriver to remove the screw.
2. Next, use an adjustable wrench to remove the handle and the stem. The stem should come out easily.
3. Now, use a pair of pliers to remove the O-ring from the stem and the bonnet nut from the valve body.
4. Finally, use a pair of pliers to loosen the valve assembly and remove it from the faucet.
Following these steps should help you successfully take apart your Moen kitchen faucet and remove the valve. It is important to remember to always turn off the water supply before starting any repair and to take extra caution when using tools. With a bit of patience and the right know-how, you can easily take apart your Moen kitchen faucet and remove the valve.
Steps to Remove the Faucet Base
Removing a Moen kitchen faucet base is not a difficult task, but it does require certain steps to be taken to ensure that the job is done correctly and safely. From the basics of turning off the water and removing the handle to the more complex task of disconnecting the supply lines, here are the steps to remove the faucet base.
First, turn off the water supply by either shutting off the valves located beneath the sink or turning off the main water source. Next, remove the handle by loosening the handle screw using a Phillips head screwdriver. Carefully lift the handle off the base.
Now that the handle is removed, you can disconnect the water supply lines. If the faucet has flexible supply lines, simply unscrew the nuts that hold them in place, then slide the lines off the faucet. If the faucet has rigid supply lines, use a basin wrench to unscrew the nuts. Once the supply lines have been disconnected, unscrew the nuts that secure the faucet to the sink and lift the faucet out.
Finally, to completely remove the faucet base, you will need to unscrew the mounting nuts that secure the base to the sink. Use a basin wrench to unscrew the nuts and then slide the base out.
By following these steps, you can easily and safely remove a Moen kitchen faucet base. With the right tools and a bit of patience, this task can be completed with minimal effort.
Steps to Reassemble the Faucet
Reassembling a Moen kitchen faucet is relatively straightforward, but it’s important to take the right steps and use the correct tools. To get started, ensure that all the parts that you need for reassembly have been collected and are in good condition. Then, you’ll want to place the sealant on the inside of the faucet, ensuring it’s evenly distributed. Once the sealant is in place, you’ll be able to put the faucet together again. First, attach the hose and the aerator to the faucet. Then, secure the valve cartridge to the faucet body. Finally, attach the handle and attach the faucet to the sink.
To finish the reassembly process, it’s important to ensure the valve is functioning properly and that the handle is firmly in place. Then, use a wrench to tighten the mounting nuts that secure the faucet to the sink. Once the faucet is in place, turn on the water and check for leaks. If there are none, you’re done—your Moen kitchen faucet is now reassembled and ready to use.
Troubleshooting Common Problems
Troubleshooting common problems with your Moen kitchen faucet can be a daunting task. Knowing how to take it apart is an important step in diagnosing and repairing the issue. Fortunately, it is relatively straightforward to take a Moen kitchen faucet apart. To do so, you will need to have a few basic tools on hand, including a screwdriver, a wrench, and a basin wrench.
Start by turning off the water supply to the faucet. Next, use a screwdriver to remove the handle. This will expose the valve stem. To get to the valve stem, use the wrench to remove the bonnet nut. Once the bonnet nut is off, you can use the basin wrench to loosen the valve stem. At this point, you should be able to remove the valve stem and pull the faucet apart.
If you are having difficulty or are unable to take the faucet apart, you may need to contact a professional plumber to help. They will be able to diagnose and repair the issue quickly and efficiently.
Taking a Moen kitchen faucet apart is relatively easy and can help you diagnose and repair common problems with your faucet. With the right tools and a bit of patience, you can get the job done in no time.
Final Tips and Advice
Taking apart a Moen kitchen faucet can be intimidating, but it doesn’t have to be. By following the steps outlined above, you can safely and easily disassemble your Moen kitchen faucet. Before you begin, make sure to have the necessary tools and supplies on hand. Additionally, it is important to remember to turn off the water supply before you begin. When it comes to reassembling your faucet, make sure that you follow the same steps in reverse order. If you are having issues, consider seeking professional assistance.
When it comes to taking apart a Moen kitchen faucet, it is important to consider these final tips and advice. With the right tools and supplies, and by following the steps outlined above, you can easily and safely take apart your Moen kitchen faucet. If you need help, don’t hesitate to enlist the help of a professional plumber or technician. Taking apart a Moen kitchen faucet is not a difficult task, but it is important to take safety precautions and consider the advice of the experts.
Conclusion
Taking a Moen kitchen faucet apart is not as difficult as it may seem. With a few simple steps, the task can be completed quickly and easily. First, identify the type of faucet you have and then use the appropriate tools to loosen the mounting nuts and screws that hold the faucet in place. Next, remove the handle and the trim plate, and unscrew the valve stem from the body of the faucet. Finally, remove the valve body and the mounting nuts. With these steps, you will be able to take apart the Moen kitchen faucet and make any repairs or replacements as needed.

