Taking apart a kitchen faucet can seem like a daunting task, but with the right tools and instructions, it can be done with relative ease. This guide will provide a step-by-step walkthrough on how to successfully take apart a kitchen faucet. With patience and attention to detail, you can have your kitchen faucet taken apart and ready for repair or replacement in no time!
Tools and Supplies Needed
When it comes to taking apart a kitchen faucet, having the right tools and supplies can make the job much easier and more efficient. It is important to have the necessary items on hand to prevent any delays or potential damages. The tools and supplies you will need for taking apart a kitchen faucet include a screwdriver, adjustable wrench, pliers, bucket, Teflon tape, and replacement parts if necessary.
Before you begin, it is important to make sure all the supplies are in working order to reduce the risk of damage. Make sure the screwdriver fits properly in the screws, the adjustable wrench is adjustable, and the pliers are strong. Additionally, inspect the Teflon tape for any signs of damage or wear.
Once you have all the supplies ready, you can begin taking apart the kitchen faucet. Depending on the type of faucet, the process may be slightly different. However, the basic steps remain the same. Start by turning off the water supply to the faucet, then remove the faucet handle and any other components that are connected. Using a screwdriver, loosen and remove the other parts, such as the valve stem, washer, and seat. Finally, use the pliers and adjustable wrench to disconnect the faucet from the pipes and place everything in the bucket.
Having the right tools and supplies on hand for taking apart a kitchen faucet is essential for ensuring a successful and safe job. Make sure to inspect all the items before you start and have any necessary replacement parts ready. With the proper supplies, you can take apart a kitchen faucet with ease.
Credit: www.thespruce.com
Turning off the Water Supply
If you want to take apart a kitchen faucet, the first step is to turn off the water supply. It’s important to do this before you start working on the faucet, as you don’t want to be dealing with a flood of water while you’re trying to take it apart. To turn off the water supply, you can either turn off the main water supply line in your home, or you can shut off the individual valves near the faucet. Once the water supply is shut off, you can proceed with taking apart the kitchen faucet. Be sure to use the correct tools and safety precautions when taking apart any plumbing fixture, and never force any parts. Using the wrong tools and forcing parts can cause serious damage to the faucet or other parts of the plumbing system.
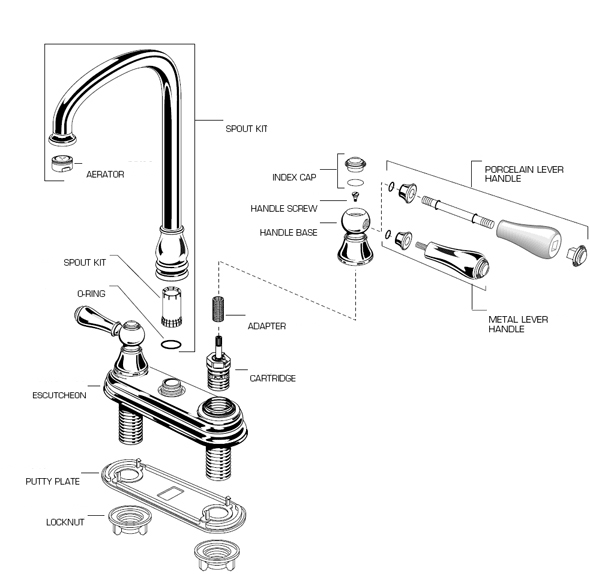
Removing the Handle
Removing the handle is a vital step in taking apart a kitchen faucet. To do this, you’ll need a few simple tools including a Phillips head screwdriver and a flathead screwdriver. Start by locating the screws that hold the handle in place. Once you have identified them, use the appropriate screwdriver to loosen them. As you loosen the screws, the handle should be easily removed from the faucet. You may need to use some force while removing the handle. Once the handle is off, you can now access the inner components of the kitchen faucet.
Removing and Replacing the Spout
Removing and replacing the spout on a kitchen faucet is not as daunting a task as it may seem. Whether you’re replacing a worn-out spout or upgrading to a new style, the process is fairly straightforward. With the right tools and supplies, you can remove and replace a kitchen faucet spout in no time.
To begin, you’ll need to turn off the water supply and loosen the mounting nut that holds the spout in place. Once the nut is removed, the spout should easily pull off from the faucet. With the old spout removed, you can then install the new spout by slipping the gasket over the end of the faucet and securing it with the mounting nut. Make sure to tighten the nut sufficiently to ensure a watertight seal.
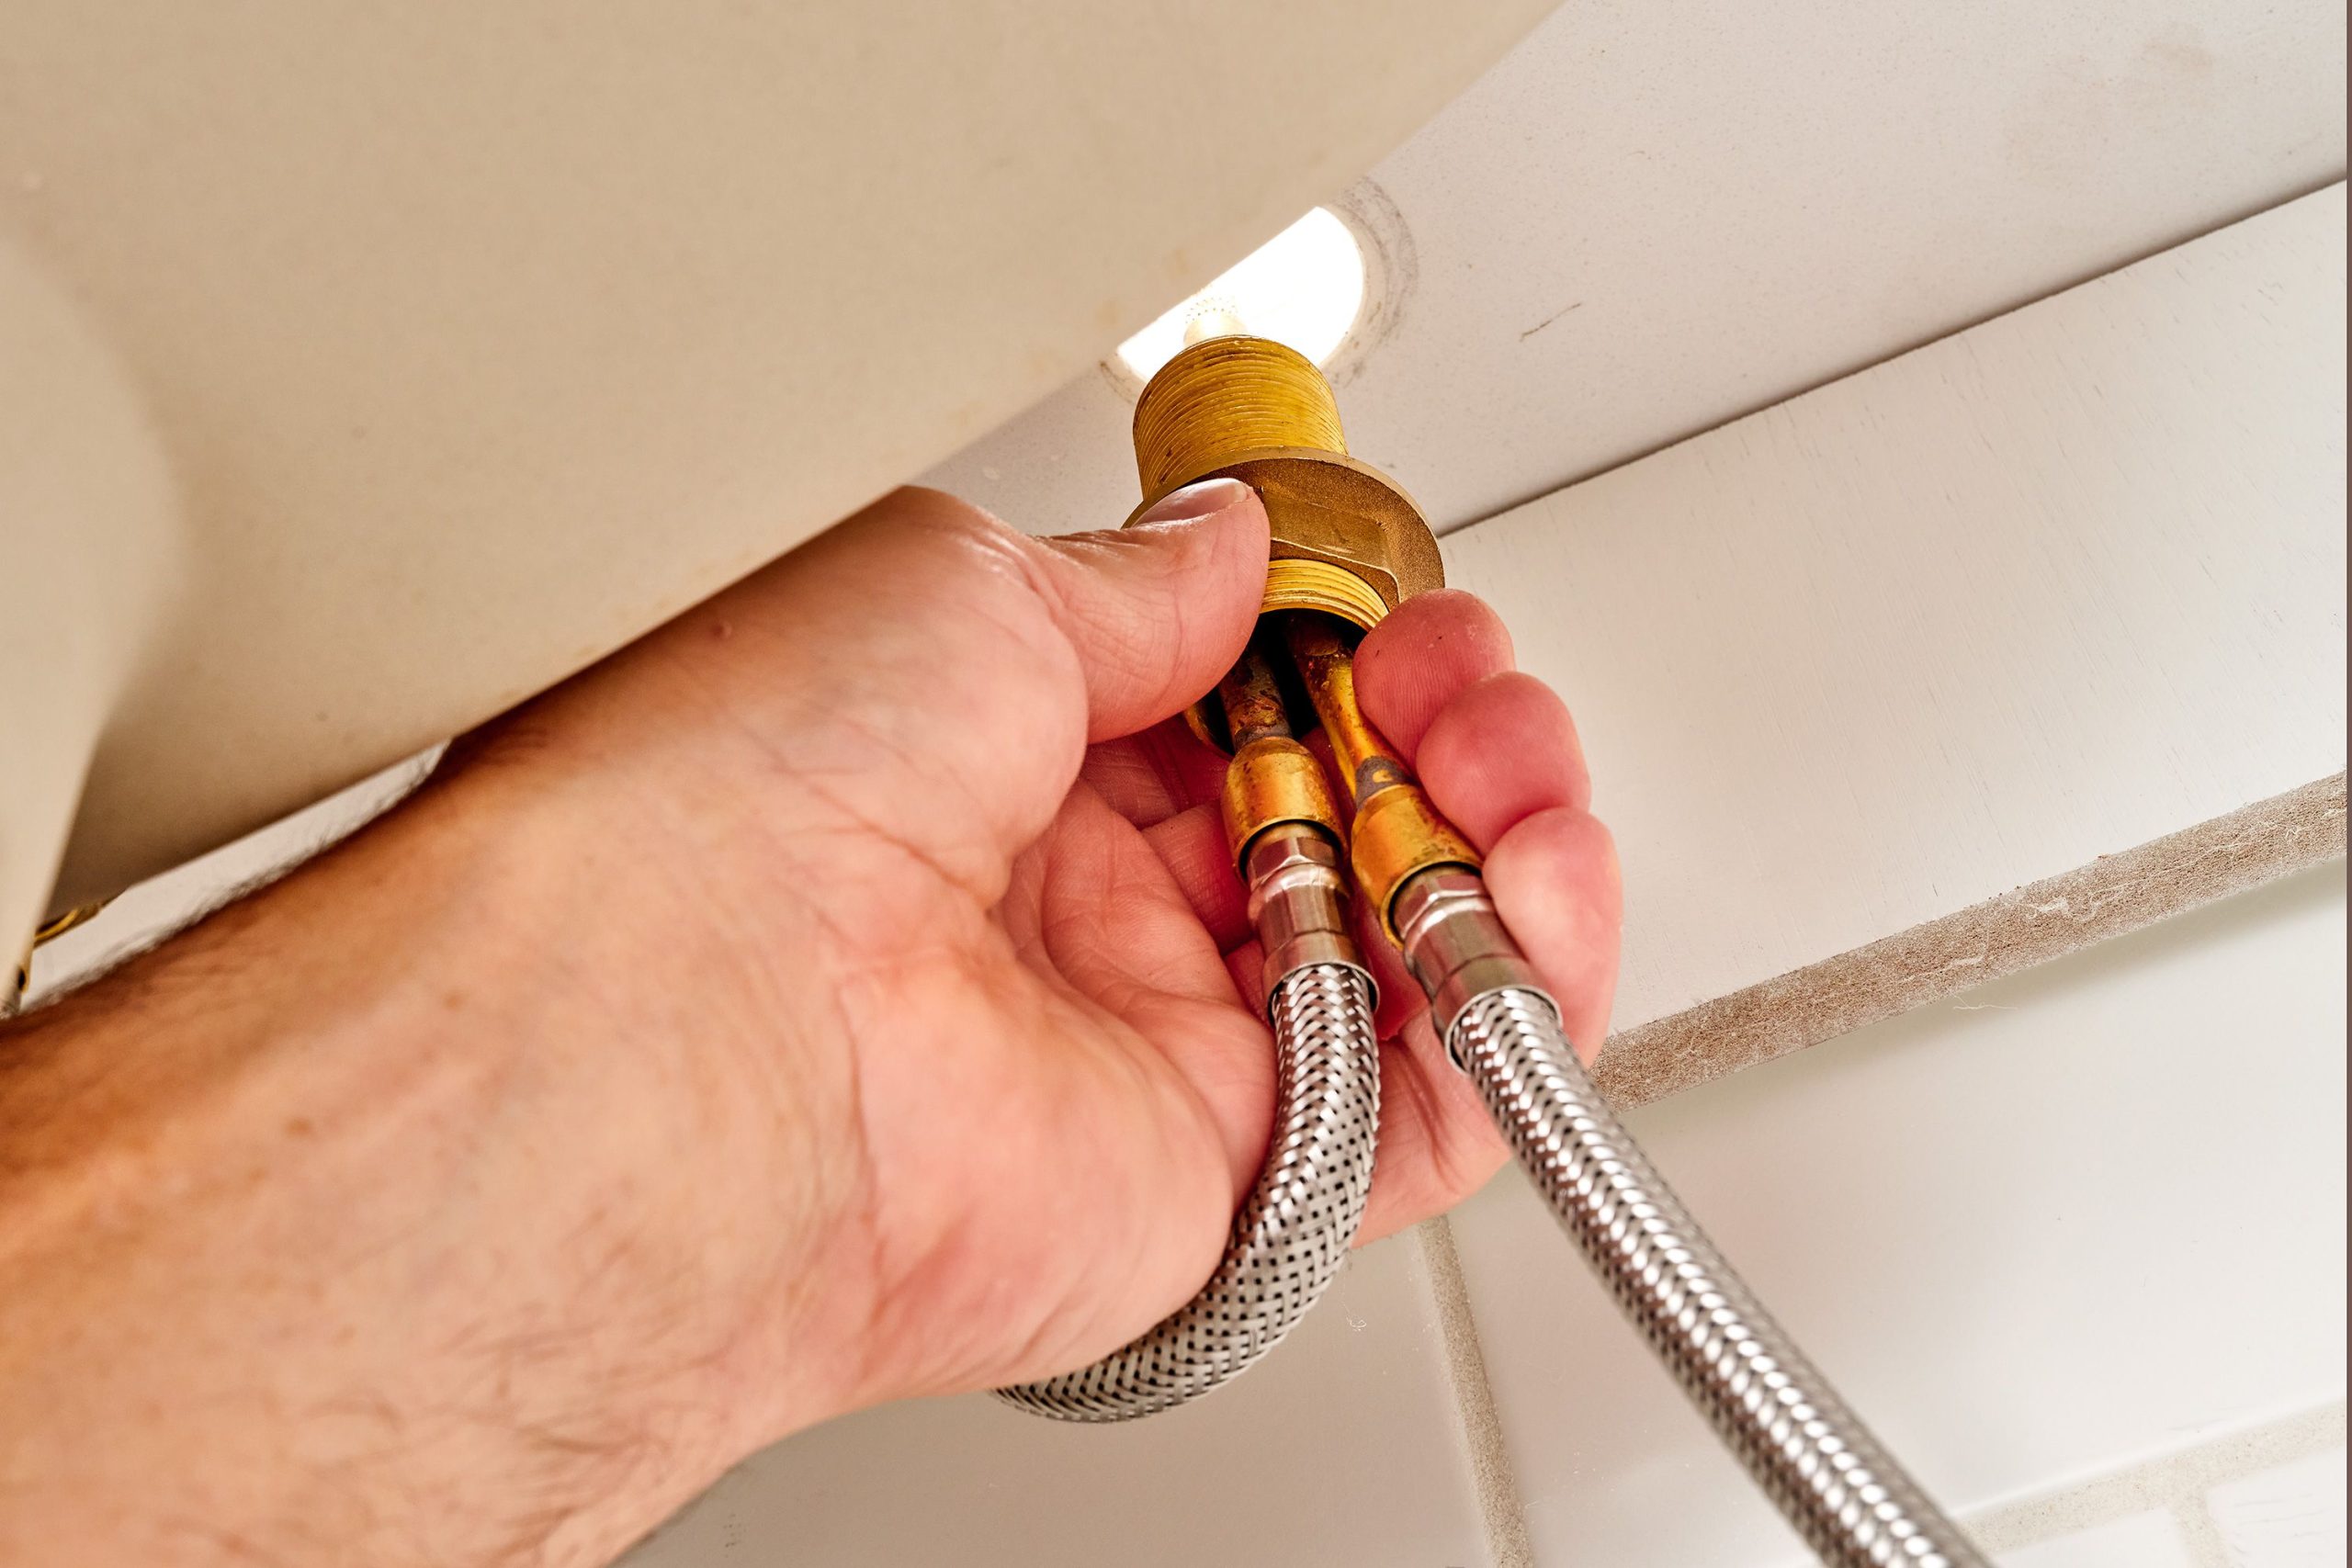
Finally, you’ll need to attach the water supply lines. The hot and cold water lines are usually marked with the corresponding symbols. Once the lines are reconnected, turn the water supply back on and check for any leaks.
Removing and replacing the spout of a kitchen faucet is a simple do-it-yourself project that can be done in a matter of minutes. With the right tools and supplies, you can quickly upgrade the style of your kitchen faucet, while also ensuring a watertight seal. Just make sure to turn off the water supply and double-check the connections for any leaks before you turn the water back on.
Reassembling the Faucet
Reassembling the faucet requires some patience and precision, but with the right tools and a few simple steps, it can be done. Before you begin, make sure to have the correct replacement parts on hand. Once you have the parts, follow these steps to reassemble your kitchen faucet:
- Carefully insert the new gaskets into the faucet body. Make sure the gaskets are intact and securely fitted.
- Place the faucet handles and the spout onto the faucet body. Secure the handles with the handle screws and then tighten the screws with a screwdriver.
- Attach the mounting nuts and washers to the faucet body. Secure them with a wrench.
- Connect the hot and cold supply tubes to the faucet body. Make sure to check the supply tube and the faucet body for any leaks.
- Turn on the water supply to check for any leaks. If there are no leaks, your kitchen faucet is ready to use.
Reassembling a kitchen faucet is a fairly simple task that requires minimal tools and know-how. However, it’s important to always take the necessary precautions and use the right tools when reassembling your faucet to ensure that it is properly installed and functioning correctly.
Cleaning the Faucet
Cleaning the faucet of your kitchen is an important part of its maintenance. Aesthetically, it will look better if it is cleaned regularly, as well as improving its performance. Taking apart your kitchen faucet is the best way to make sure it is properly cleaned and ready for use. To do this, you will need to have the right tools and be prepared for a bit of elbow grease.
First, begin by gathering the right tools. You will need a wrench, a screwdriver, and a few towels to protect the sink. Now you can start the process of taking apart the faucet. Unscrew the handle of the faucet using the appropriate tool and place it aside. Then, unscrew the faucet itself, taking care not to damage the sink. You may need to use a wrench to loosen the nuts. Once the faucet is removed, examine it for any mineral buildup and clean it with a soft cloth.
After cleaning the faucet, it is time to reassemble it. Place the faucet back in the sink and tighten the nuts with the wrench. Now you can replace the handle and screw it into place. Make sure the handle is secured and the faucet is fully tightened. Finally, turn on the water and check for any leaks. If all is well, you can now enjoy a fully functioning kitchen faucet.
Testing the Faucet
Testing your faucet is the final step in the process of taking it apart. Before you start, make sure that you have all of the necessary tools and materials to complete the job. To test your faucet, turn on the water and check for any leaks. If there is a leak, you will need to tighten the connections or replace them. Once everything is in place, make sure the water flow is consistent and that the faucet is functioning properly. If the faucet is not functioning correctly, you may need to replace it. After testing your kitchen faucet, you can now enjoy the convenience of having a properly functioning faucet.
FAQs About the How To Take Apart Kitchen Faucet
Q1: What tools do I need to take apart a kitchen faucet?
A1: You will need a wrench, a Phillips-head screwdriver, and a flat-head screwdriver to take apart a kitchen faucet.
Q2: Is it difficult to take apart a kitchen faucet?
A2: Taking apart a kitchen faucet is usually not difficult. However, some models may require more complicated disassembly processes.
Q3: What should I do if the faucet is stuck?
A3: If the faucet is stuck, you can try using a lubricant, such as WD-40, to loosen the parts. If that does not work, you may need to use a pair of pliers or a pair of channel-locking pliers to loosen the parts.
Conclusion
Taking apart a kitchen faucet is not as difficult as one might think. All it takes is a few simple steps and the right tools. First, turn off the water supply to the faucet, then remove the handle, nut, and gasket. Unscrew the valve stem and lift out the cartridge. Clean the faucet and its components, and replace any worn parts. Reassemble in the reverse order and test out the faucet. With these steps, anyone can take apart a kitchen faucet in no time.

