Uninstalling a kitchen faucet can be a daunting task for the DIYer, but with the right tools and a bit of knowledge, it doesn’t have to be. This guide will walk you through the process of safely removing and uninstalling a kitchen faucet, from turning off the water supply to reinstalling a new faucet. With a few simple steps, you can upgrade your kitchen with a new look and fresh plumbing.
Gather the Necessary Tools
When it comes to uninstalling a kitchen faucet, having the right tools can make all the difference. You will need a Phillips head screwdriver, a basin wrench, an adjustable wrench, and a pair of pliers. You may also find a utility knife and a flathead screwdriver useful, depending on your particular faucet model. Before beginning, make sure you have these tools on hand and ready to use. It is also recommended that you have a bucket and a few rags nearby to catch any dripping water. By having the right tools and materials, the entire process of uninstalling a kitchen faucet will be smoother and quicker.
Turn off the Water Supply
Uninstalling a kitchen faucet can seem like a daunting task, but it doesn’t have to be! Before beginning the process, you must first turn off the water supply. The water supply valve is typically located underneath the sink and must be shut off before you can begin the process. Shut off the valve by turning it clockwise until it is tight; this will cut off the water flow. Once you have completed this step, you can move on to the next step in the process.
Disconnect the Water Lines
Uninstalling a kitchen faucet can seem like a daunting task, but with the right tools and the correct steps, it can be done in no time. Before you start, it is important to ensure that the water is shut off and that the sink is empty, as you will be disconnecting the water lines from the faucet.
Start by unscrewing the nuts that connect the water lines to the faucet. Often, these can be stubborn and require a wrench to loosen them. Once the nuts are removed, pull the water lines away from the faucet and store them in a safe place. If you plan to keep the water lines, be sure to label them for easy reattachment later. If you are replacing the water lines, you can discard them.
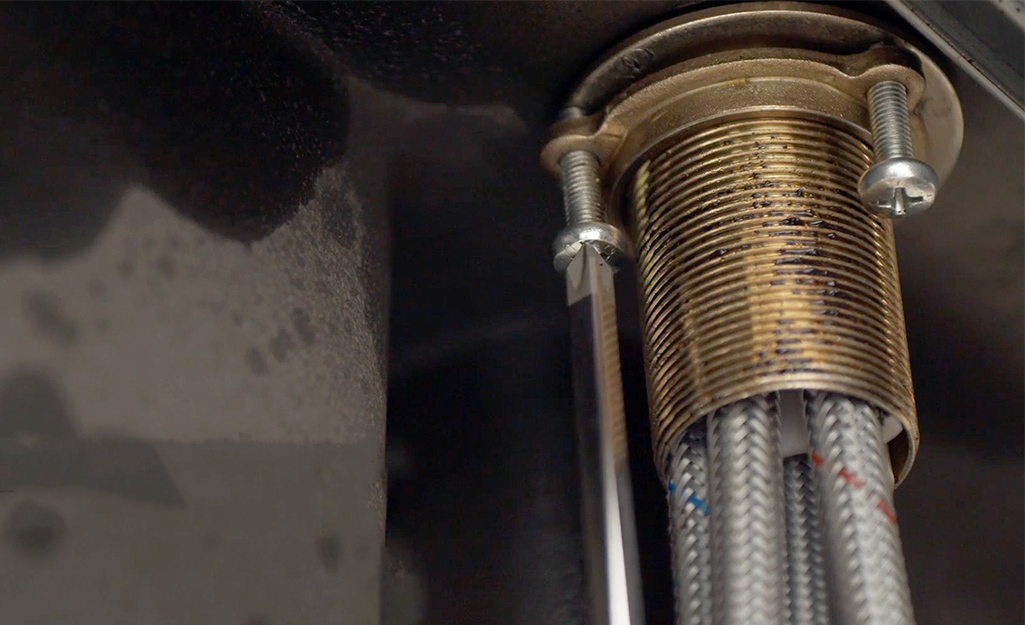
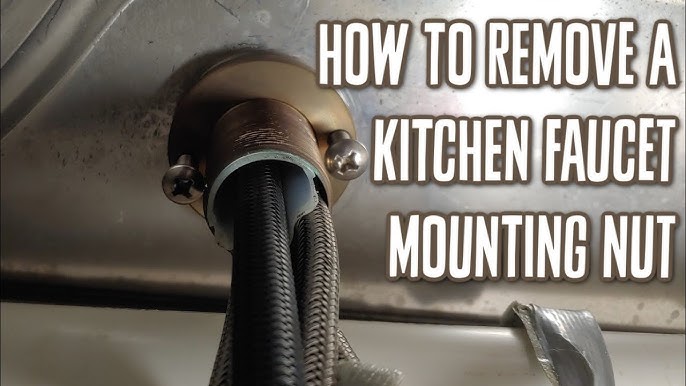
Next, you will need to disconnect the mounting nuts from the faucet itself. While you may be able to do this by hand, it is often helpful to use a wrench or pliers to loosen them. Once the mounting nuts are loosened, you can then remove the faucet from the sink.
Unscrew and Remove the Faucet
Removing a kitchen faucet can seem like a daunting task, but with the right tools and a few simple steps, you can uninstall it quickly and easily! The first step is to unscrew and remove the faucet. Start by turning off the water supply to the faucet. Then, use a wrench to loosen and remove the mounting nuts from the faucet. Once the nuts are removed, you can unscrew the faucet from the countertop or sink. If there are any seals or washers, gently remove them with a flathead screwdriver and discard them. Be sure to keep any parts you may need to reinstall the new faucet. Once you have the faucet removed, you can move on to the next step of uninstalling your kitchen faucet!
Install the New Faucet
Installing a new kitchen faucet can be a great way to freshen up your kitchen, and provide a functional and stylish upgrade. But, before you can get to the fun part of installing the new faucet, you need to know how to properly uninstall the old one. Uninstalling a kitchen faucet is often an intimidating task, but with the right tools and a little patience, you can do it yourself! This article will guide you through the steps of how to uninstall a kitchen faucet, so you can get your new one installed quickly and efficiently.
First, you will need to shut off the water supply to the kitchen faucet. Once the water is shut off, you will then need to remove any decorative pieces or handles that are attached to the faucet. After this, you will need to use a basin wrench to loosen the nuts securing the faucet to the sink. Once the nuts are loosened, you can then gently pull the faucet from the sink. After the old faucet is removed, you can then proceed with the installation of the new faucet.
To ensure a successful installation, make sure that you have all of the necessary tools on hand before beginning the process. Additionally, it’s a good idea to have a few rags or towels handy to keep the area around the sink clean. With the right tools and a little patience, you can easily uninstall and install a new kitchen faucet.
Connect the Water Lines
Installing a kitchen faucet is a fairly straightforward process. But when it comes to uninstalling, things can get a bit tricky, especially when it comes to connecting the water lines. This article will provide a step-by-step guide on how to properly uninstall a kitchen faucet and properly connect the water lines.
First, turn off the main water supply and drain the lines. This step is crucial to prevent water from leaking all over your kitchen. Once the water is shut off, you can then begin to disconnect the water lines. Depending on the type of faucet, the lines may be connected with compression fittings, which require a special wrench to loosen the nut. If the lines are connected with threaded fittings, you can use an adjustable wrench to loosen the nut.
Once the water lines are disconnected, you can then remove the faucet from the sink. Depending on the type of faucet, you may need to use a wrench to loosen the mounting nuts. Once the faucet is removed, you can then clean the sink surface and replace the sink gasket.
Finally, you can then begin the process of connecting the new faucet. Depending on the type of faucet, you may need to use a compression fitting or threaded fitting. Again, the type of fitting will depend on the type of faucet. Once the new faucet is connected, you can then turn on the main water supply and test the faucet for leaks.
Turn on the Water Supply
If you’re planning to replace your kitchen faucet, the first step is to turn off the water supply to the faucet. This will help to ensure that you don’t end up with a huge mess while you’re trying to uninstall the faucet. To do this, first, locate the main shut-off valve for the water supply to your kitchen. Next, turn off the valve by turning it clockwise until it is completely closed. Once the water is turned off, you can move on to the next step in the process.
FAQs About the How To Uninstall A Kitchen Faucet
Q1: What tools do I need to uninstall a kitchen faucet?
A1: To uninstall a kitchen faucet you will need a basin wrench, an adjustable wrench, and a flathead screwdriver.
Q2: How do I turn off the water supply before uninstalling the faucet?
A2: To turn off the water supply before uninstalling the faucet, locate the shut-off valves under the sink and turn them clockwise until they are completely closed.
Q3: How do I remove the old faucet once I have shut off the water supply?
A3: To remove the old faucet, first disconnect the water supply lines from the shut-off valves and the faucet with a basin wrench. Then, use an adjustable wrench to loosen the mounting nuts and remove the faucet from the sink. Finally, use a flathead screwdriver to unscrew the mounting plate from the sink.
Conclusion
Uninstalling a kitchen faucet is not a difficult task, but it is important to take the necessary precautions to avoid any damage. By following the steps outlined in this guide, you should be able to safely and effectively remove your old faucet and replace it with a new one. It is important to remember to turn off the water supply before beginning the process and to take extra care when handling the pipes and fittings. With the right tools and a bit of patience, you can have a new faucet installed in no time.

